Table of Contents
- 1.User Registration
- 2.What You Can Do with the Account Management App
- 3.Sign in to the account management app
- 4.About the Common Menu (Header) in the Account Management App
- 5.Announcements
- 6.1.View personal information
- 6.2.Edit personal information
- 7.Identity verification information
- 8.App usage history
- 9.Data sharing settings
- 10.1.Owned NFTs
- 10.2.NFT history
- 11.1.Signed-in devices
- 11.2.Two-factor authentication settings
- 11.2.1.Send verification code by SMS to phone number
- 11.2.2.Send verification code by email
- 11.2.3.Do not send verification code
- 11.3.Phone number verification
- 12.1.Email address settings
- 12.2.Change password
- 12.3.Account closure request
- 12.3.1.Account closure request cancel
- 12.4.Menu position
- 13.1.User guide
- 13.2.Terms of use
- 14.Sign out
- 15.Forgot your password?
1.User Registration
Register a user for Jasmy Personal Data Locker.
①Go to the user registration URL.
https://register.datalocker.jasmy.co.jp/?lang=en
②Please select your preferred language from the “日本語 | English” menu at the top of the screen. The display will switch to the selected language.
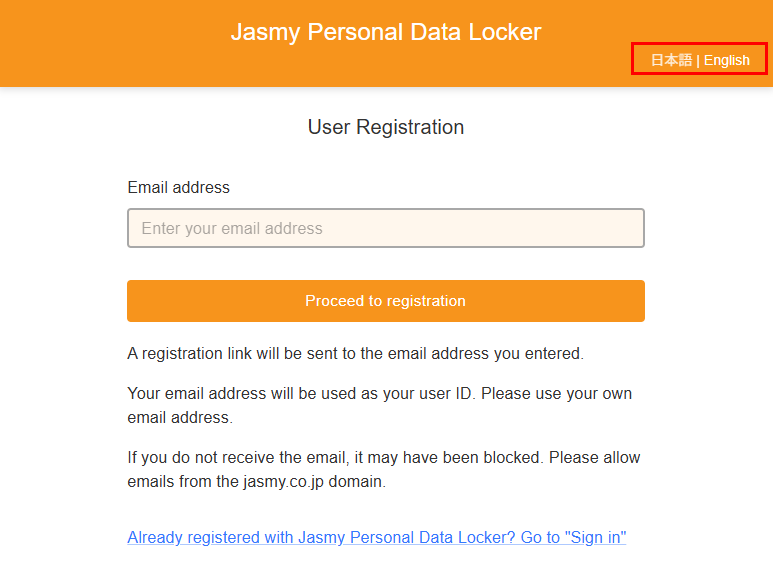
③Enter your “Email address” and click the “Proceed to registration” button.
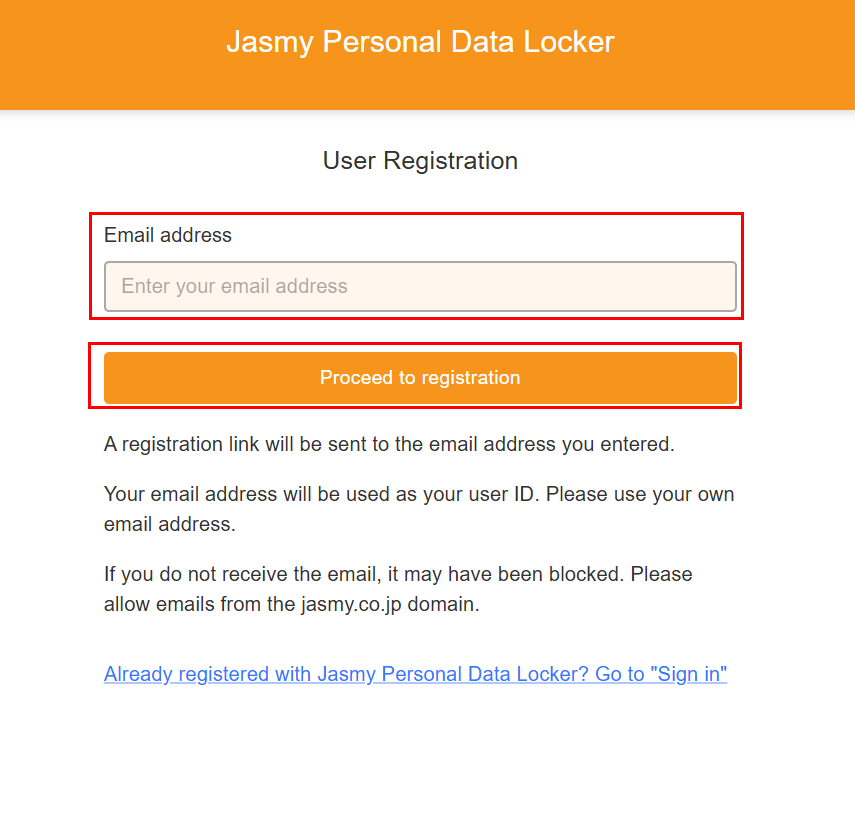
A notification email confirming your provisional registration will be sent to the email address you provided.
If you haven’t received the email after a few hours,
Please check to see if emails from the jasmy.co.jp domain are being blocked,
Please check your spam folder. If you still can’t find it,
There may be an issue with your email address, so we apologize for the inconvenience, but
Please go through the user registration process again.
④Go to the URL provided in the temporary registration notice email.
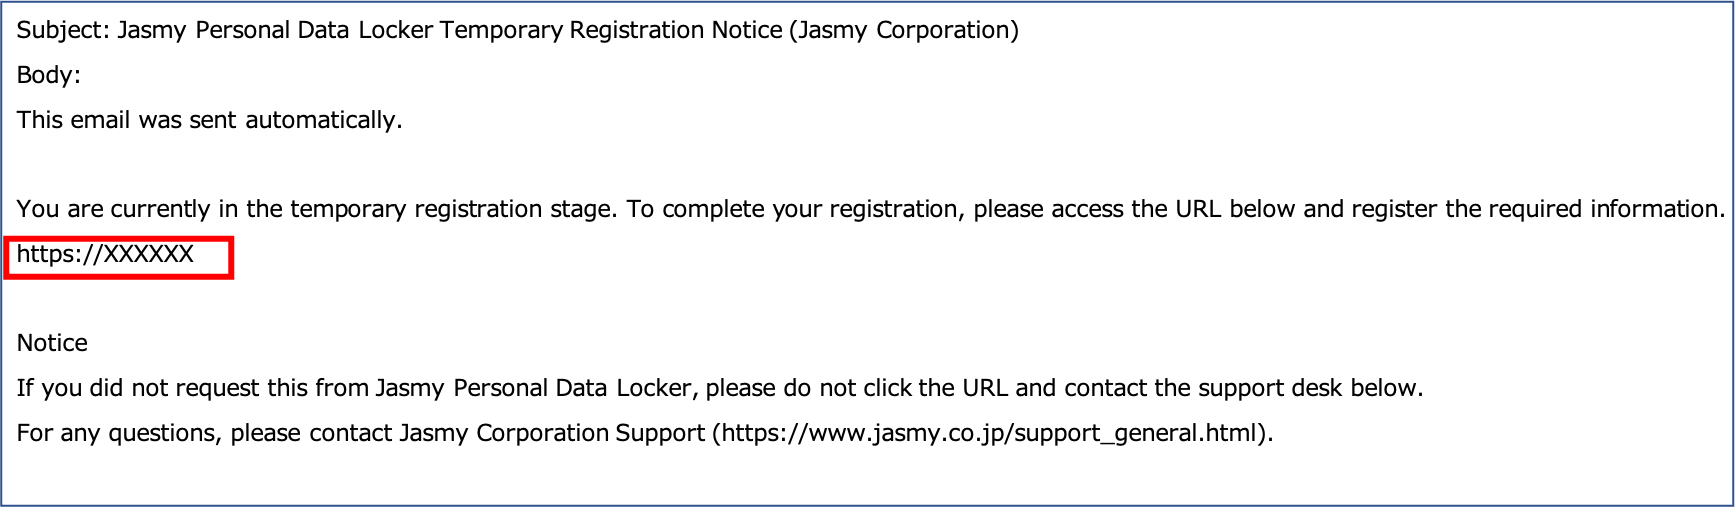
The “User Registration” screen will appear.
⑤Click the “View the agreement” button.

The Jasmy Personal Data Locker Service End User Agreement will be displayed.
⑥Scroll to the bottom and click the “I agree” button.
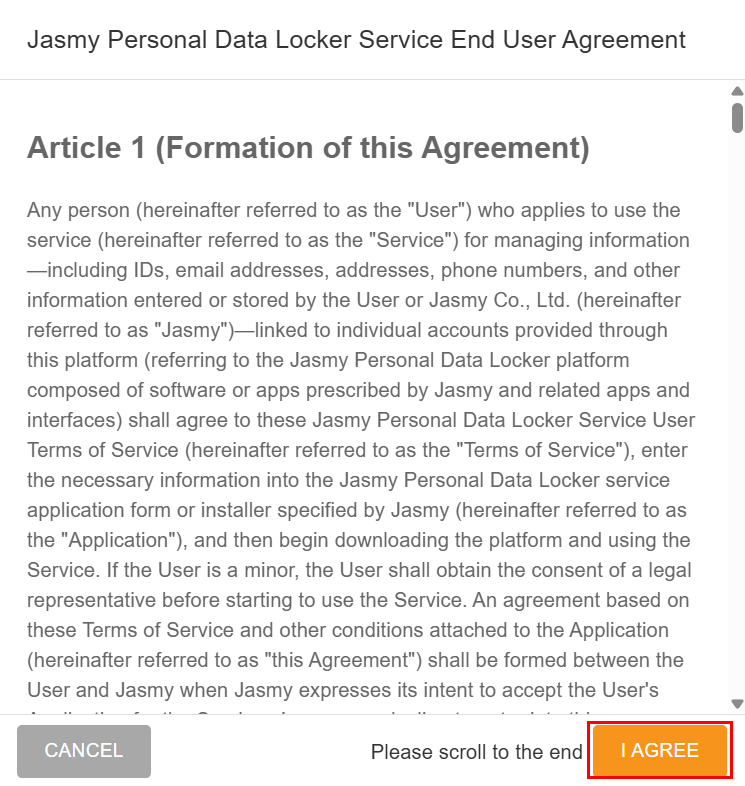
The user registration screen will appear.
⑦Enter the following information and click the “Confirm your entries” button.
You must enter your Password, Password (confirmation), and your Full name.
- Password
- Enter your password to log in.
 You can view the password you entered by clicking the button.
- Password (confirmation)
- Please re-enter the same password to confirm.You can view the password you entered by clicking the button.
- Full name
- Enter the user’s name.
- Date of birth
- Select the user’s date of birth from the drop-down menu.
For minors, a checkbox for parental consent will appear at the bottom.
- Gender
- Select the user’s gender from the drop-down menu.
- Phone number
- Enter the phone number without hyphens.
- Address
- Enter your postal code and click the “Search by postal code” button, and the “Prefecture,” “City,Town & District” fields will be filled in automatically.
Enter the “Building, floor, room, etc.” manually.
*If the message “Postal code was not found.” appears, please check that the postal code you entered is correct,
Please manually enter the “Prefecture,” “City,Town & District” information.
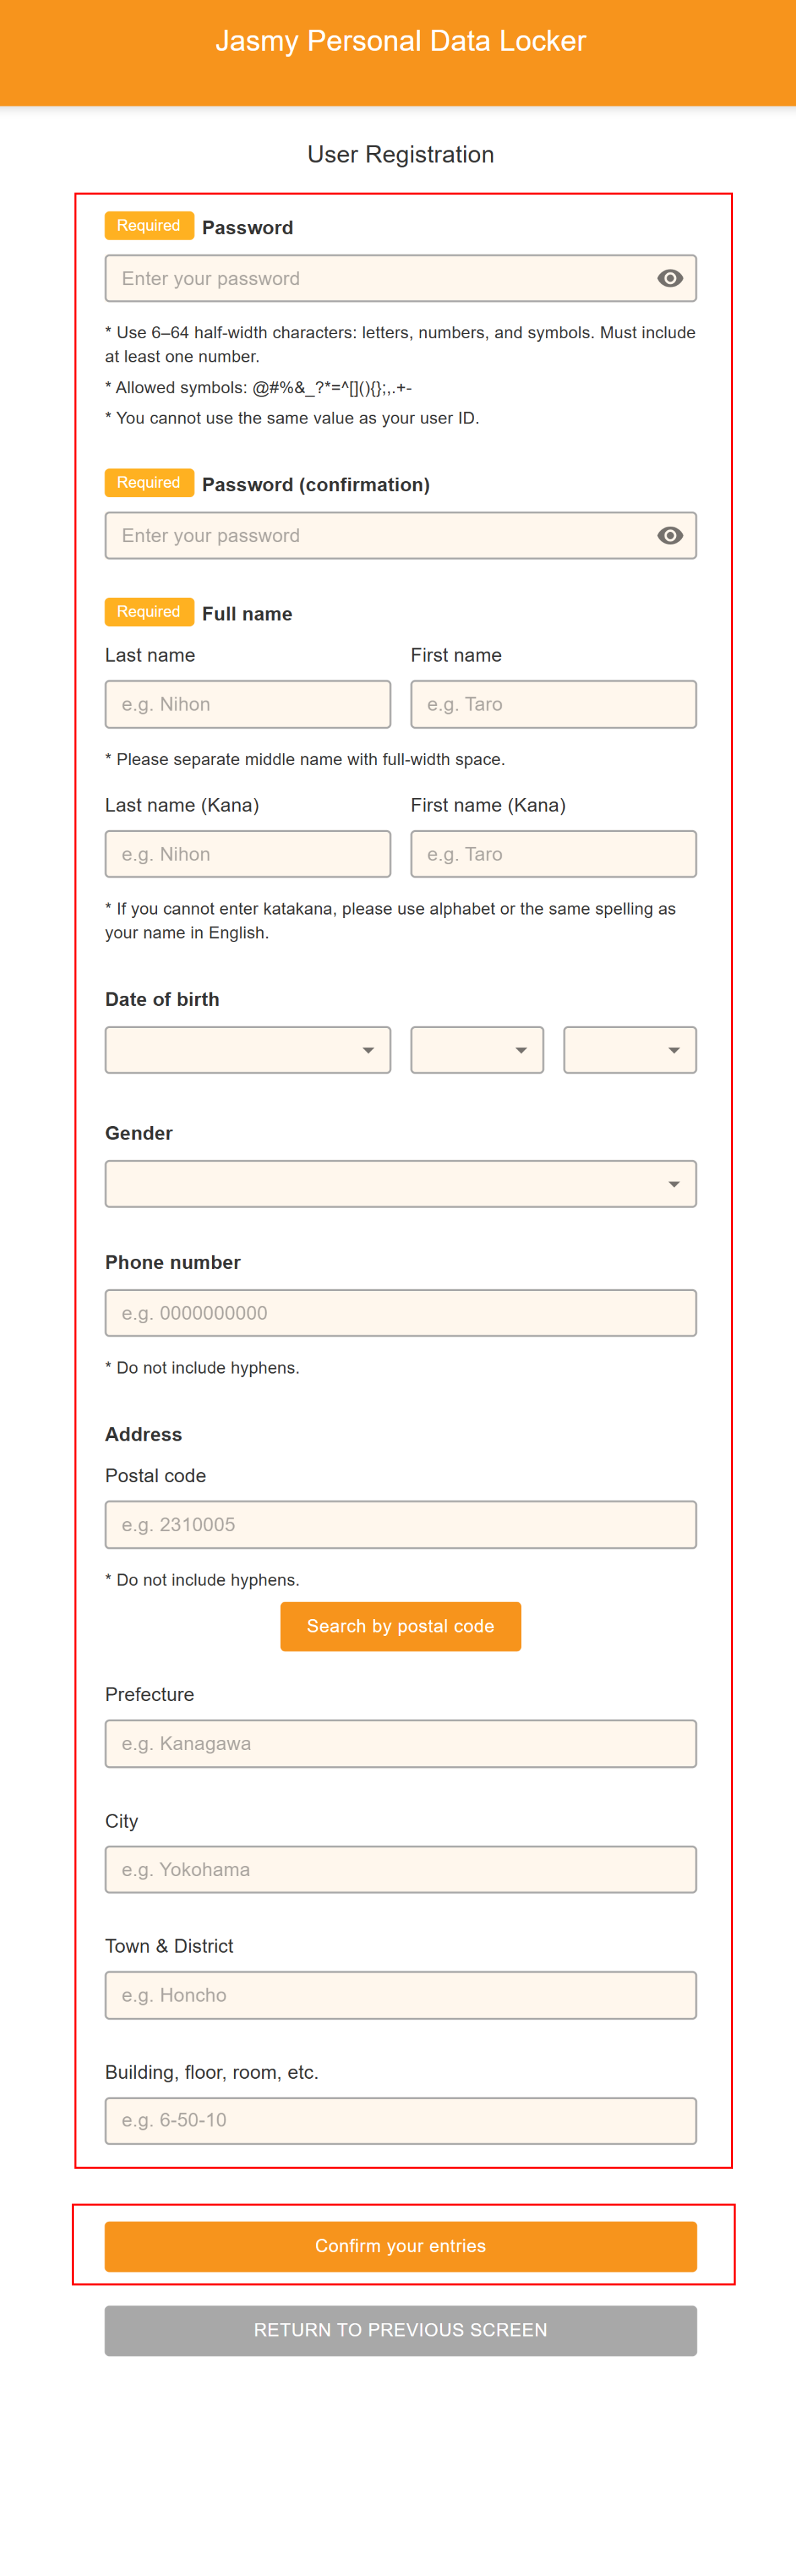
The “User Registration Confirmation” screen will appear.
⑧Verify that your entries have been saved, then click the “Register” button.
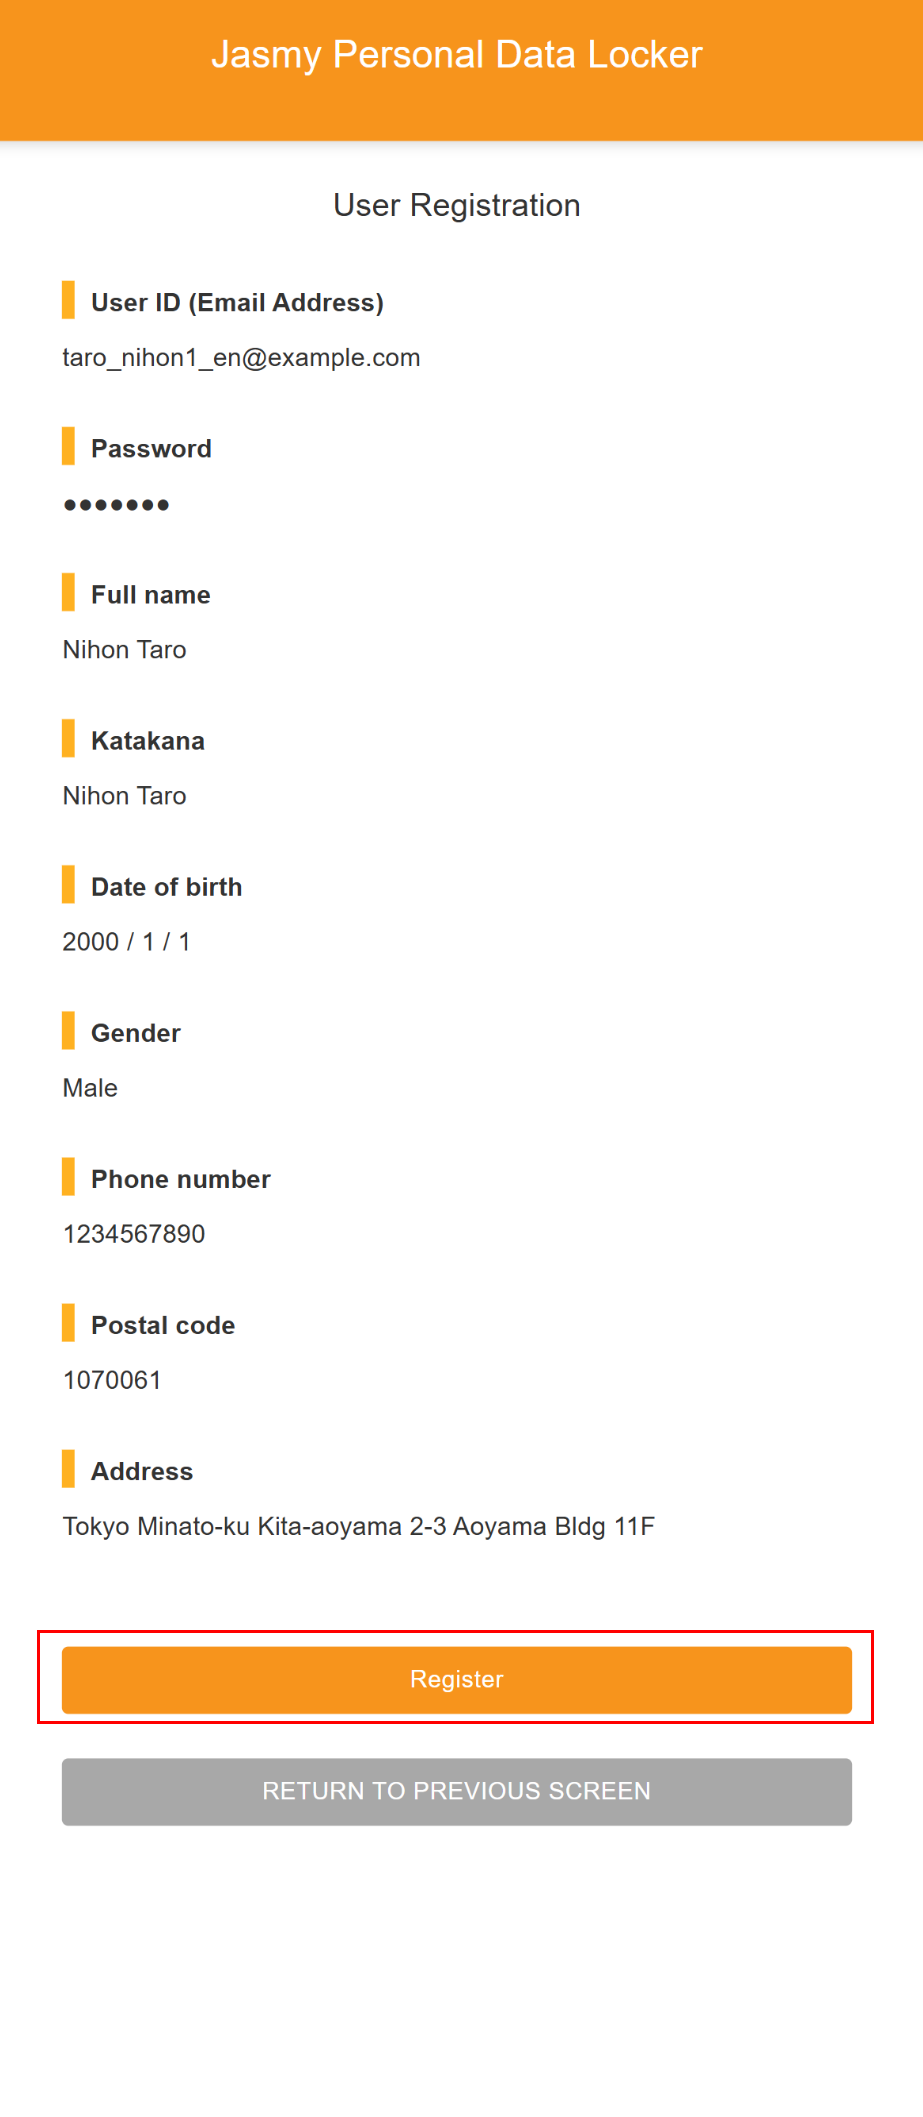
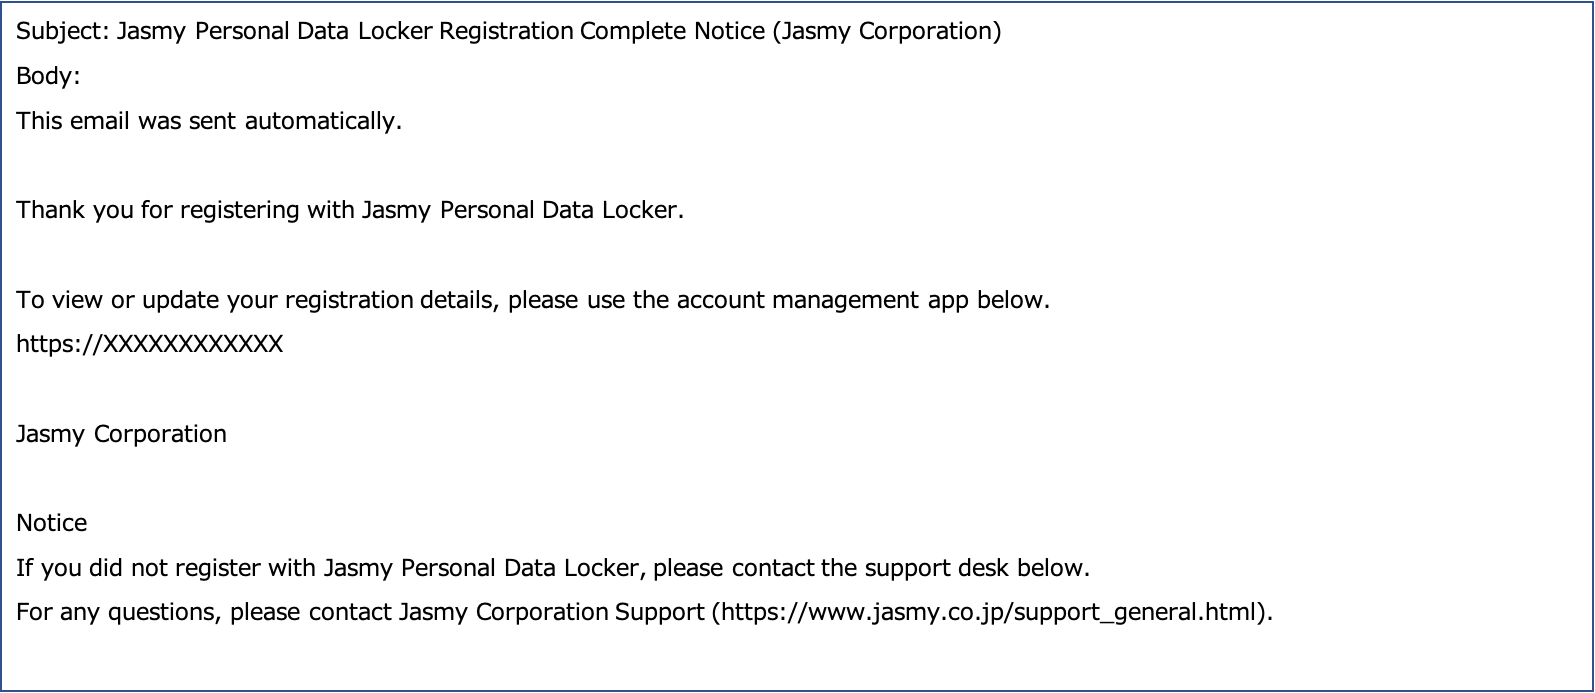
The “User Registration Complete” screen will appear.
*Please note that the link button may or may not appear, depending on your system settings.
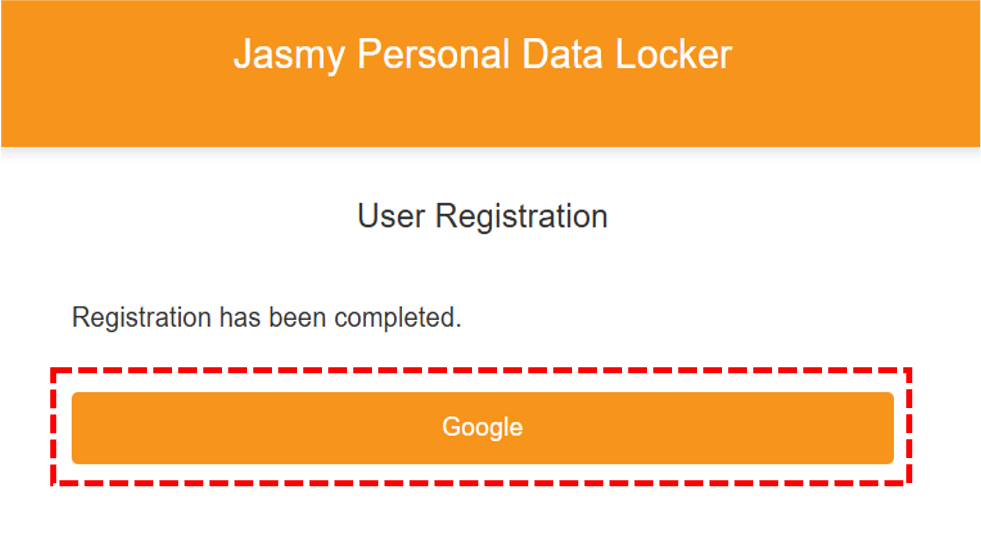
The email address you entered during provisional registration will serve as your user ID, and a registration confirmation email will be sent to that address.
2.What You Can Do with the Account Management App
Here’s what you can do with the Jasmy Personal Data Locker account management app.
- 5.Announcements
- A notification regarding Jasmy Personal Data Locker will appear.
- 6.1.View personal information
- You can view your registered personal information.
- 6.2.Edit personal information
- You can edit your registered personal information.
- 7.Identity verification information
- You can view and delete your personal identity verification information.
- 8.App usage history
- You can view the data that the app is accessing.
- 9.Data sharing settings
- You can configure whether or not to provide personal data.
- 10.1.Owned NFTs
- You can view a list of the NFTs you own.
- 10.2.NFT history
- You can view the history of the NFTs you have owned to date.
- 11.1.Signed-in devices
- You can check which devices are currently signed-in and sign out.
- 11.2.Two-factor authentication settings
- You can configure the settings to allow login using a verification code in addition to your email address and password.
- 11.2.1.Send verification code by SMS to phone number
- You can set up the system to send a verification code via SMS to your phone number.
- 11.2.2.Send verification code by email
- You can configure the settings to send verification codes via email.
- 11.2.3.Do not send verification code
- You can configure the settings to disable the sending of verification codes.
- 11.3.Phone number verification
- You can verify the validity of your registered phone number.
- 12.1.Email address settings
- You can view or change your currently registered email address.
- 12.2.Change password
- Enter your current password and set a new one.
- 12.3.Account closure request
- You can unsubscribe from Jasmy Personal Data Locker through the account management app.
- 12.3.1.Account closure request cancel
- You can cancel your cancellation within 30 days of completing the cancellation process.
- 12.4.Menu position
- You can change the menu location in the account management app.
- 13.1.User guide
- You will be redirected to this user guide from the account management app.
- 13.2.Terms of use
- You will be redirected to the Jasmy Personal Data Locker Service End User Terms of Use.
- 14.Sign out
- Sign out of the account management app.
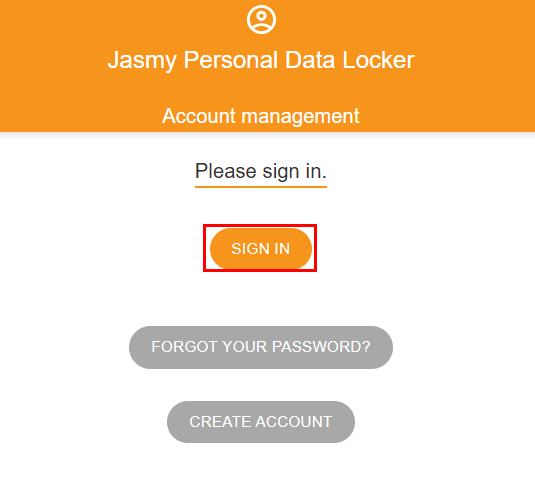
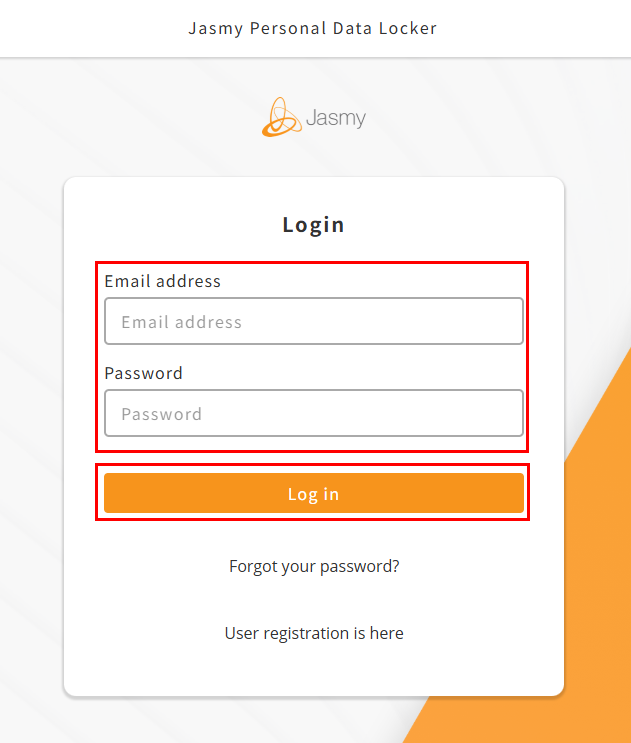
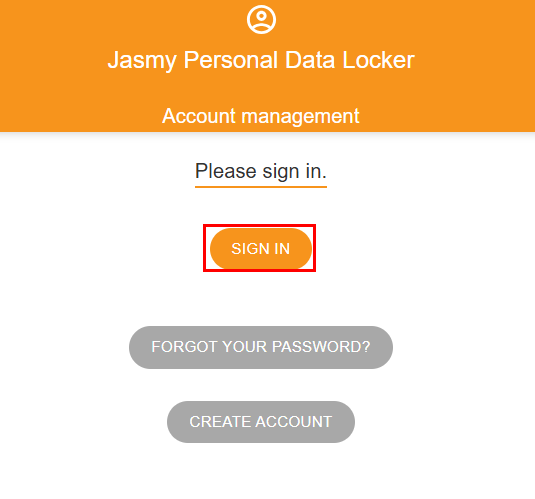
3.Sign in to the account management app
Sign in to the Jasmy Personal Data Locker account management app
①Go to the sign in URL.
https://user.datalocker.jasmy.co.jp/?lang=en
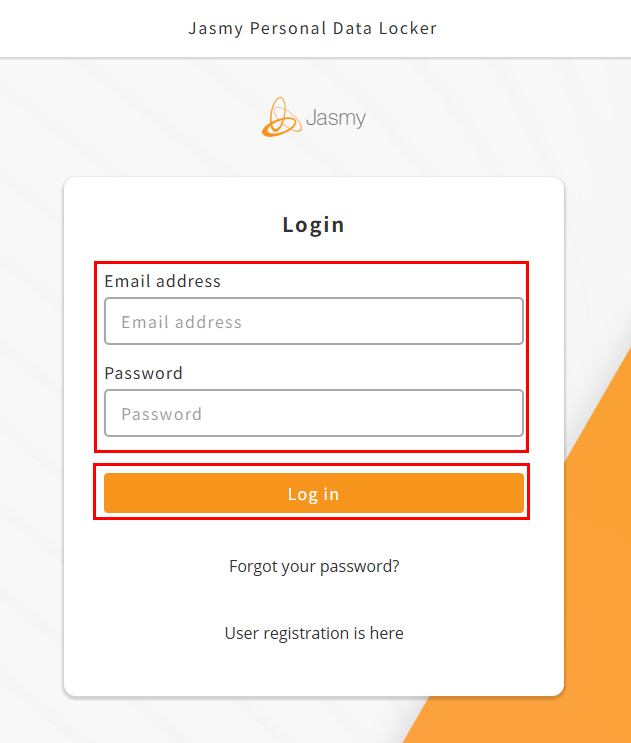
②On the “Please sign in.” screen, click the “SIGN IN” button.
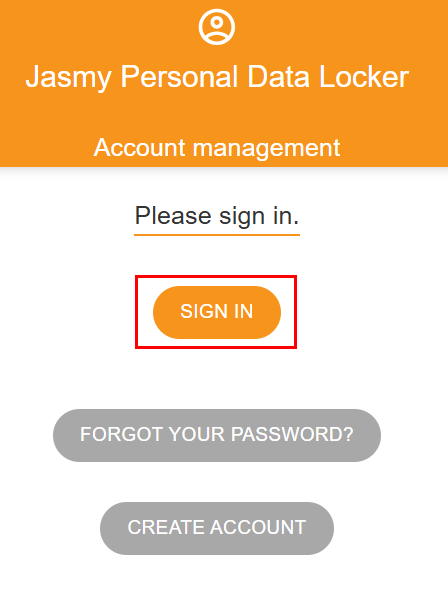
The “Login” screen will appear.
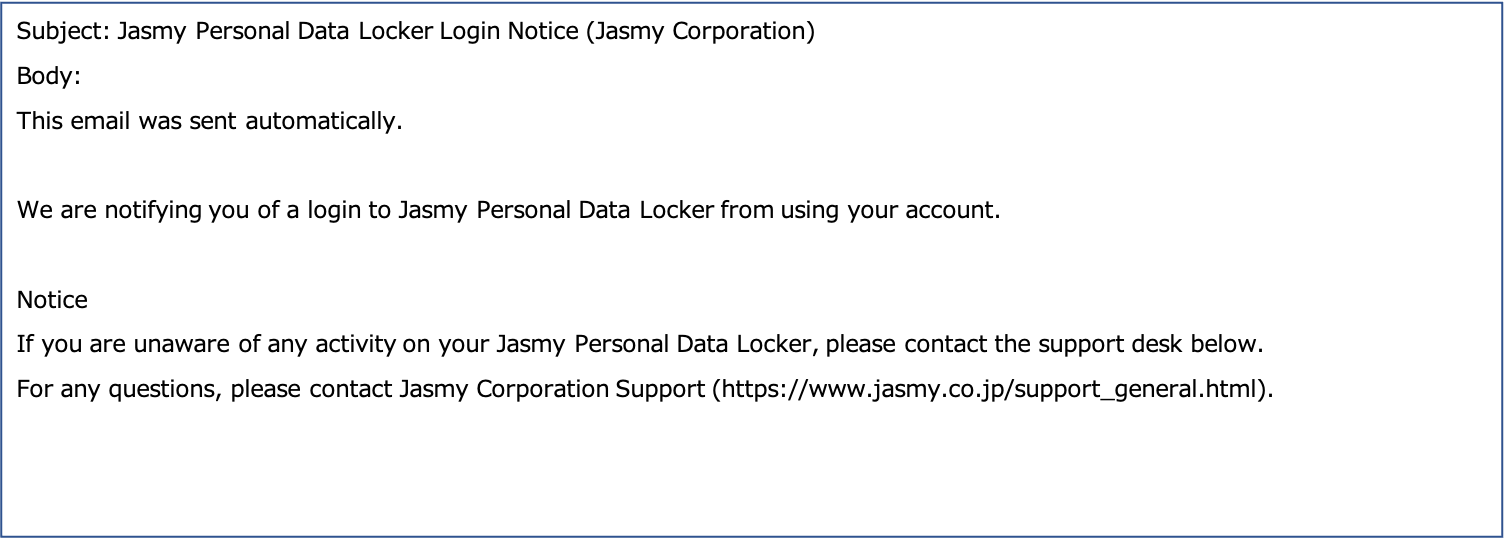
③Enter your “Email address” and “Password,” then click the “Log in” button.

The “Home” screen will appear.
A login notification email will be sent to the email address you used to log in.
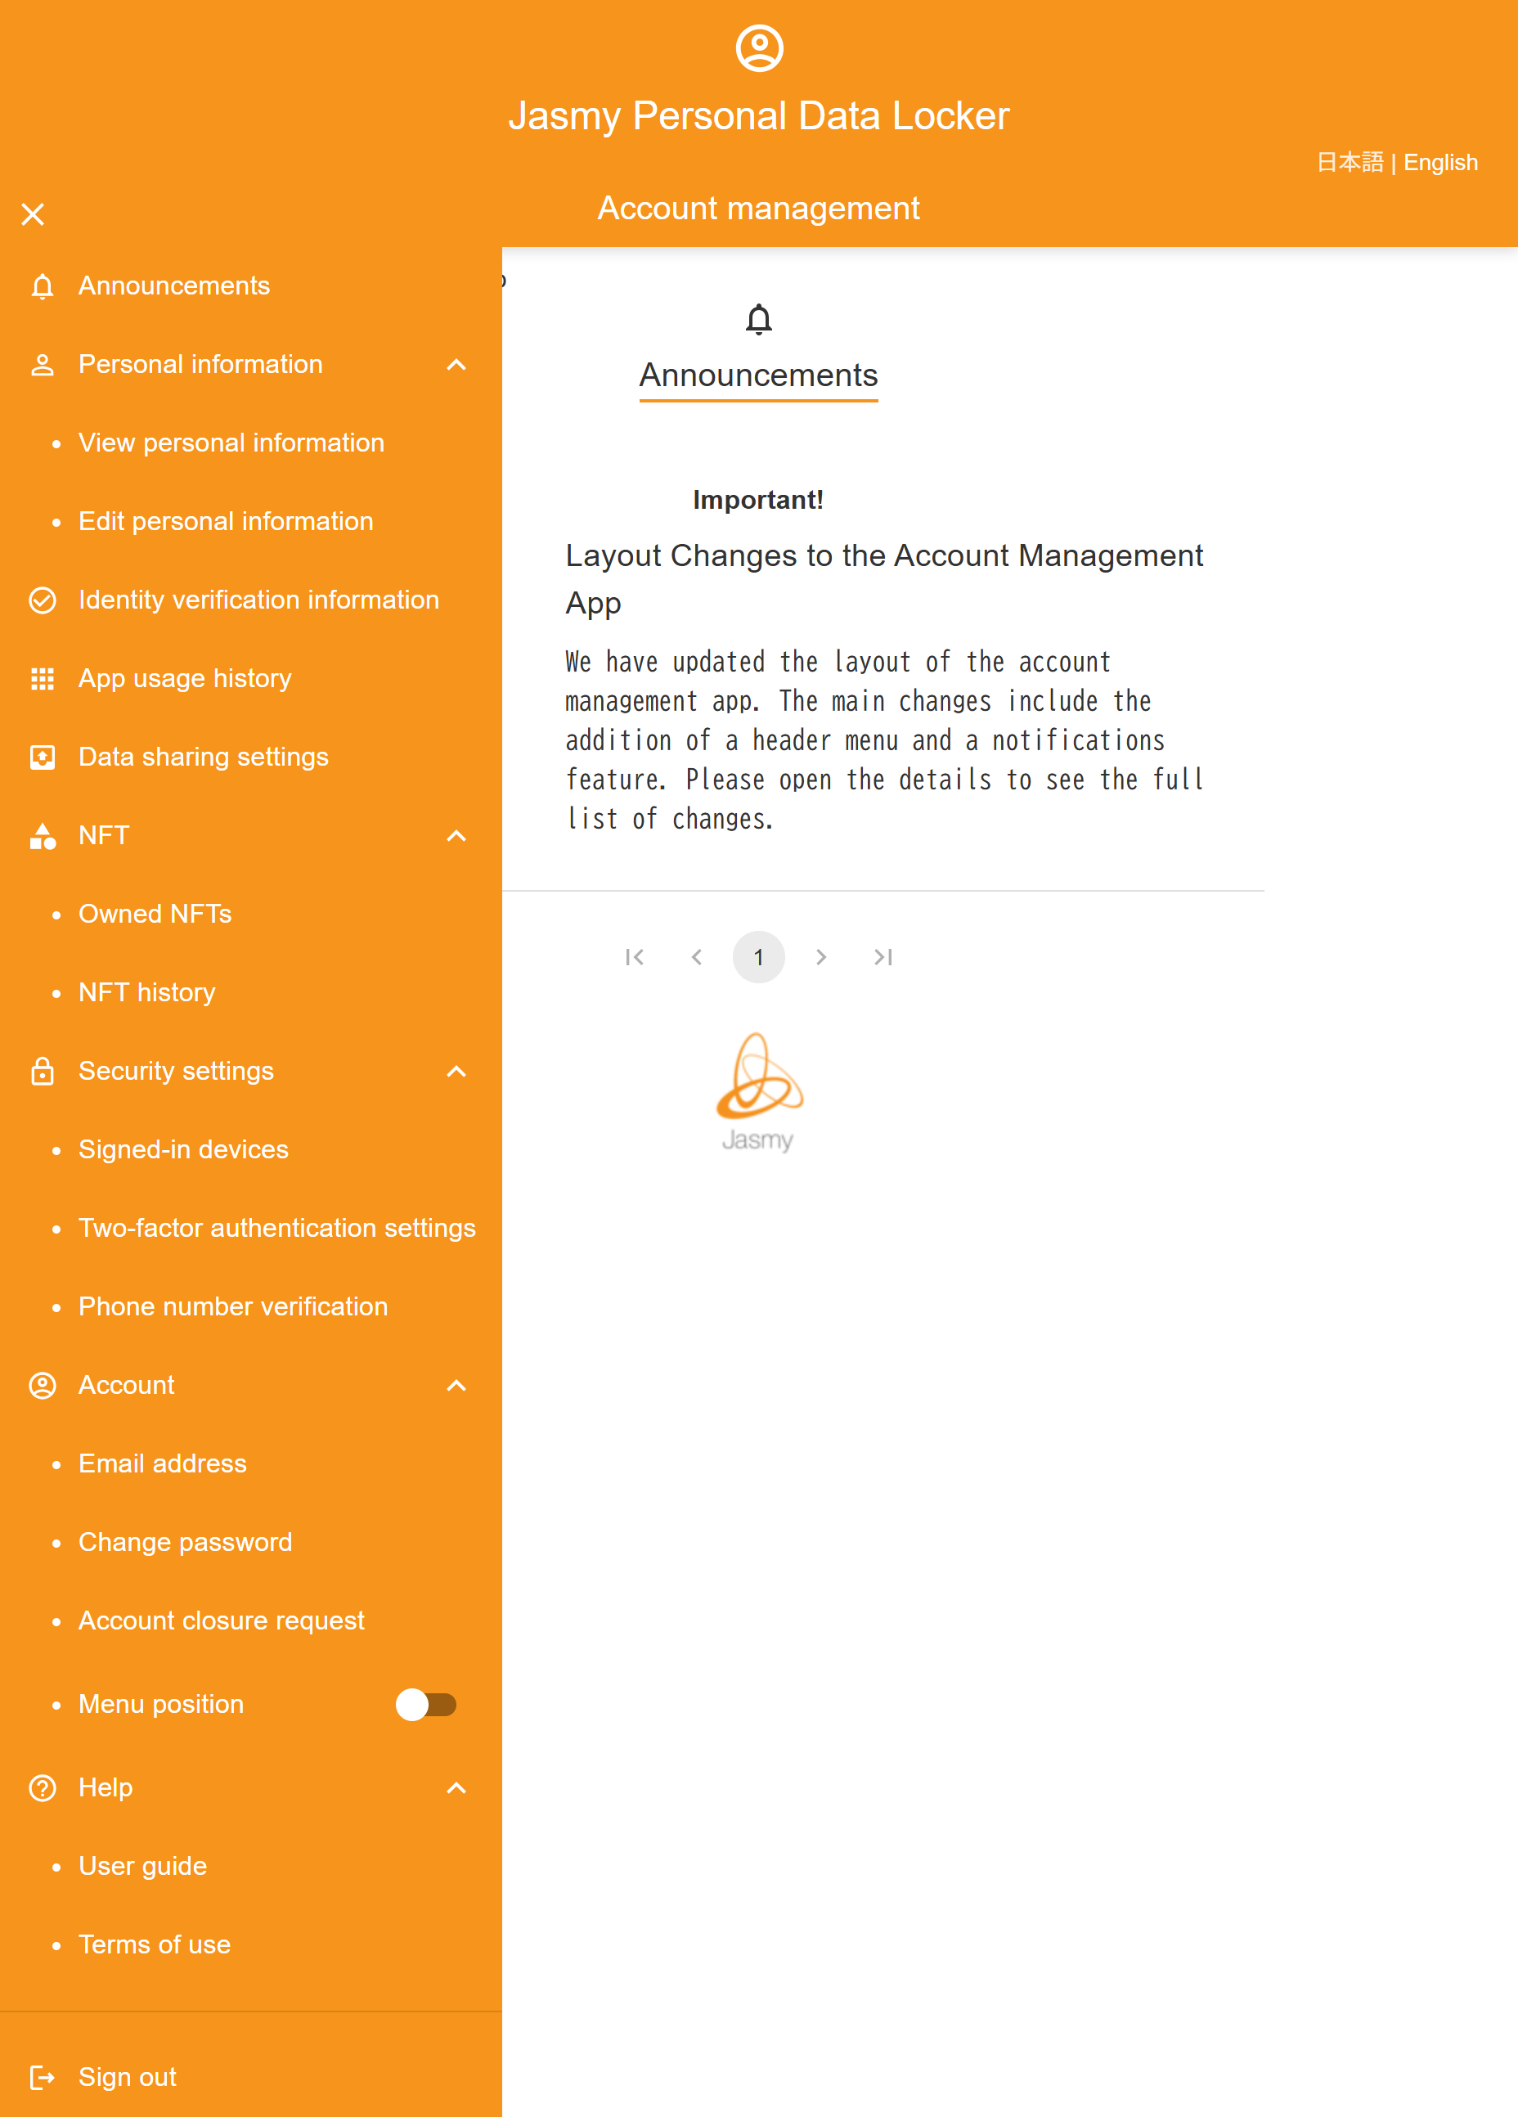
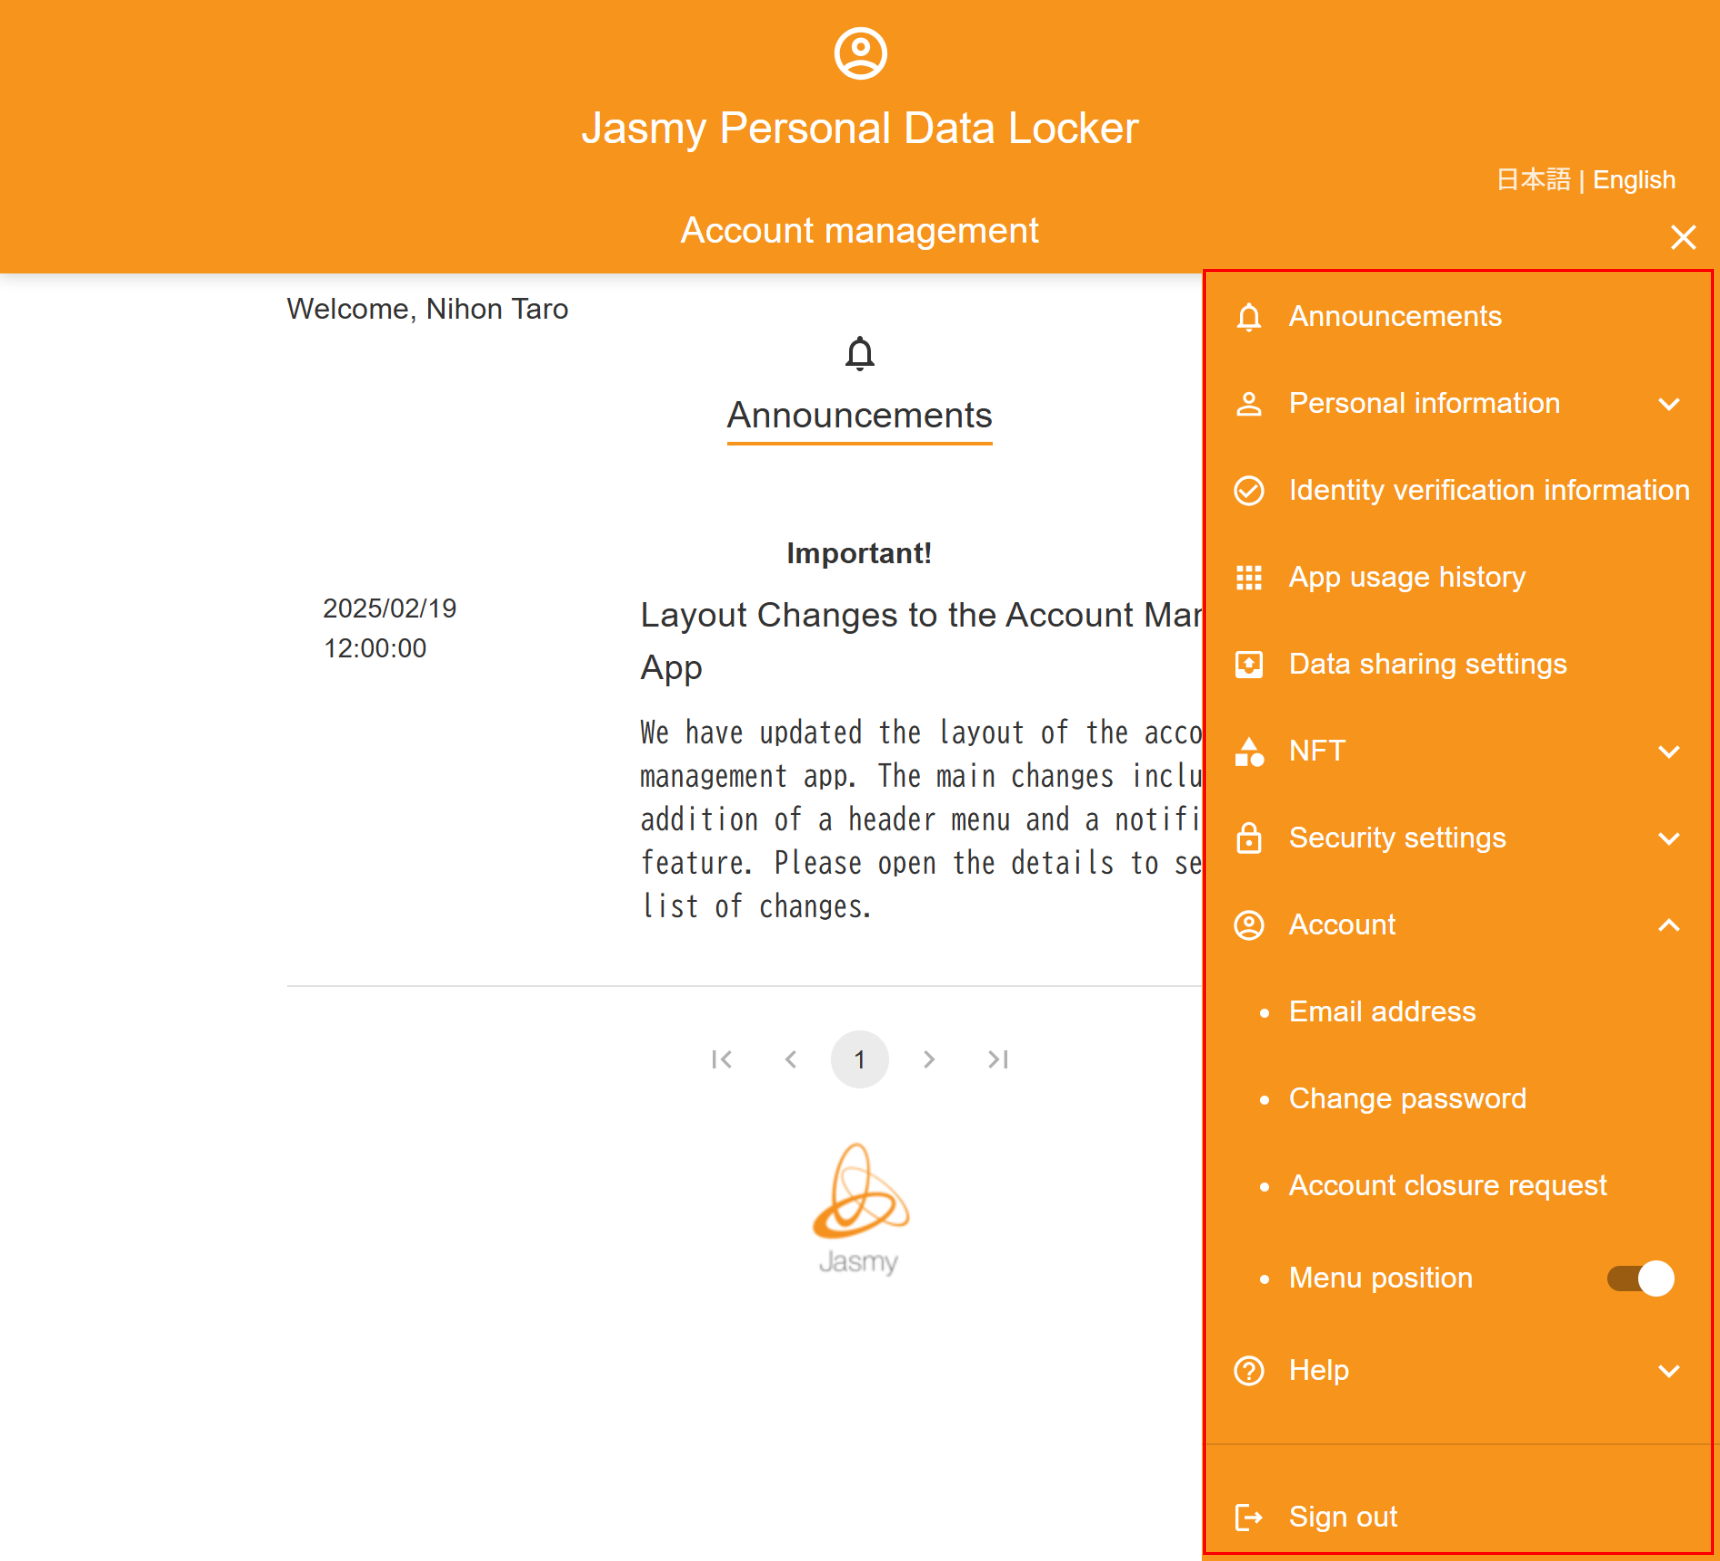
4.About the Common Menu (Header) in the Account Management App
This is an explanation of the common menu (header) in the Jasmy Personal Data Locker account management app.
①On each screen of the account management app, tapping the three-line menu bar will display various menu screens.
②Tapping the “Personal information”, “NFT”, “Security settings”, “Account” or “Help” buttons will display the corresponding submenus.
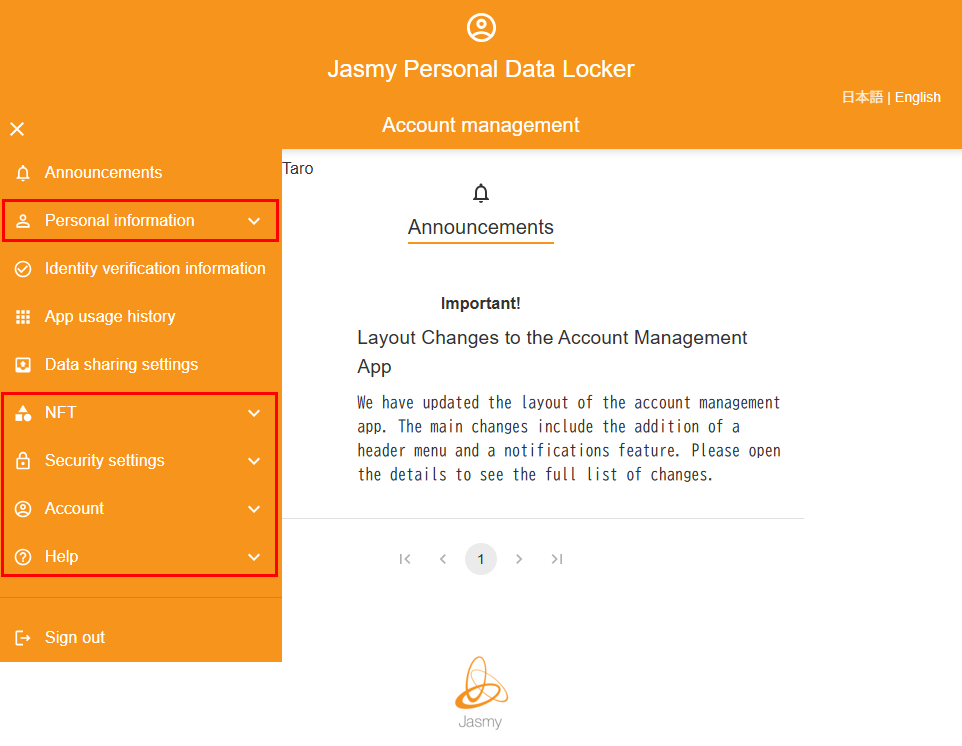
Clicking each menu item will take you to the corresponding page.
For descriptions of each menu option, please refer to “2.What You Can Do with the Account Management App”
①On each screen of the account management app, select your preferred language from the “日本語 | English” menu at the top of the screen. The display will switch to the selected language.
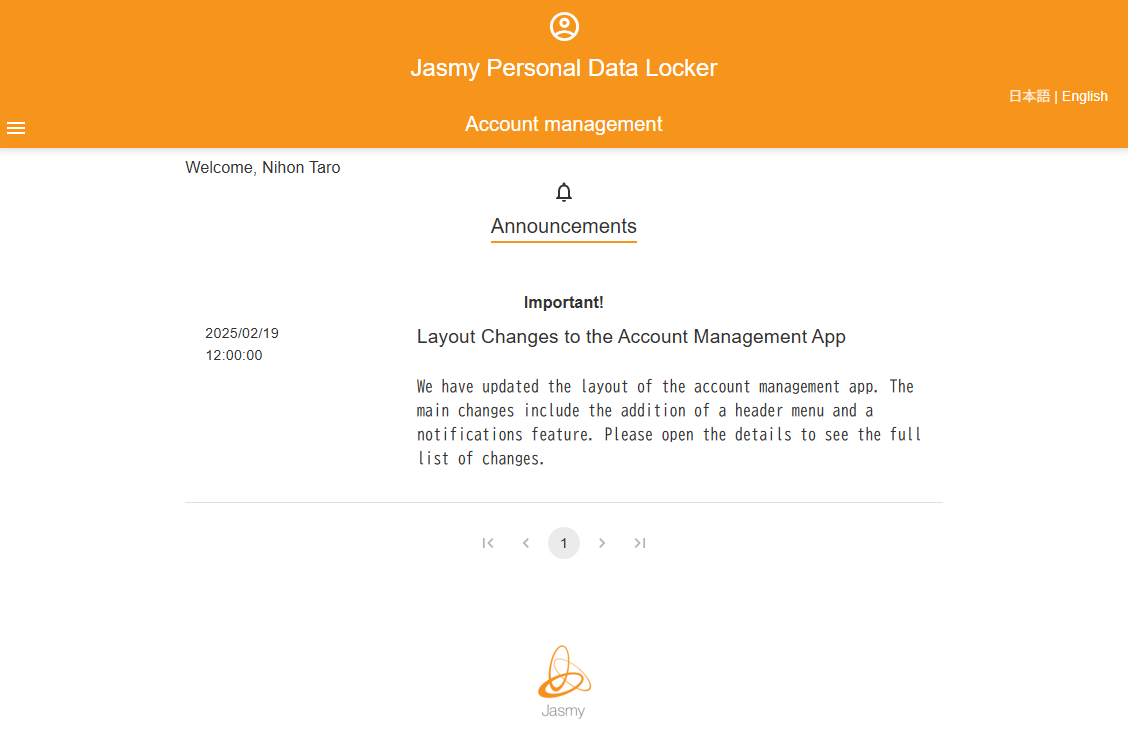
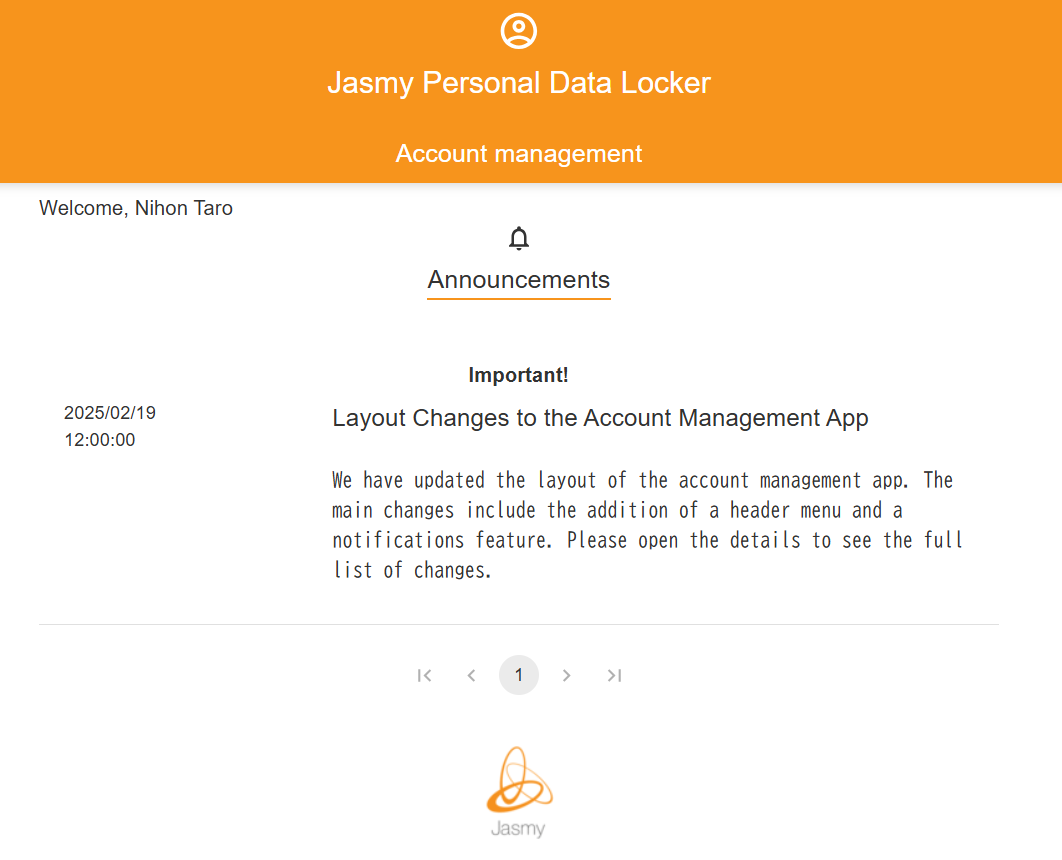
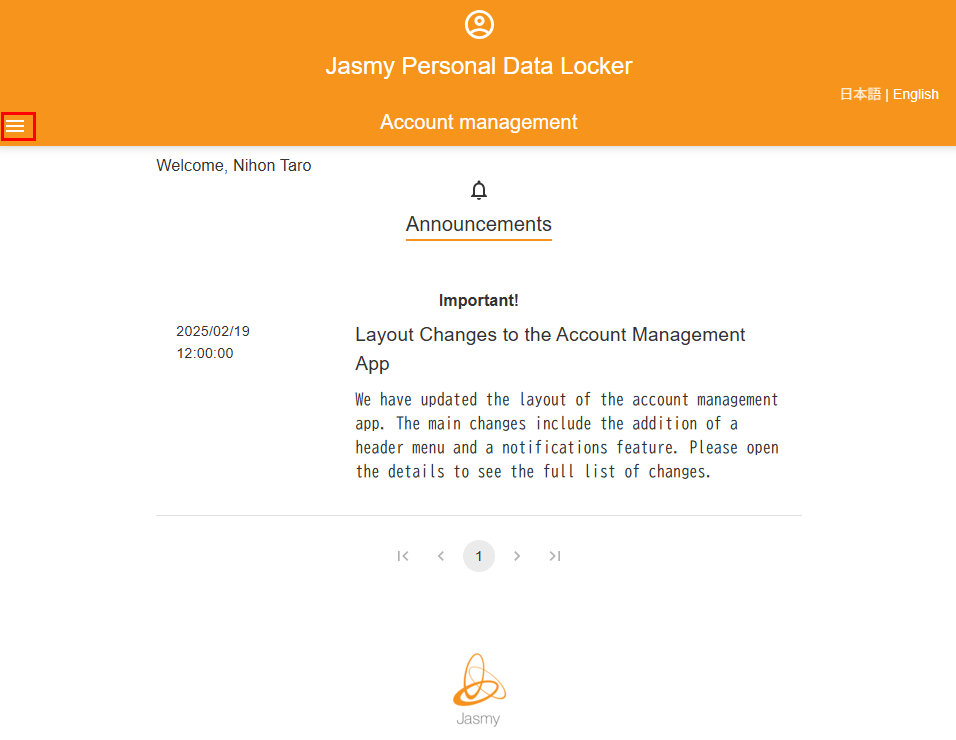
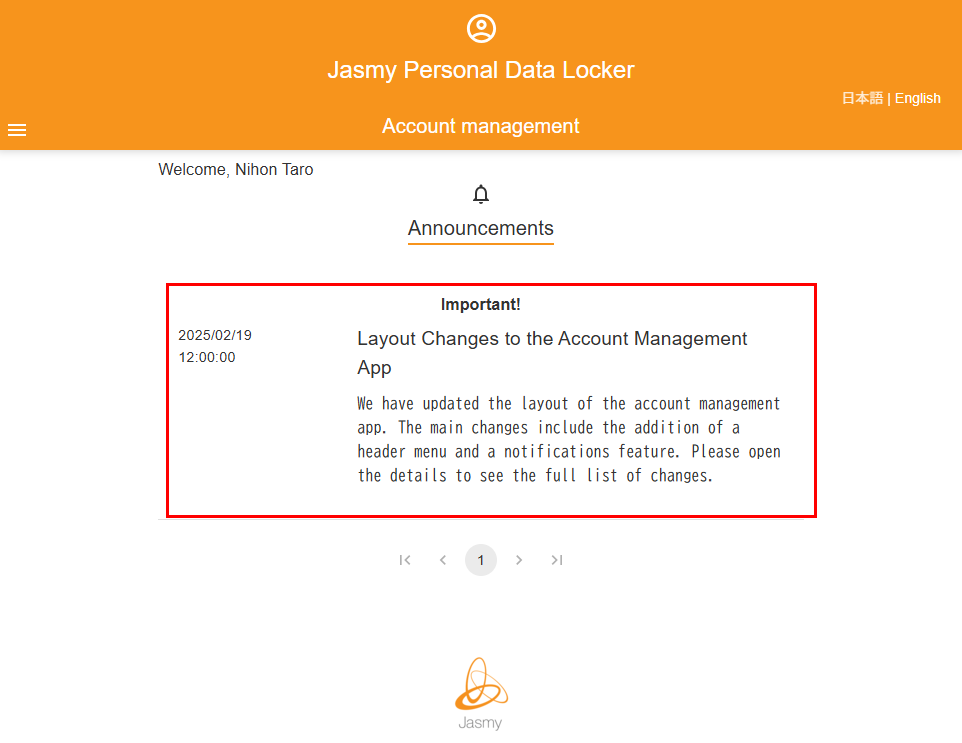
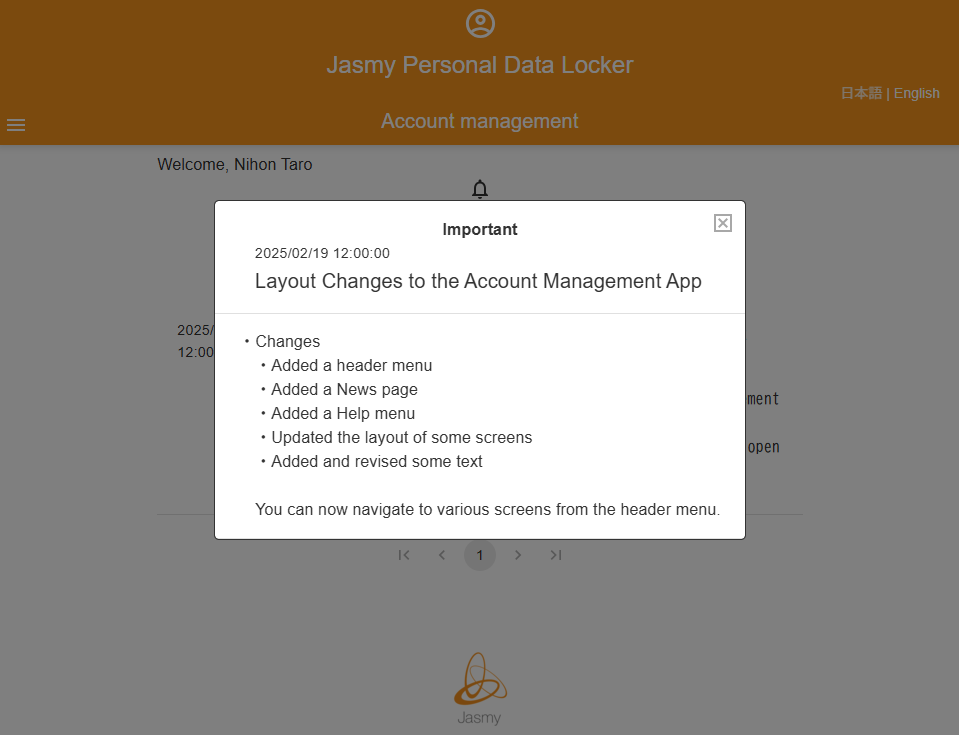
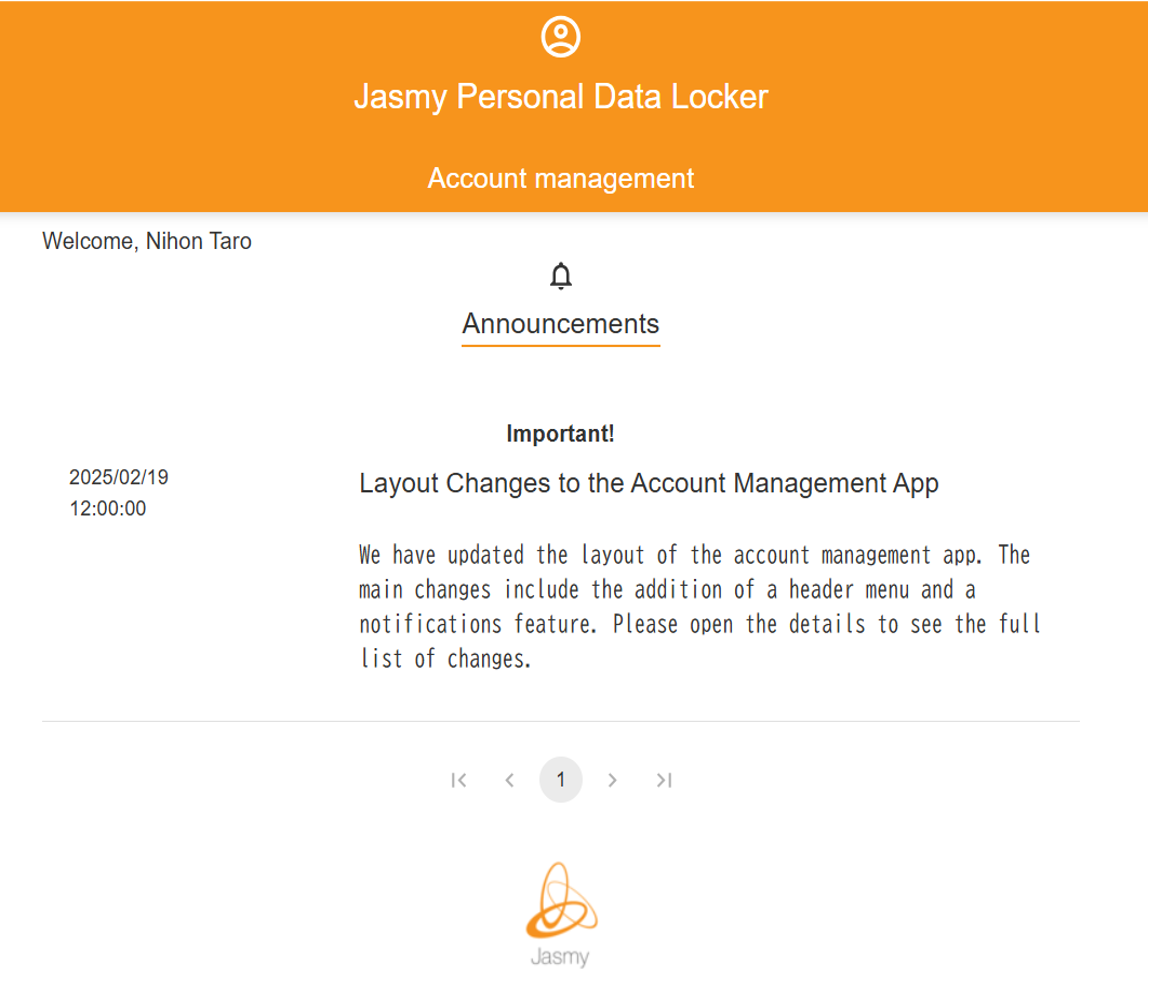
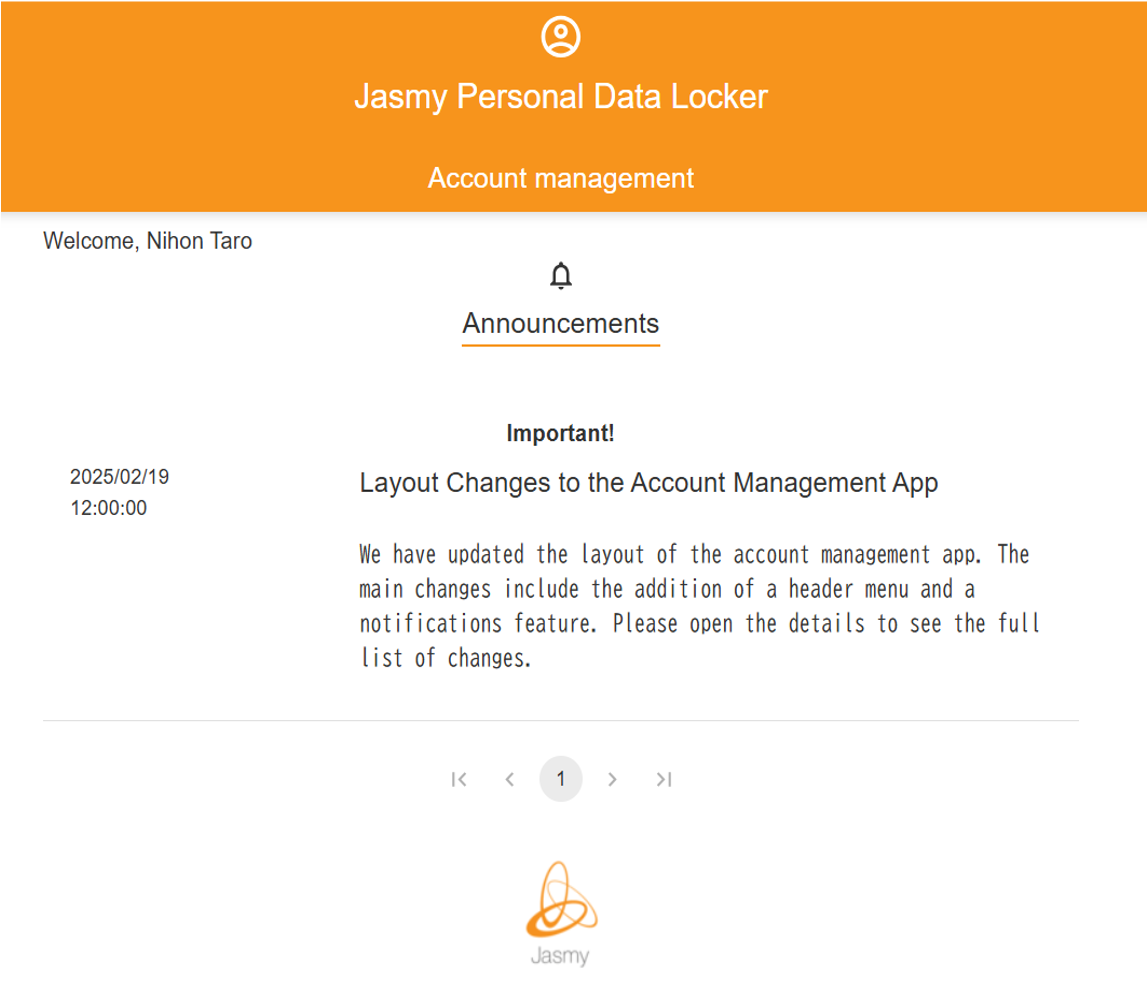
5.Announcements
A notification regarding Jasmy Personal Data Locker will appear.
The “Home” page serves as the announcements page.
To navigate to this page from another page, tap “Announcements” on the menu screen.
The Announcements page displays updates regarding Jasmy Personal Data Locker.
The title and summary of the announcement are displayed on the home screen.
Tap the relevant notification to view its details.
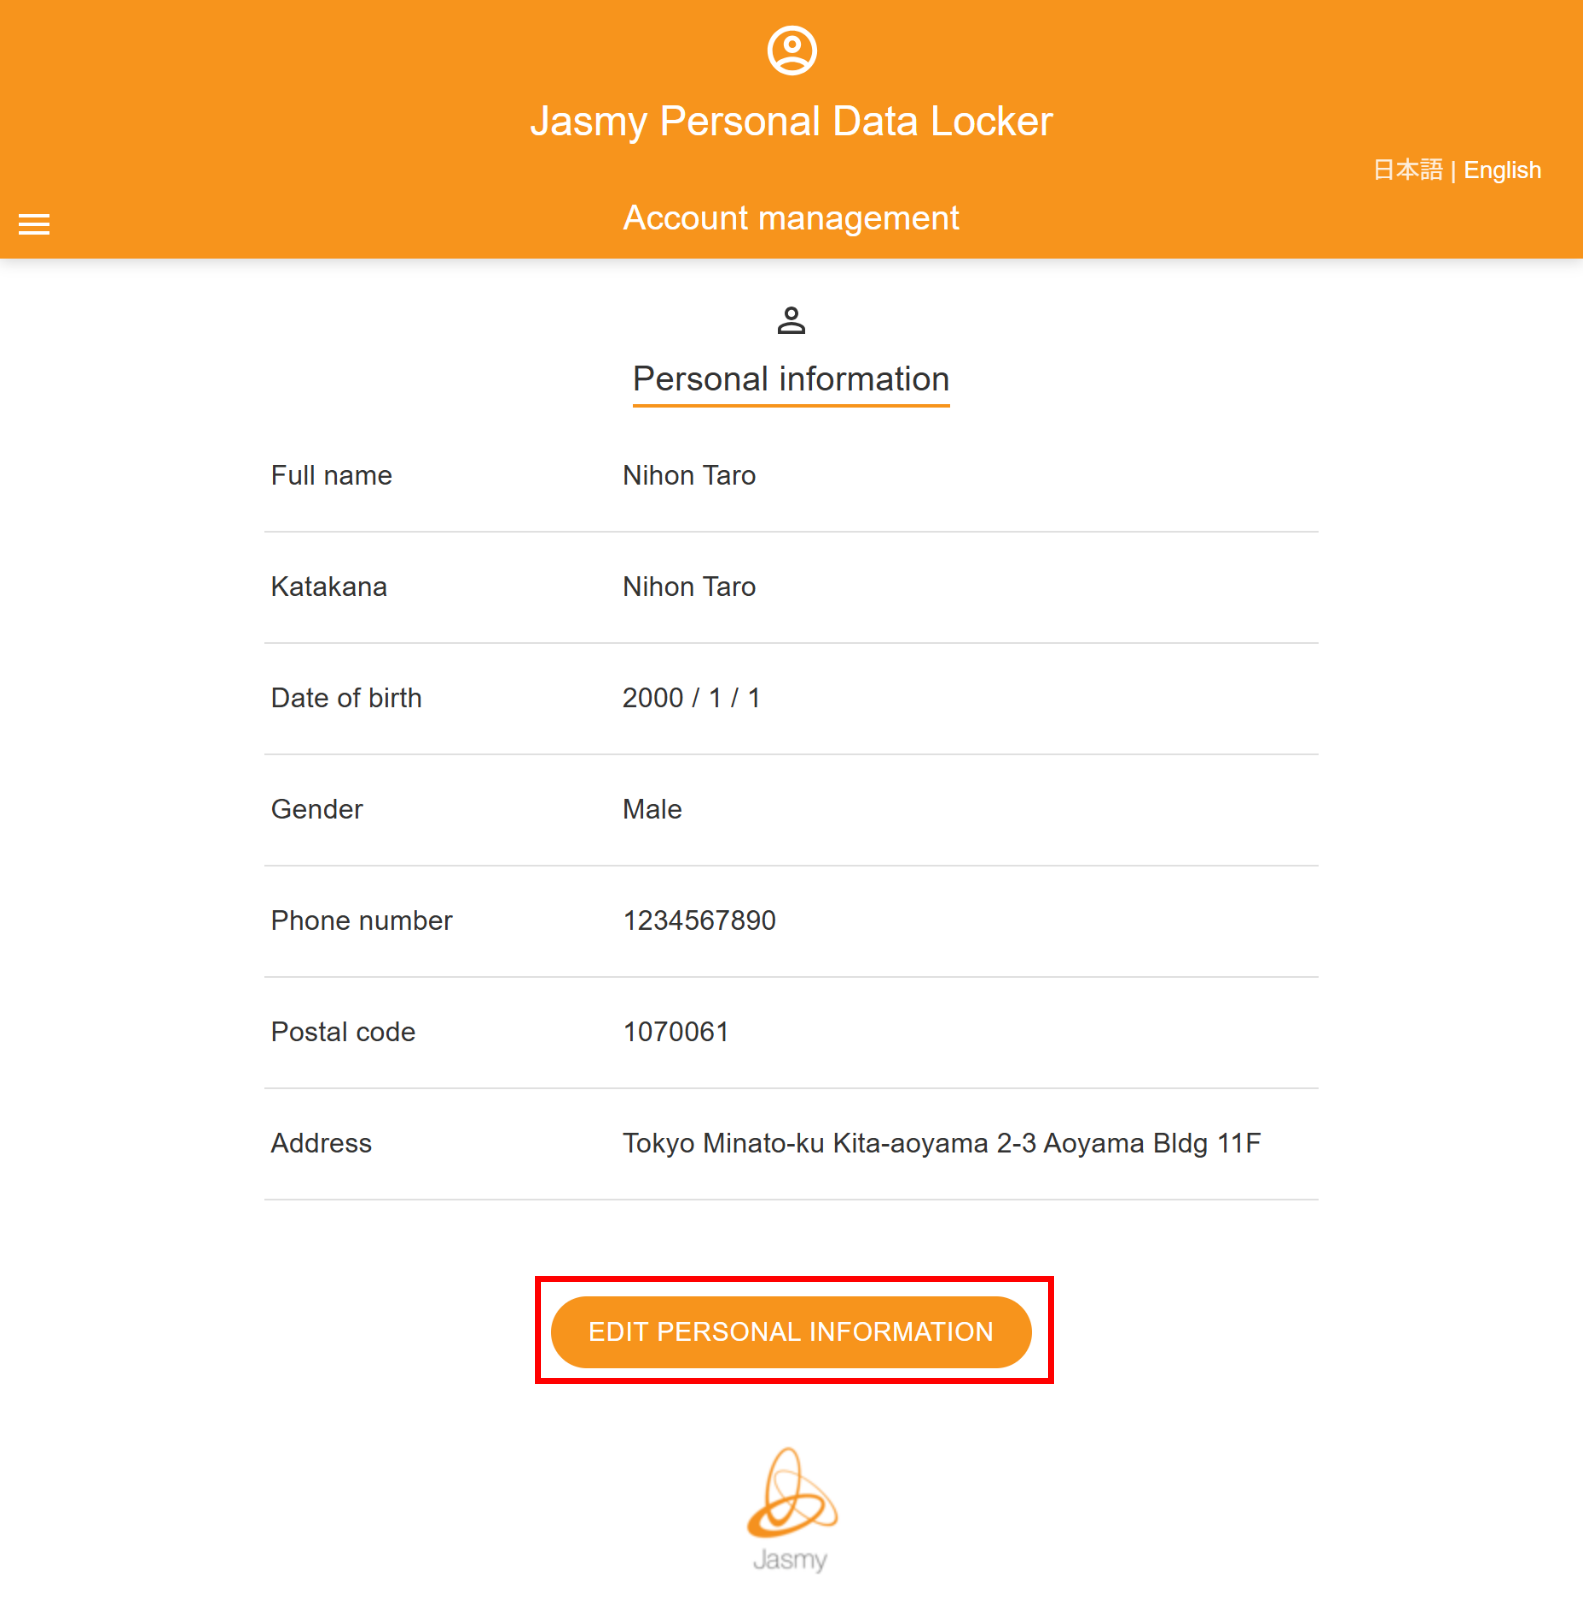
6.1.View personal information
You can view your registered personal information.
①From the menu screen, tap “Personal information” to open the submenu, then tap “View personal information.”
Your registered personal information will be displayed.
If you wish to change your personal information, click the “EDIT PERSONAL INFORMATION” button at the bottom to go to the screen where you can edit your registered personal information.
6.2.Edit personal information
You can edit your registered personal information.
①From the menu screen, tap “Personal information” to open the submenu, then tap “Edit personal information.”
The personal information edit screen will appear.
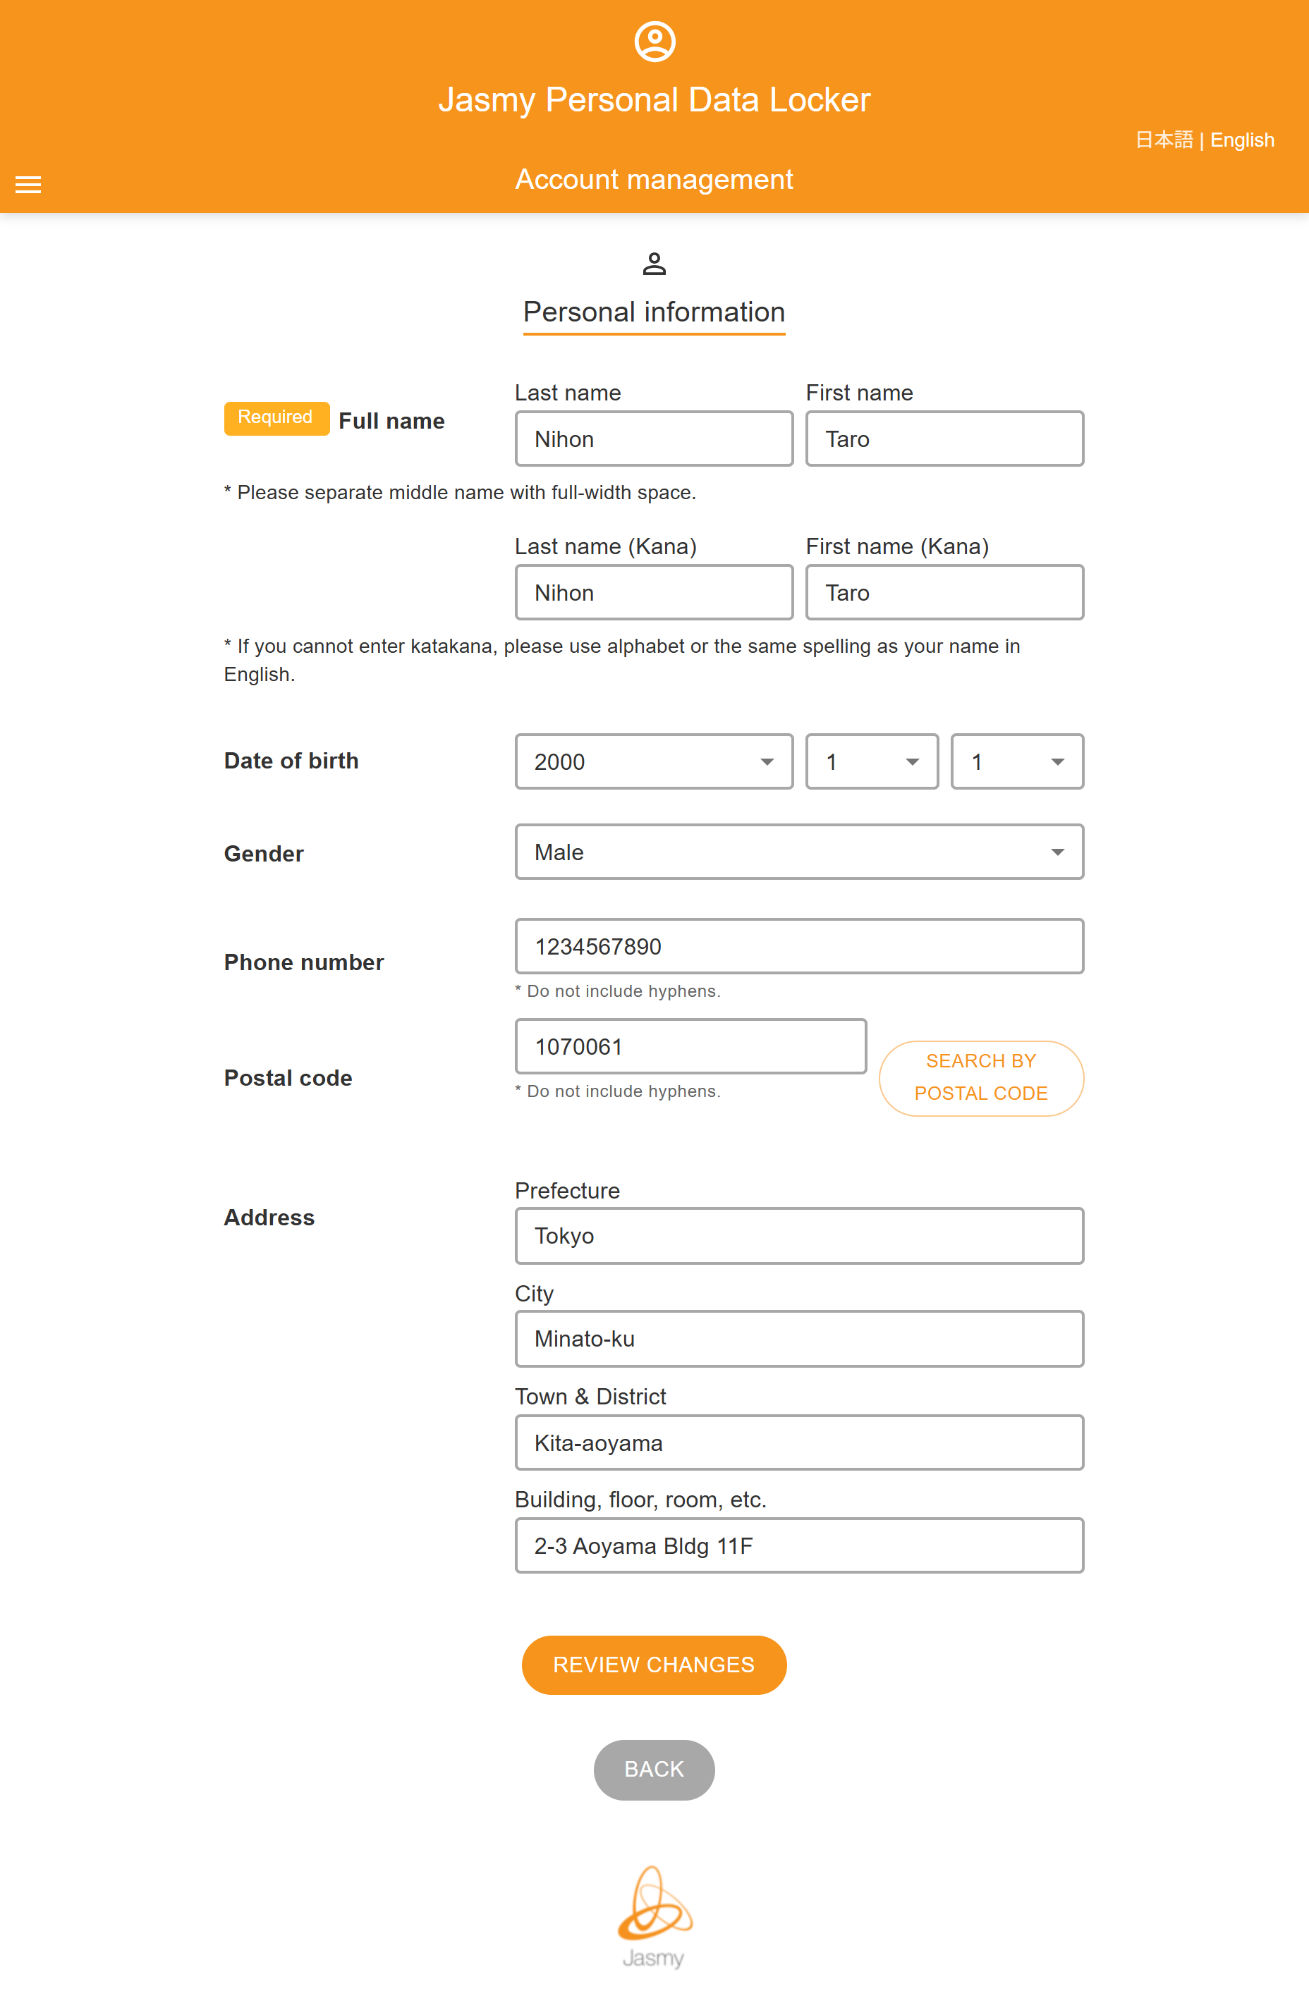
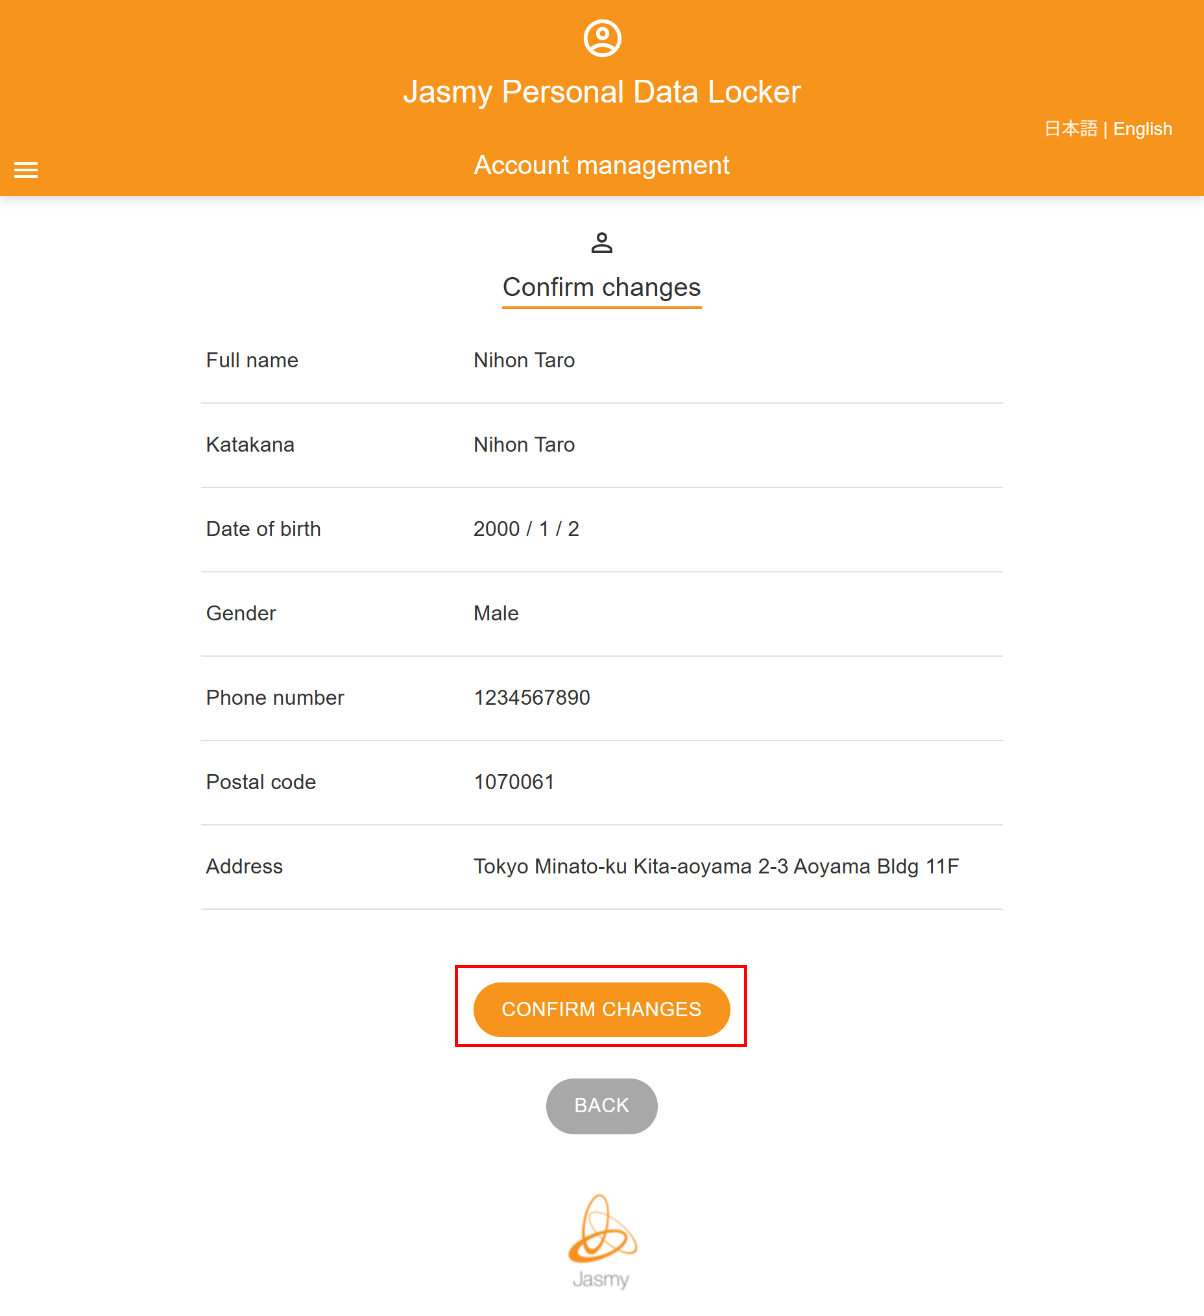
②Edit the parts of your personal information you wish to change, then click the “REVIEW CHANGES” button.

The “Confirm changes” screen will appear.
③Verify that the changes have been applied, then click the “CONFIRM CHANGES” button.
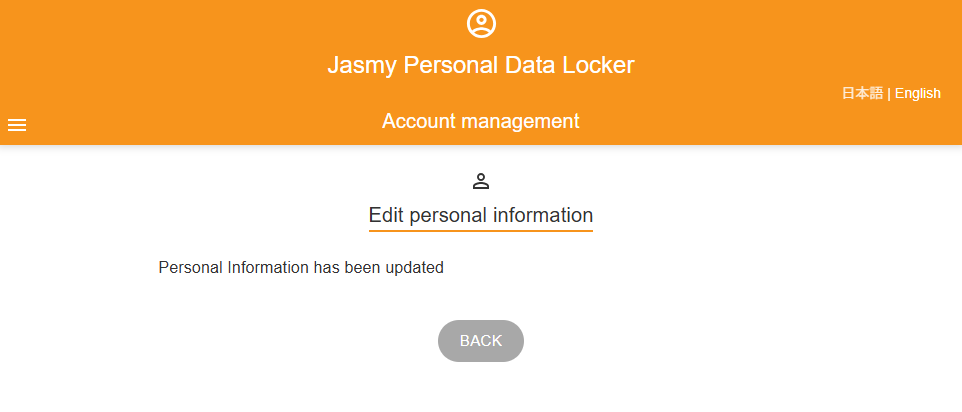
The “Edit personal information” screen will appear.
Your personal information has been updated.
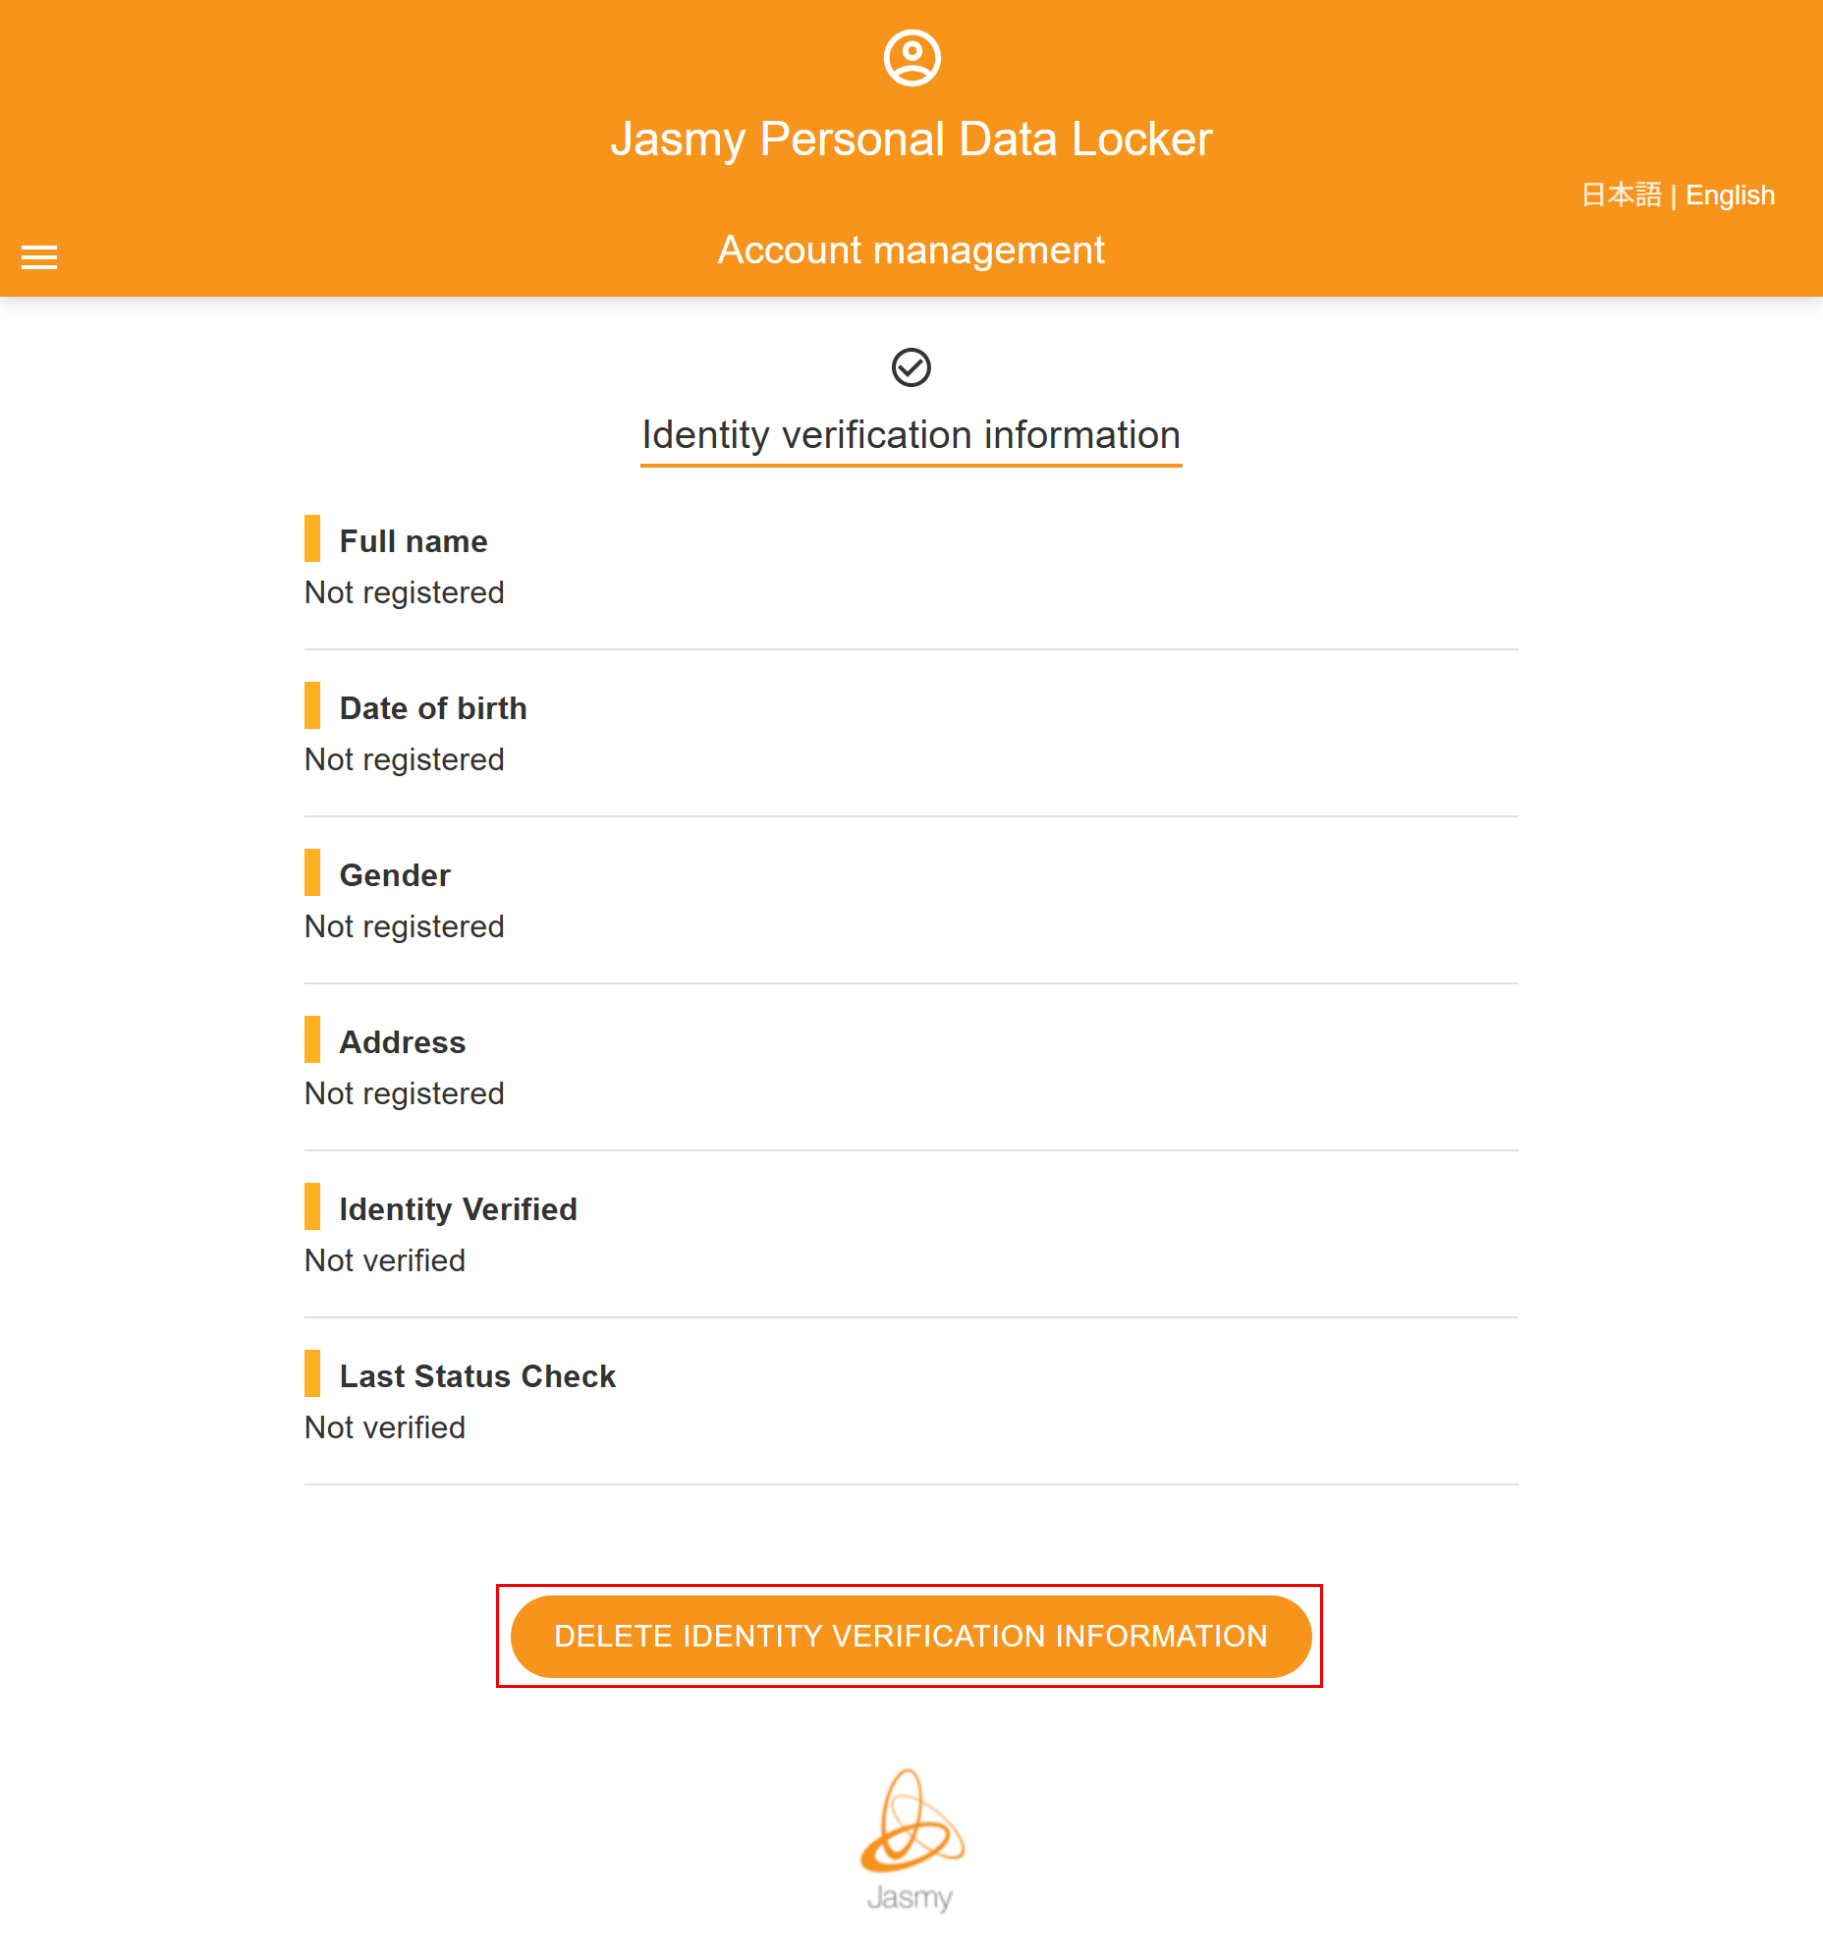
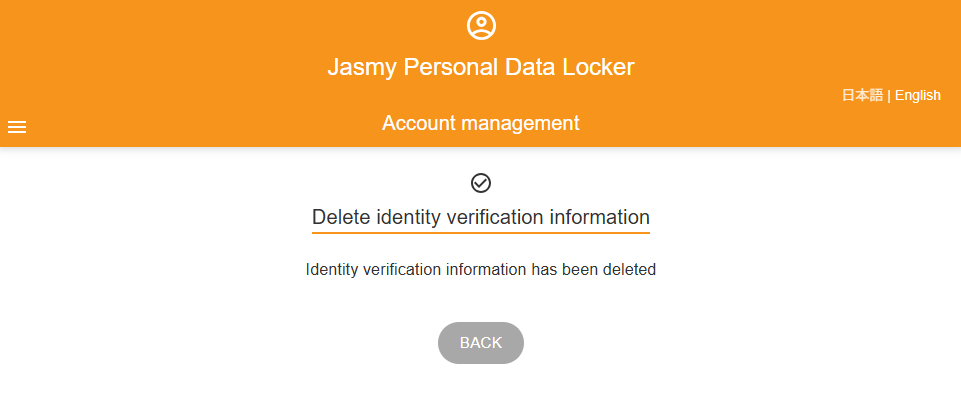
7.Identity verification information
You can delete your registered Identity verification information.
①From the menu screen, tap “Identity verification information”
The “Identity verification information” screen will appear.
②To delete your Identity verification information, click “DELETE IDENTITY VERIFICATION INFORMATION”
The “Delete Identity verification information” screen will appear.
③To delete your Identity verification information, click “DELETE”
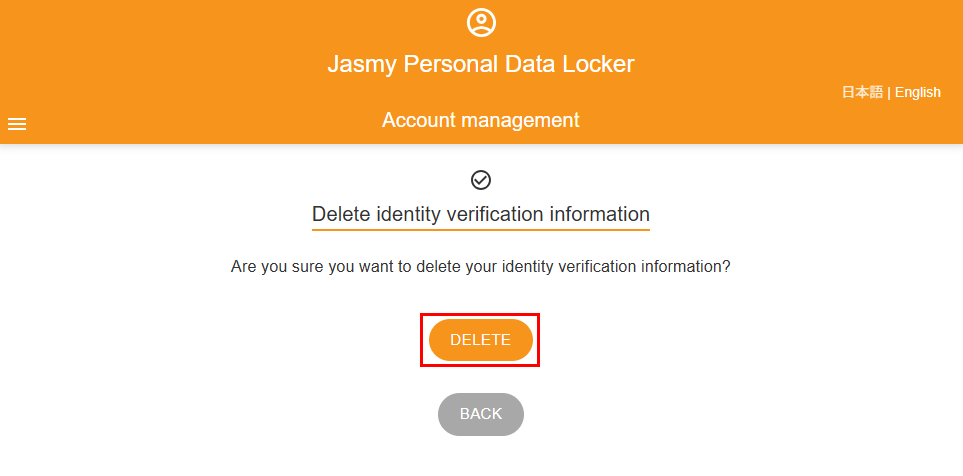
A message will appear indicating that your Identity verification information has been deleted.
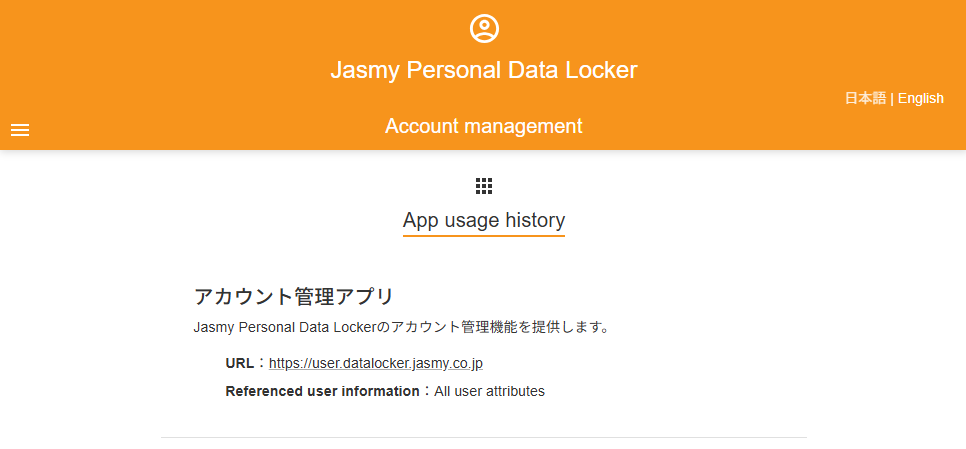
8.App usage history
You can view the data that the app is accessing.
①From the menu screen, tap “App usage history”
The “App usage history” screen will appear.
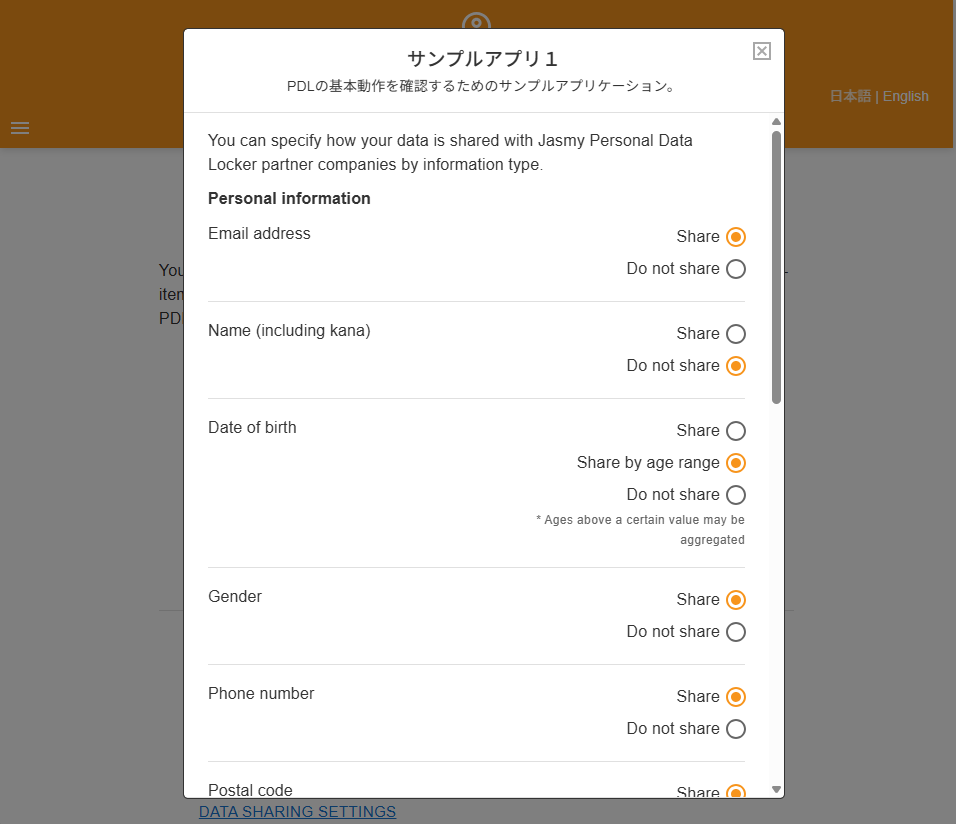
9.Data sharing settings
You can set whether or not to provide personal data.
①From the menu screen, tap “Data Sharing Settings.”
The “Data sharing settings for PDL partner companies” screen will appear, displaying the apps to which data will be shared.
Tap “DATA SHARING SETTINGS” for the relevant app to view the details of the data sharing settings.
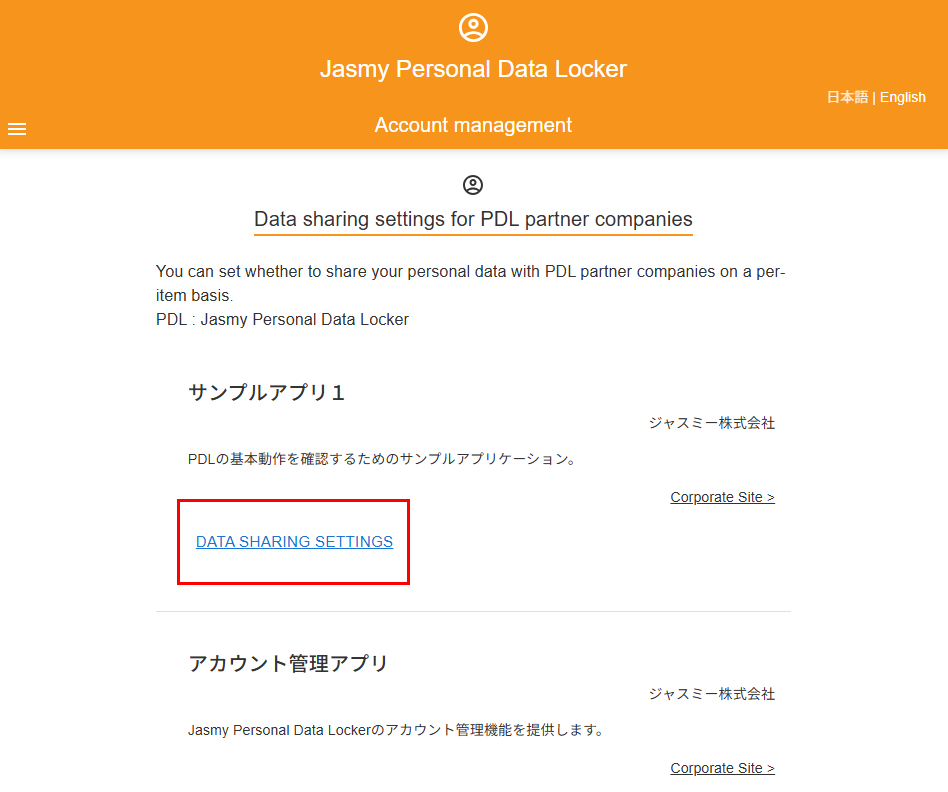

②Change the settings for data sharing where desired.
Any changes you make will be saved automatically.
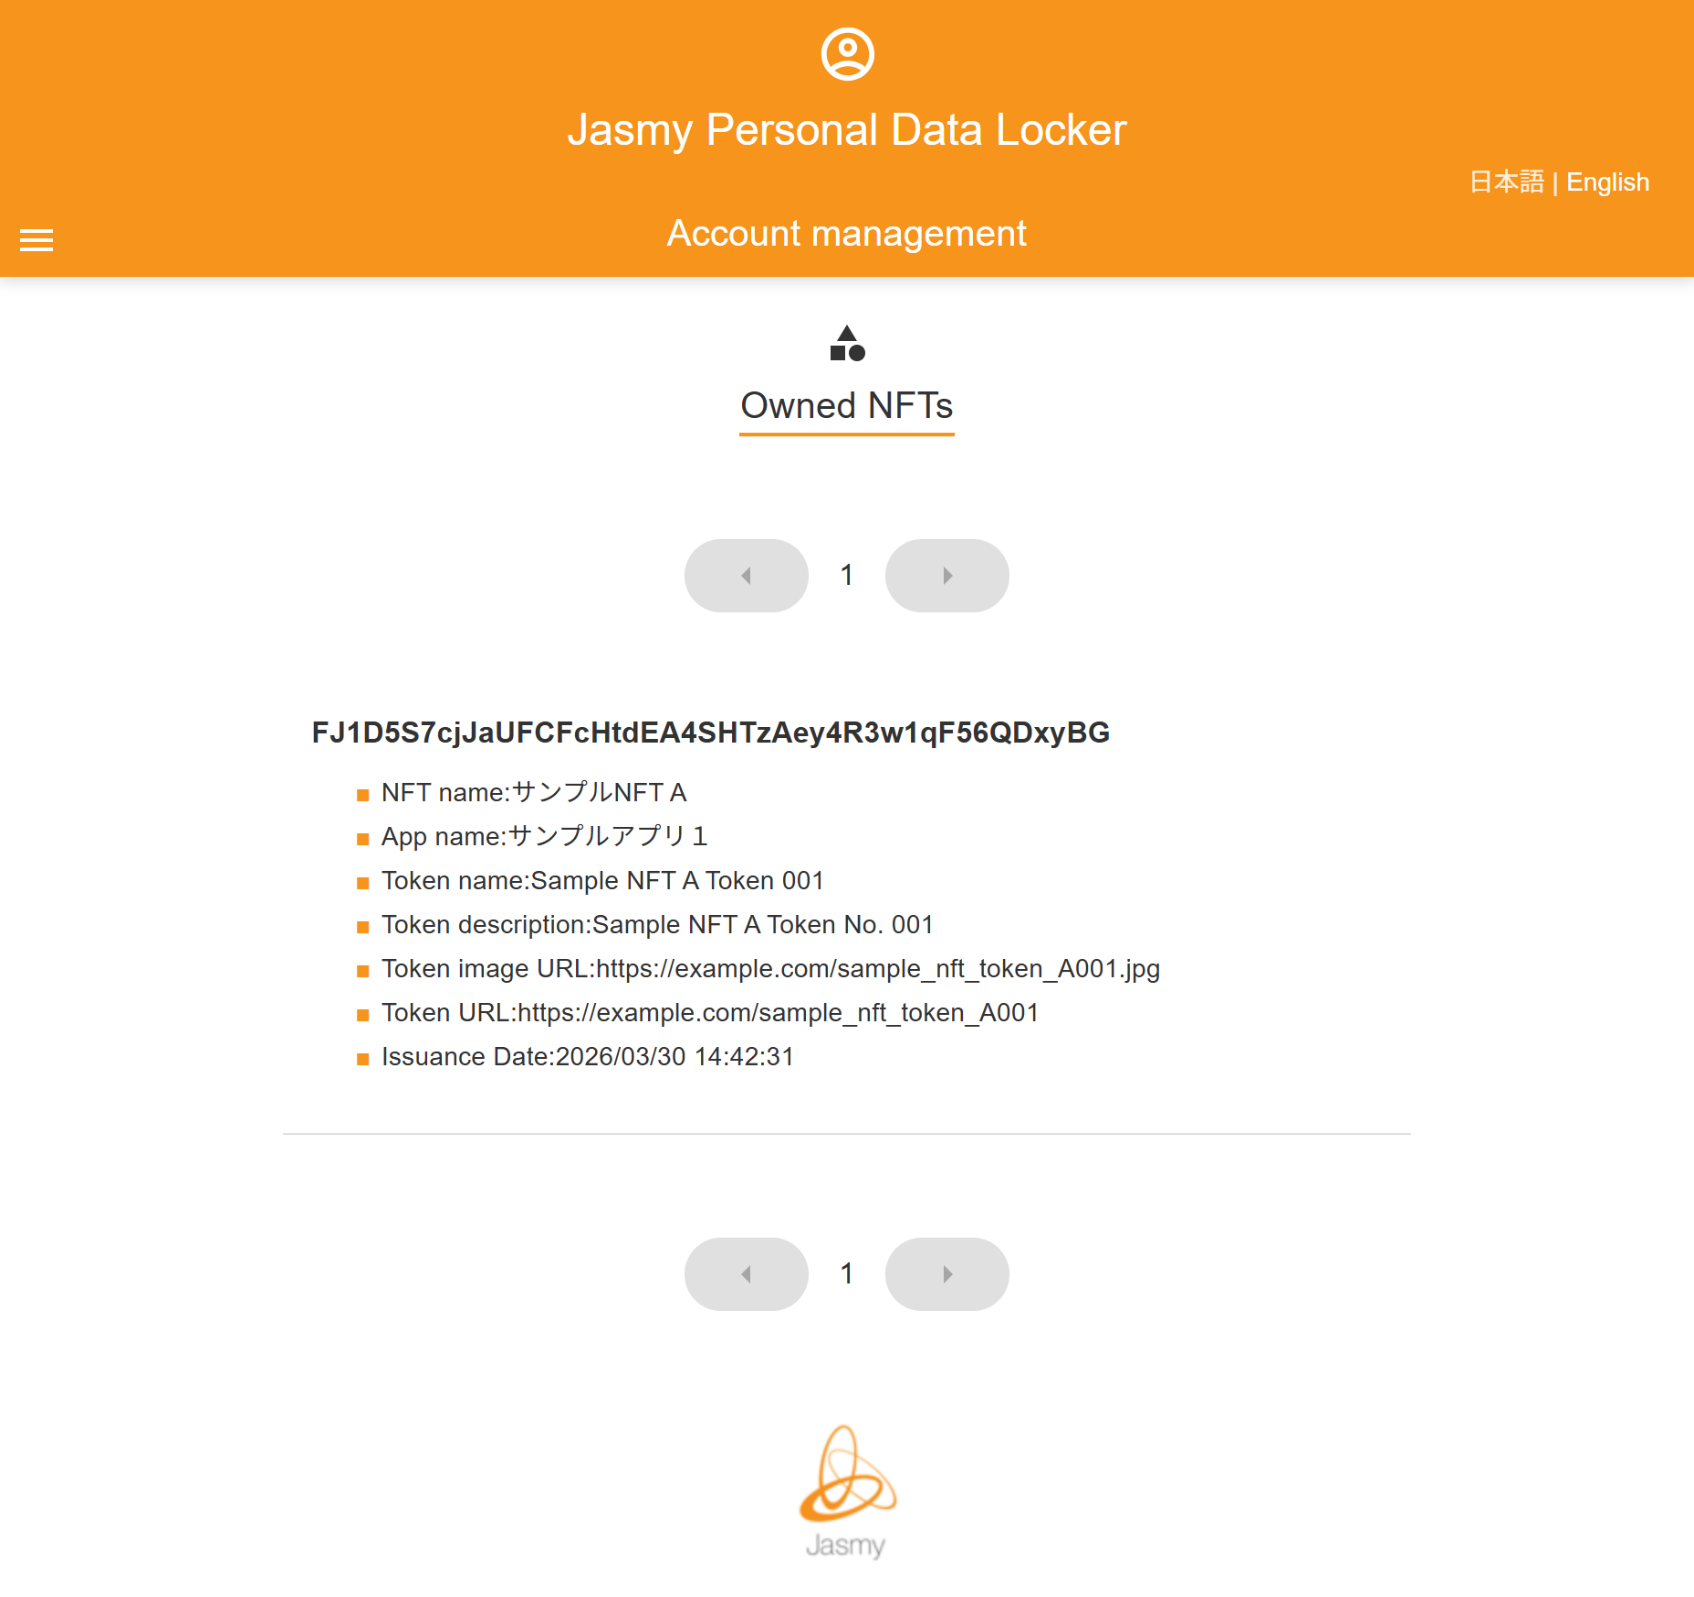
10.1.Owned NFTs
You can view a list of the NFTs you own.
①From the menu screen, tap “NFT” to open the submenu, then tap “Owned NFTs”
The “Owned NFTs” screen will appear, allowing you to view the NFTs you currently own.
If you own multiple NFTs that don’t fit on a single page, you can use the left and right buttons to view them.
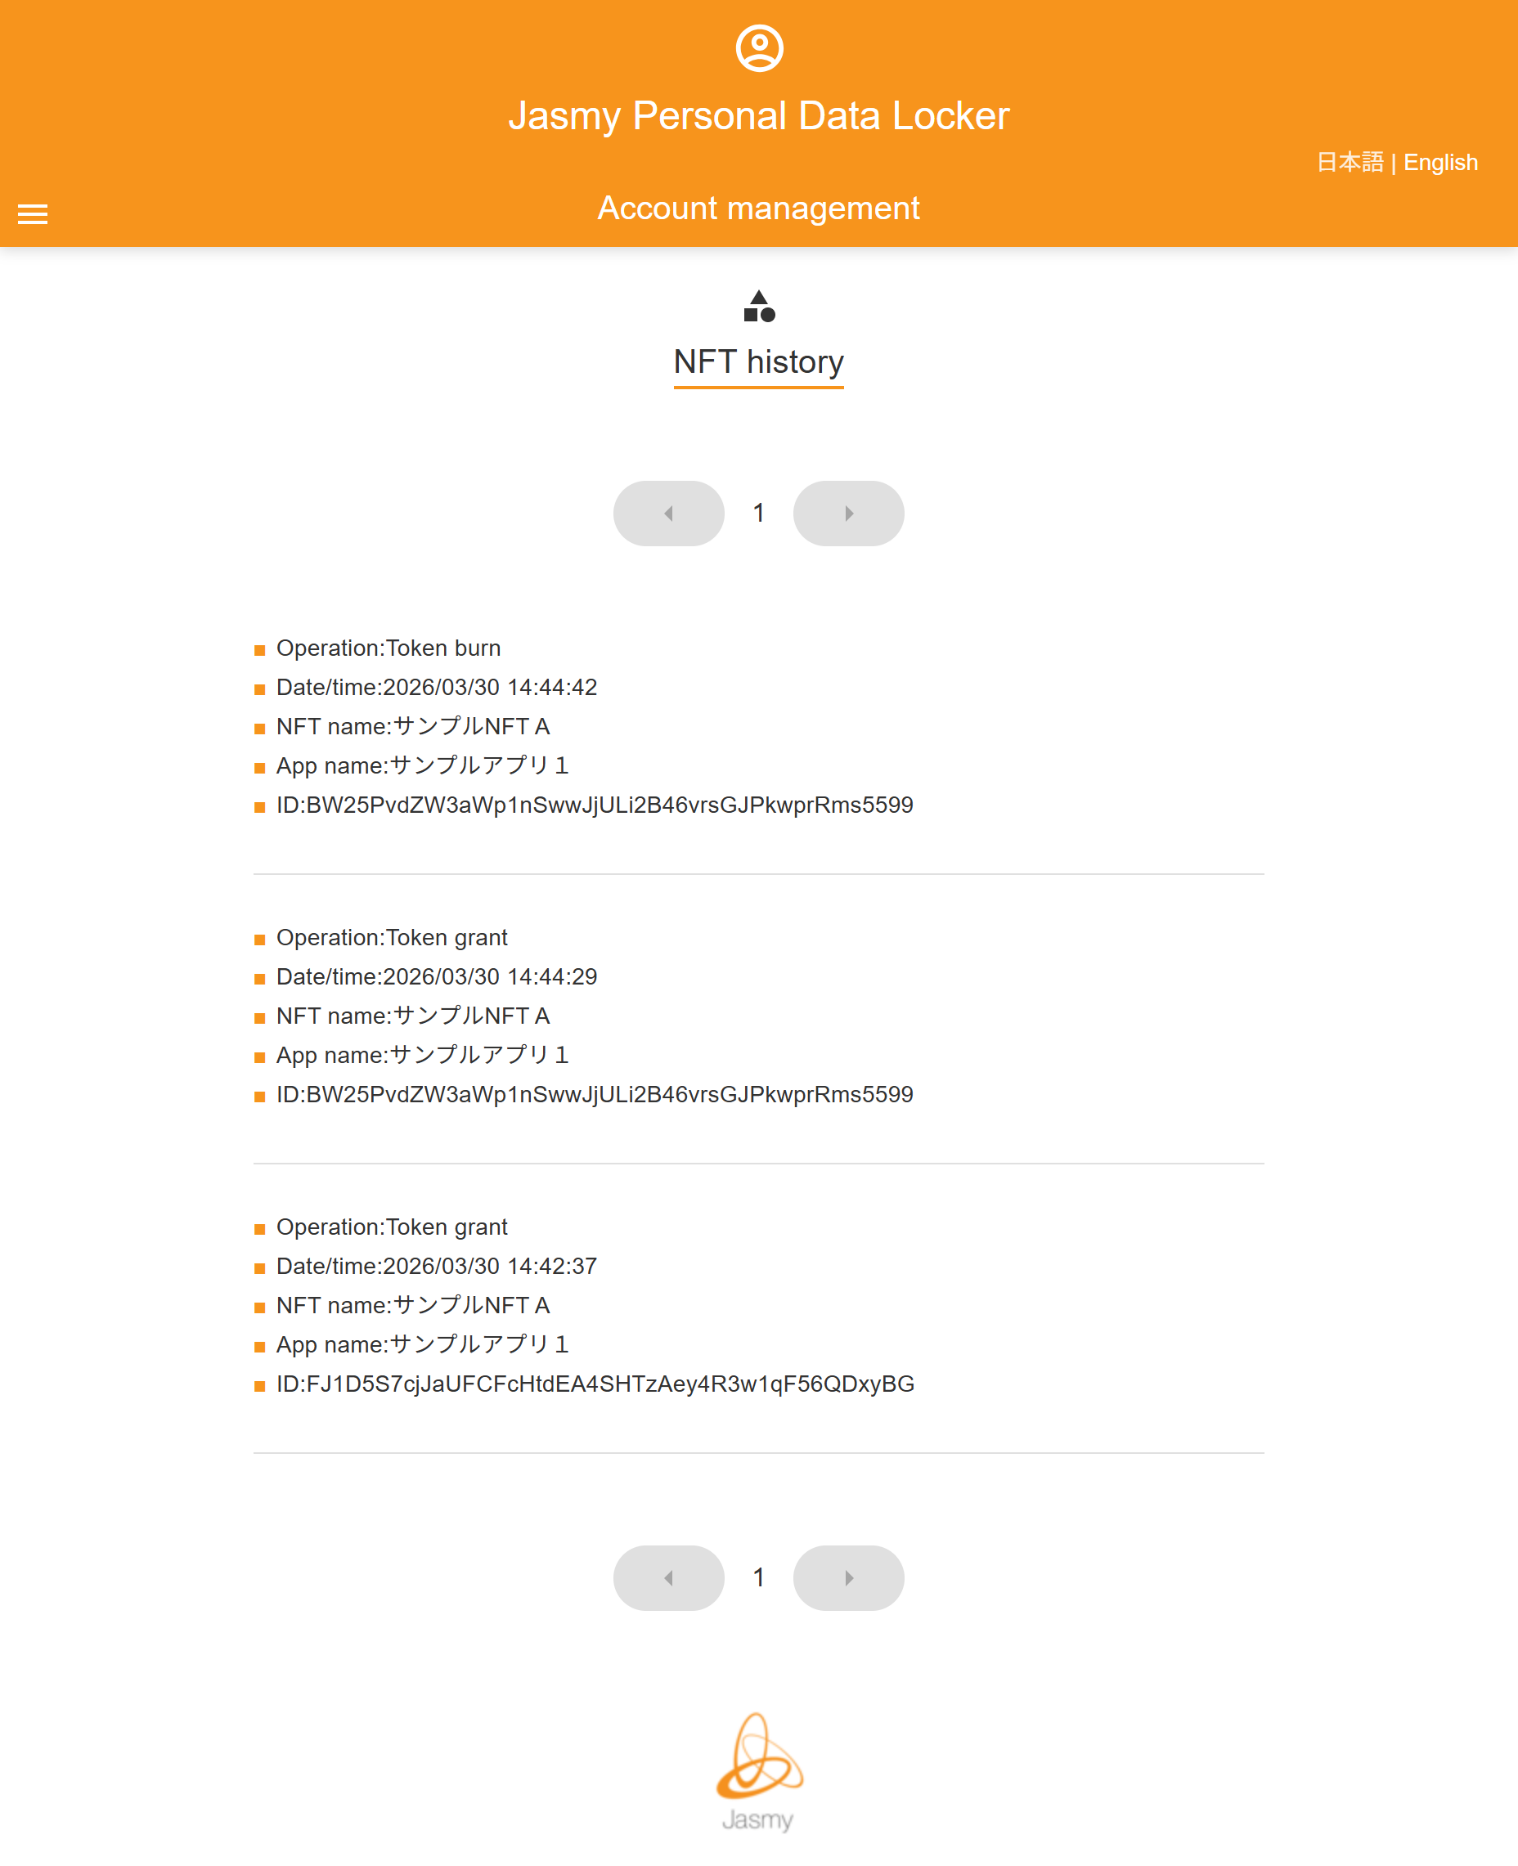
10.2.NFT history
You can view the history of the NFTs you have owned to date.
①From the menu screen, tap “NFT” to open the submenu, then tap “NFT history”
The “NFT history” screen will appear, allowing you to view the history of all NFTs you have owned to date.
If there are multiple NFT entries and they do not all fit on a single page, you can use the left and right buttons to view them.
11.1.Signed-in devices
You can check which devices are currently Signed-in and sign out.
①From the menu screen, tap “Security Settings” to open the submenu, then tap “Signed-in devices”
The “Signed-in devices” screen will appear.
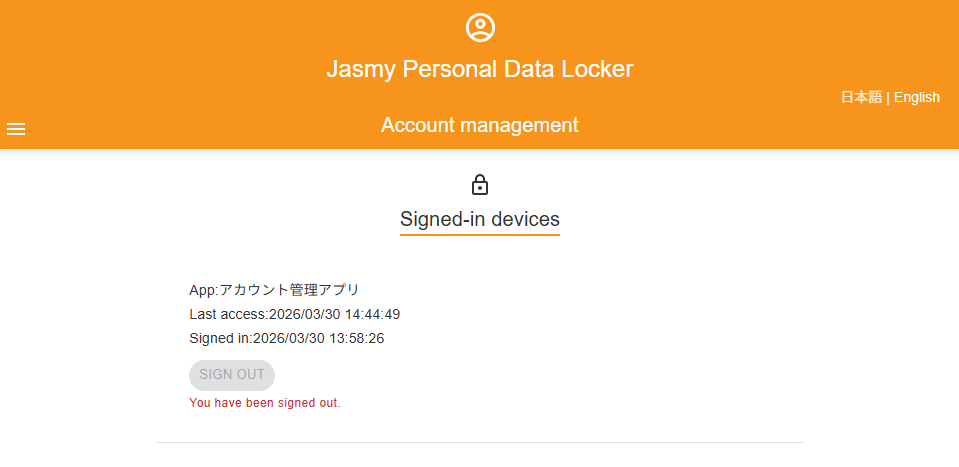
To sign out of the device currently signed into the app, tap the “SIGN OUT” button.
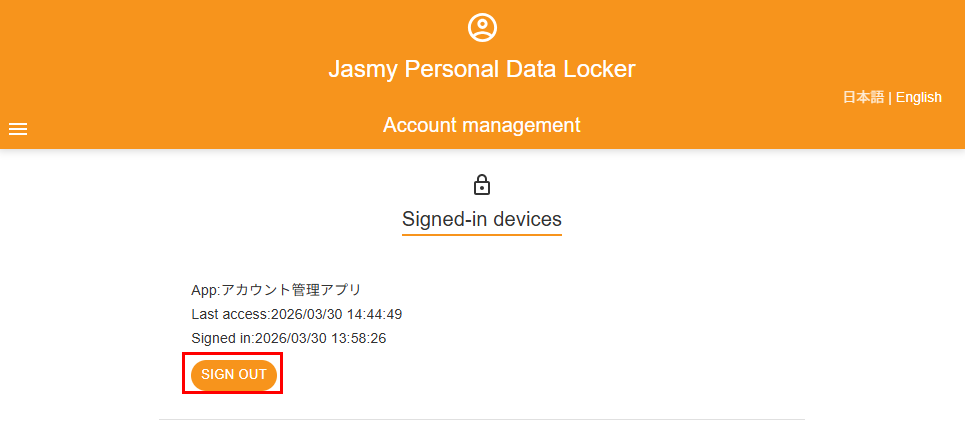
You are about to sign out.
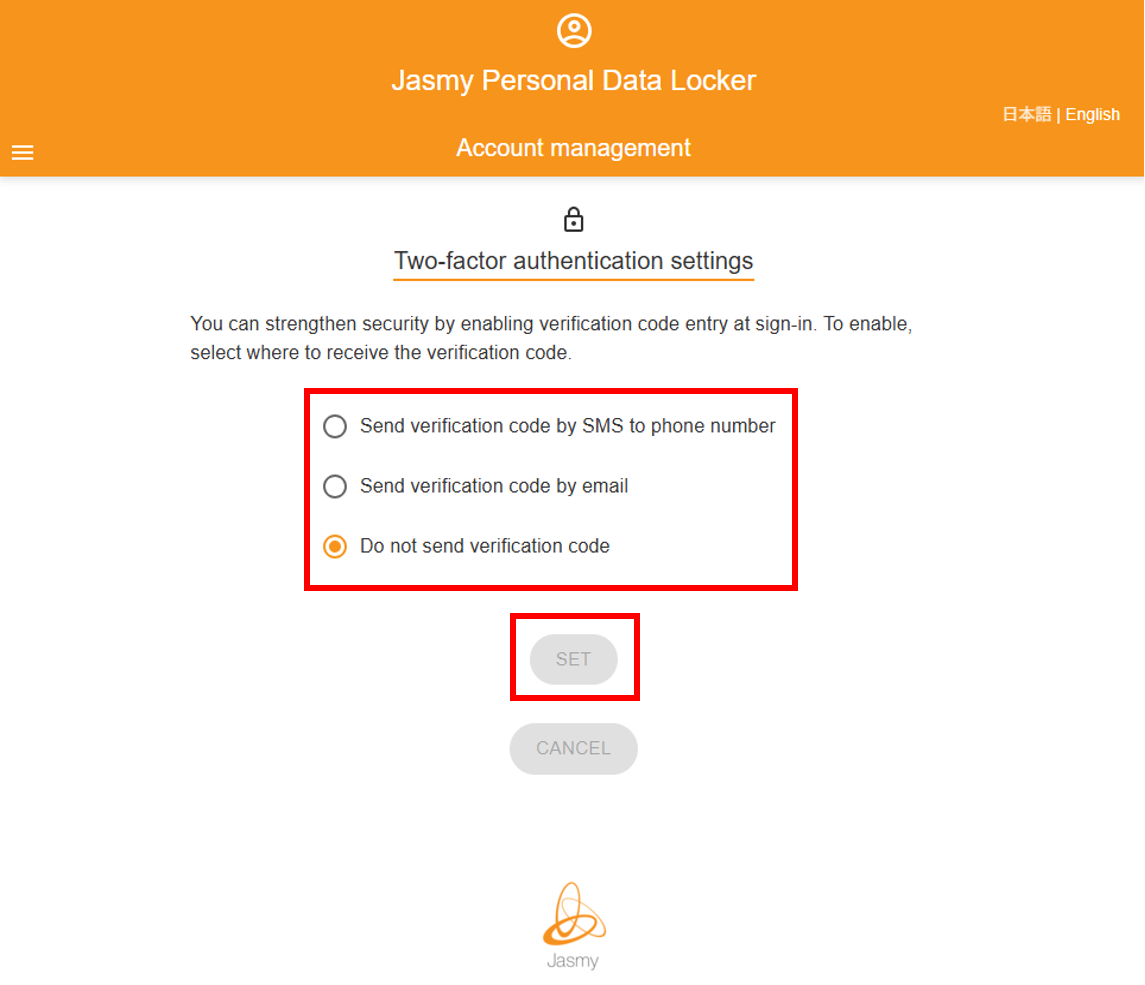
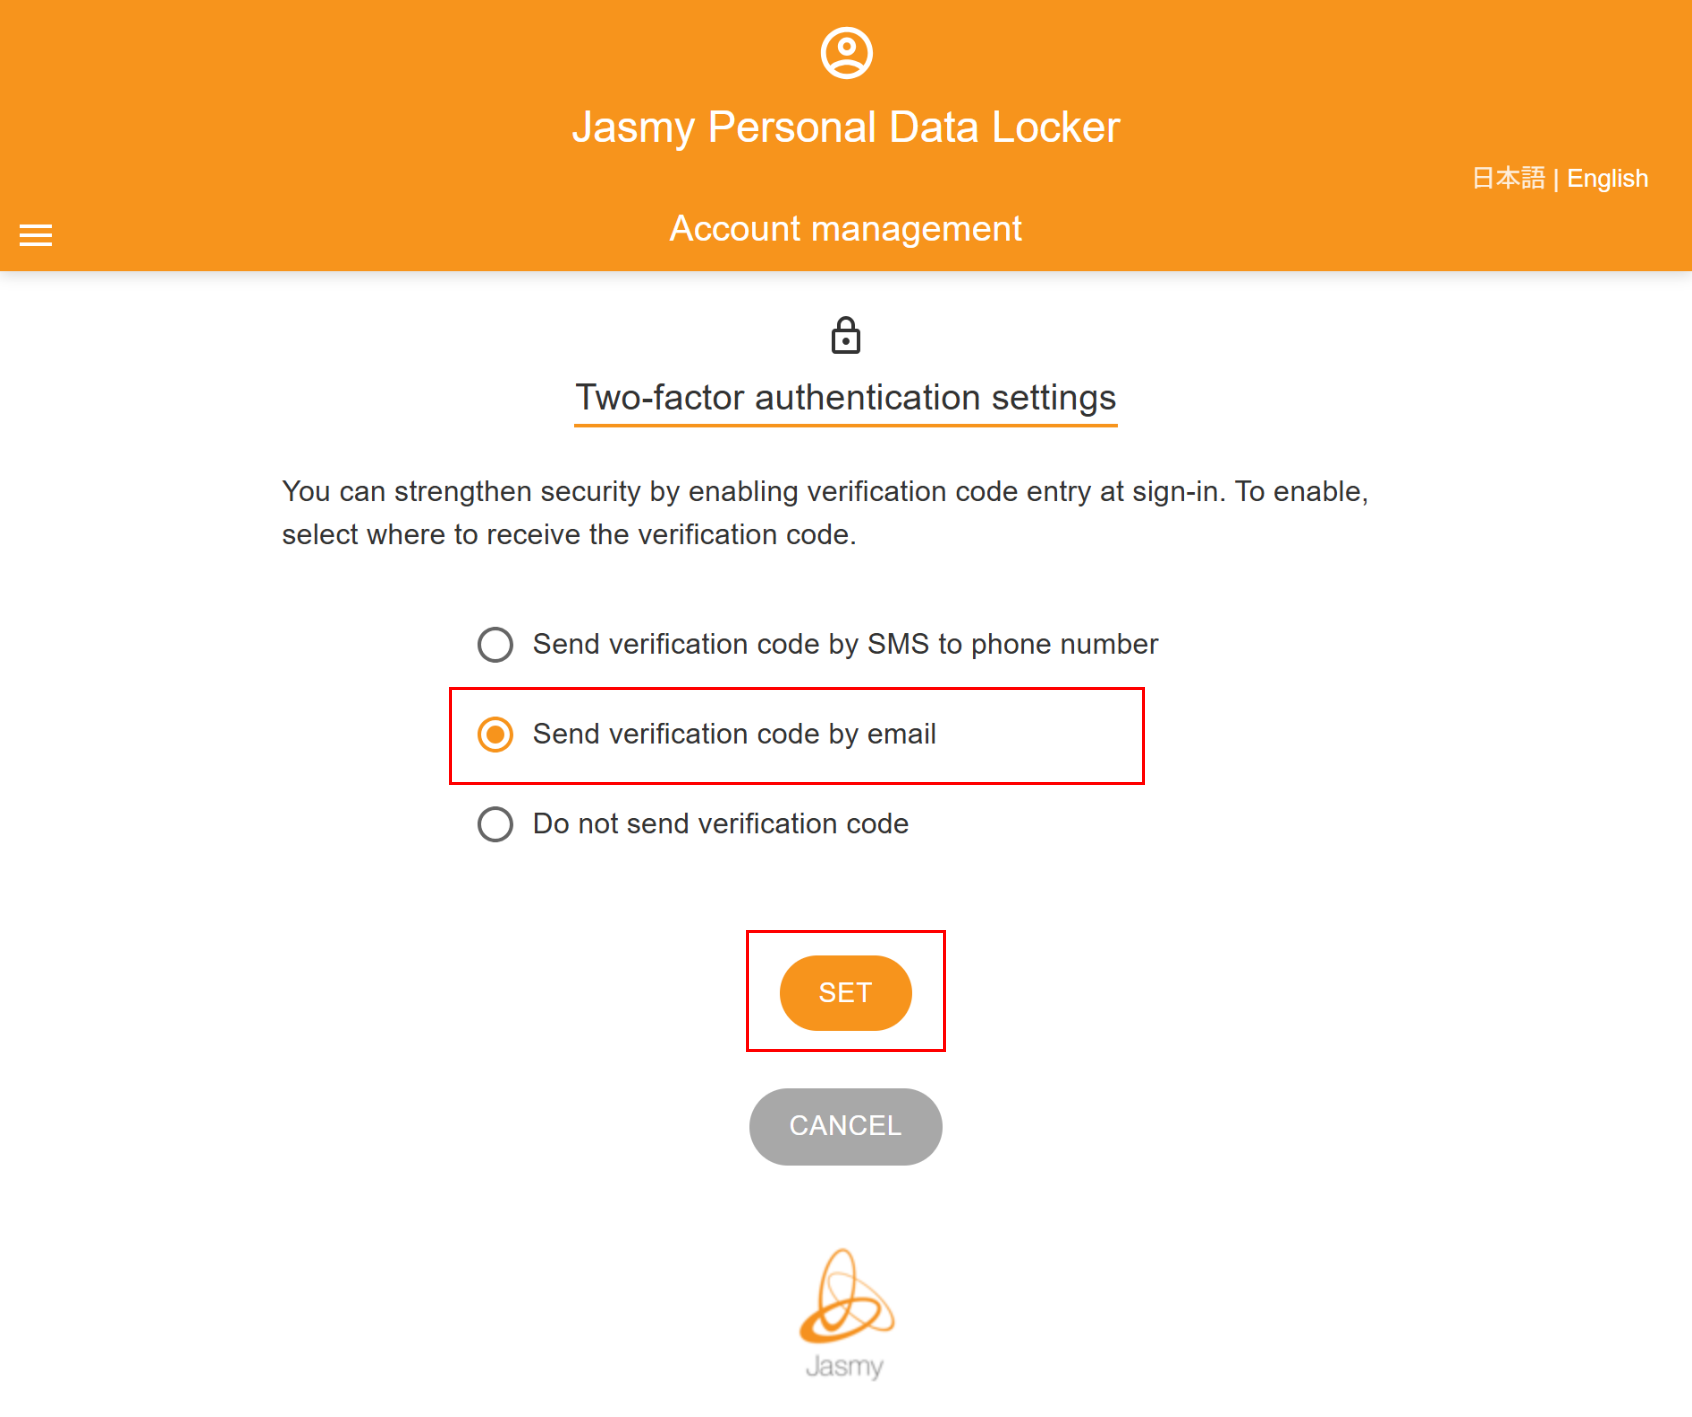
11.2.Two-factor authentication settings
You can configure the settings to allow sign in using a verification code in addition to your email address and password.
By default, the setting is configured not to send a verification code.
①From the menu screen, tap “Security settings” to open the submenu, then tap “Two-factor authentication settings”
The “Two-factor authentication settings” screen will appear.
②When sending via SMS to a phone number
11.2.1.Send verification code by SMS to phone number
③When doing so via email
11.2.2.Send verification code by email
④If you do not set up authentication
11.2.3.Do not send verification code
11.2.1.Send verification code by SMS to phone number
If you want to receive a verification code via SMS, please follow these steps to set it up.
Please use a phone number that can receive SMS messages.
If you are unable to receive calls from a particular phone number, please update your personal information.
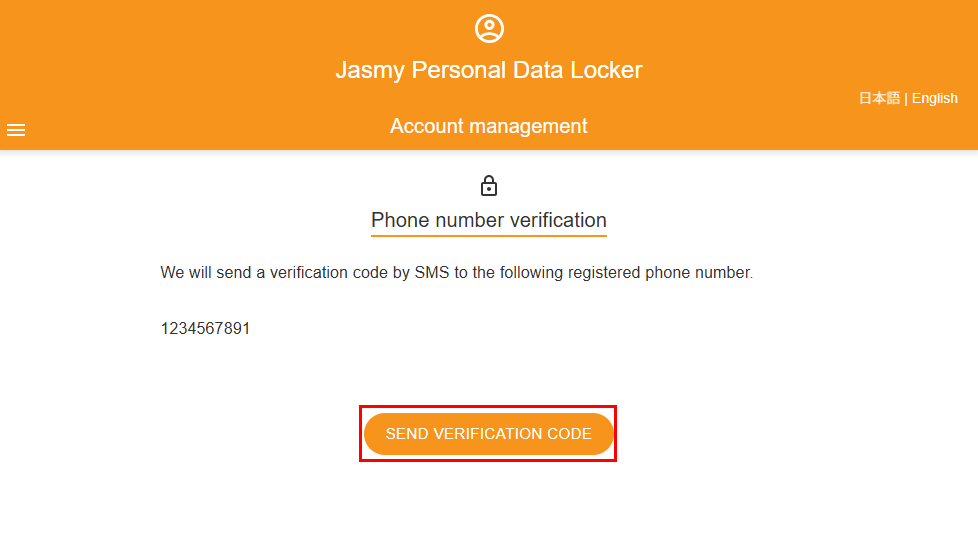
①Select “Send verification code by SMS to phone number” then tap the “SET” button.
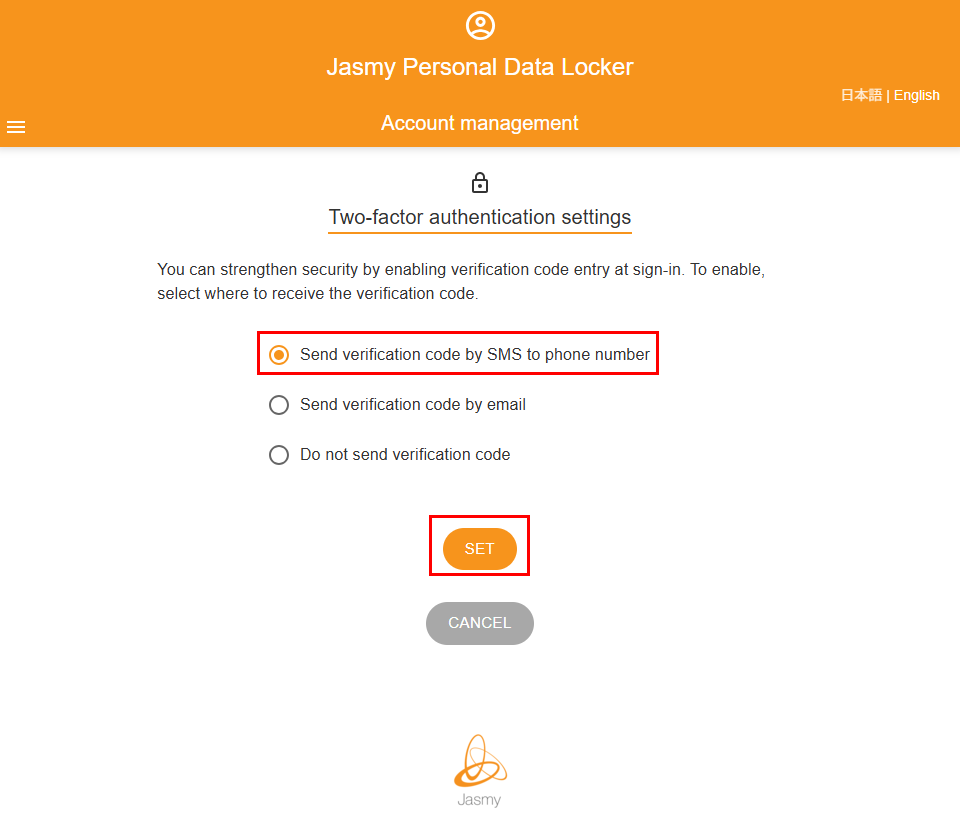
The “Phone number verification” screen will appear.
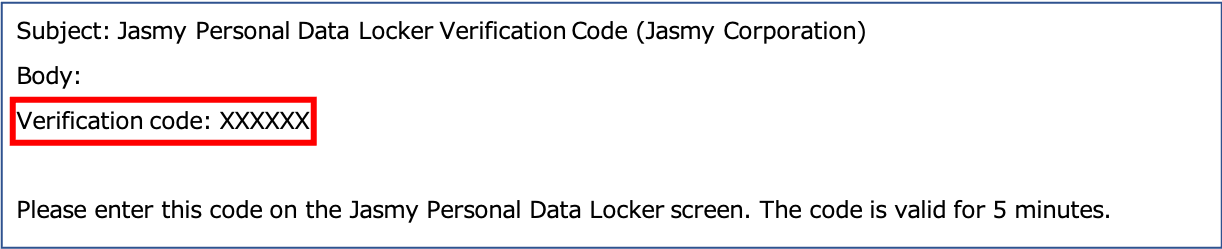
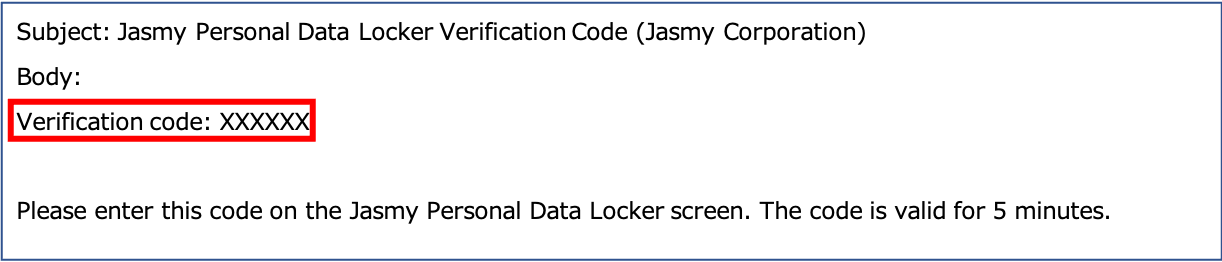
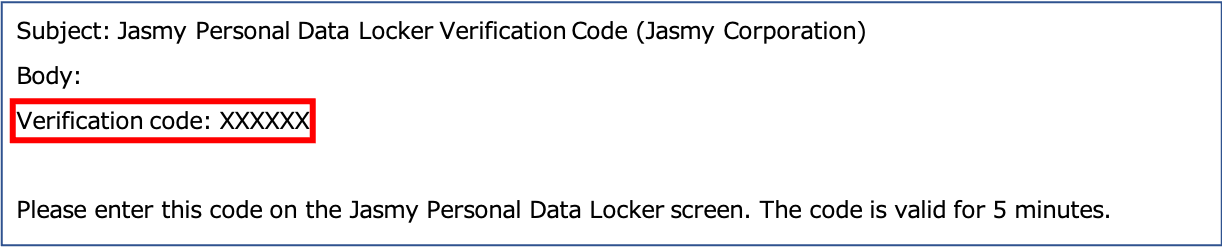
②Verify that the registered phone number is correct, then click the “SEND VERIFICATION CODE” button.
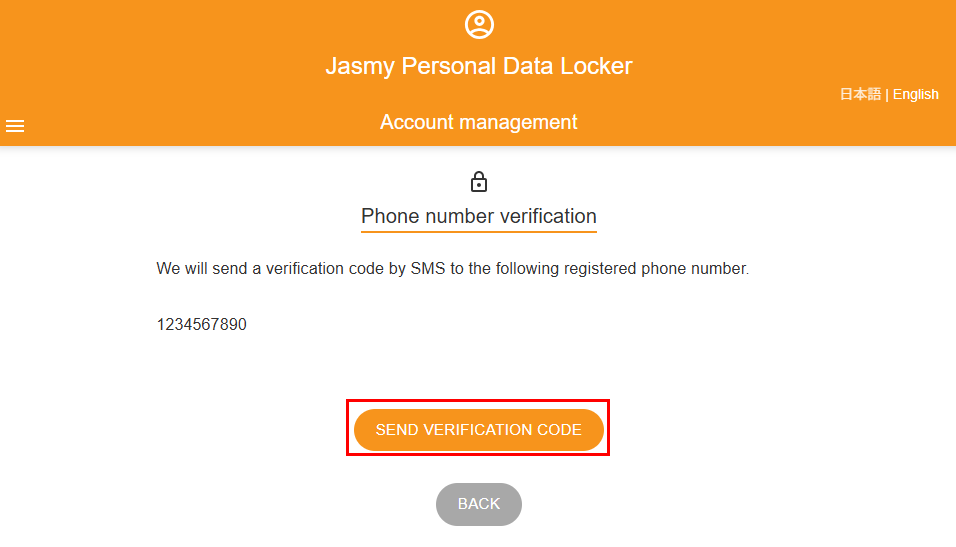
A verification code will be sent via SMS to the phone number you registered.
If you haven’t received it after more than 5 minutes, we apologize for the inconvenience, but please re-enter the information via the authentication settings during login.
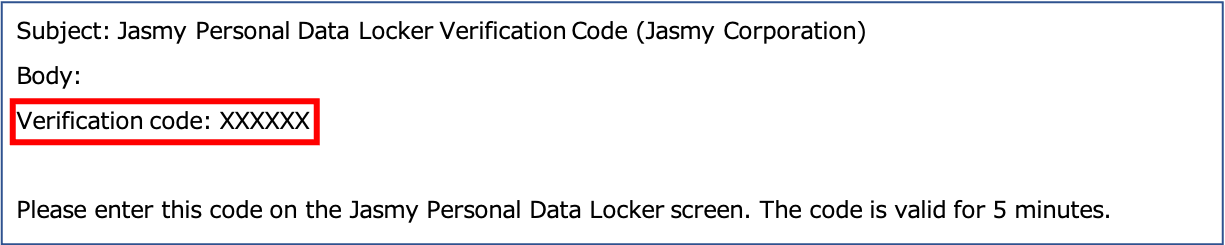
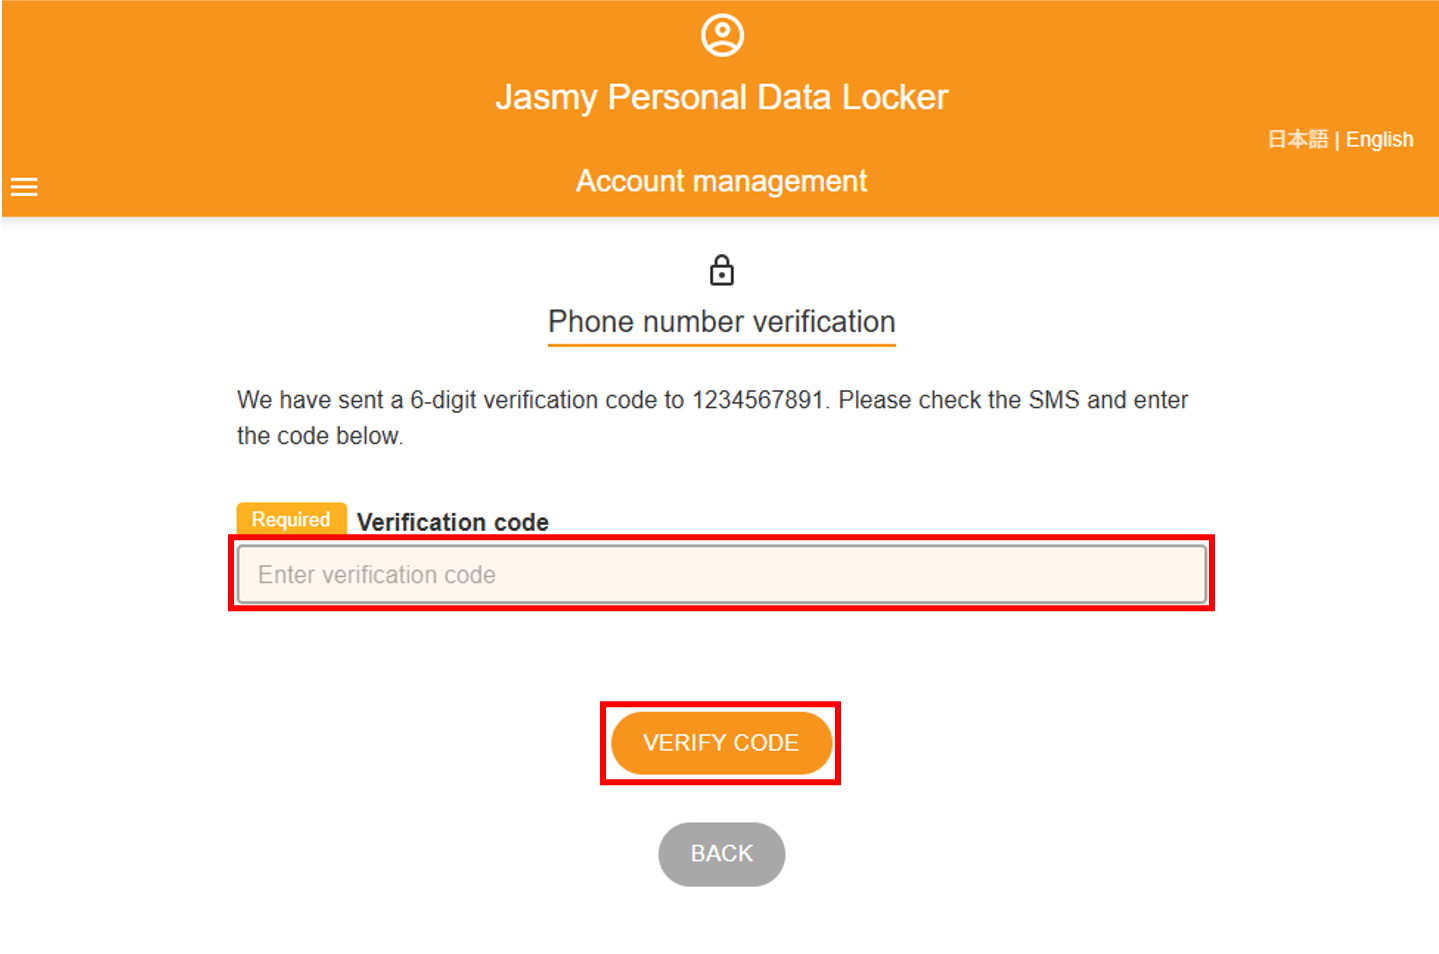
The “Enter Verification Code” screen will appear.
③Enter the “Verification code” and click the “VERIFY CODE” button.
A message confirming that your phone number has been verified will appear.
The next time you log in, a verification code will be sent via SMS to your phone number.

①Go to the sign in URL.
https://user.datalocker.jasmy.co.jp/?lang=en
②On the “Sign in” screen, click the “SIGN IN” button.
The “Login” screen will appear.
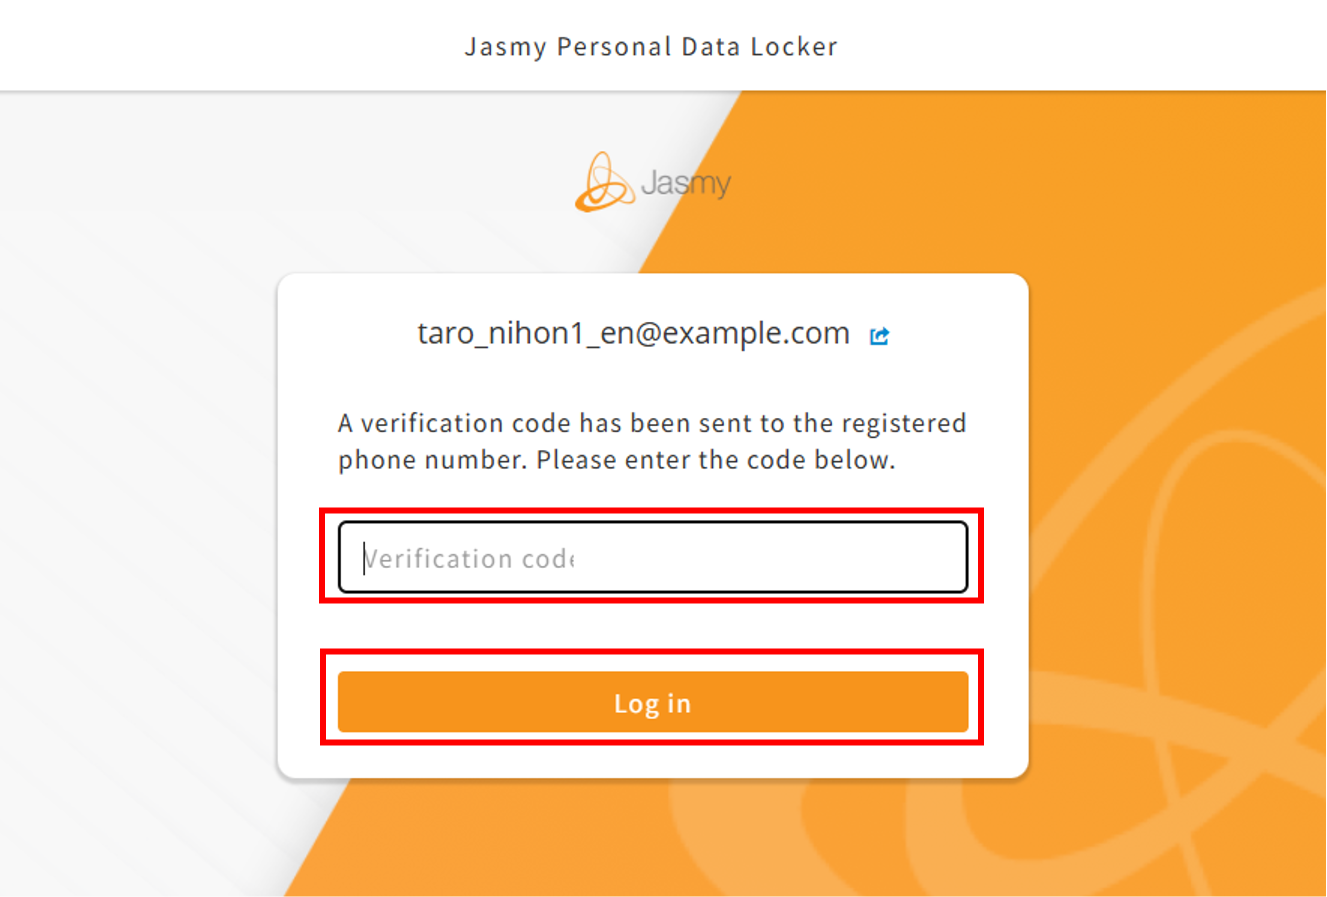
③Enter your “Email address” and “Password,” then click the “Log in” button.
A verification code will be sent via SMS to the registered phone number.
The “Enter Verification Code” screen will appear.
④Enter the “verification code” and click the “Log in” button.
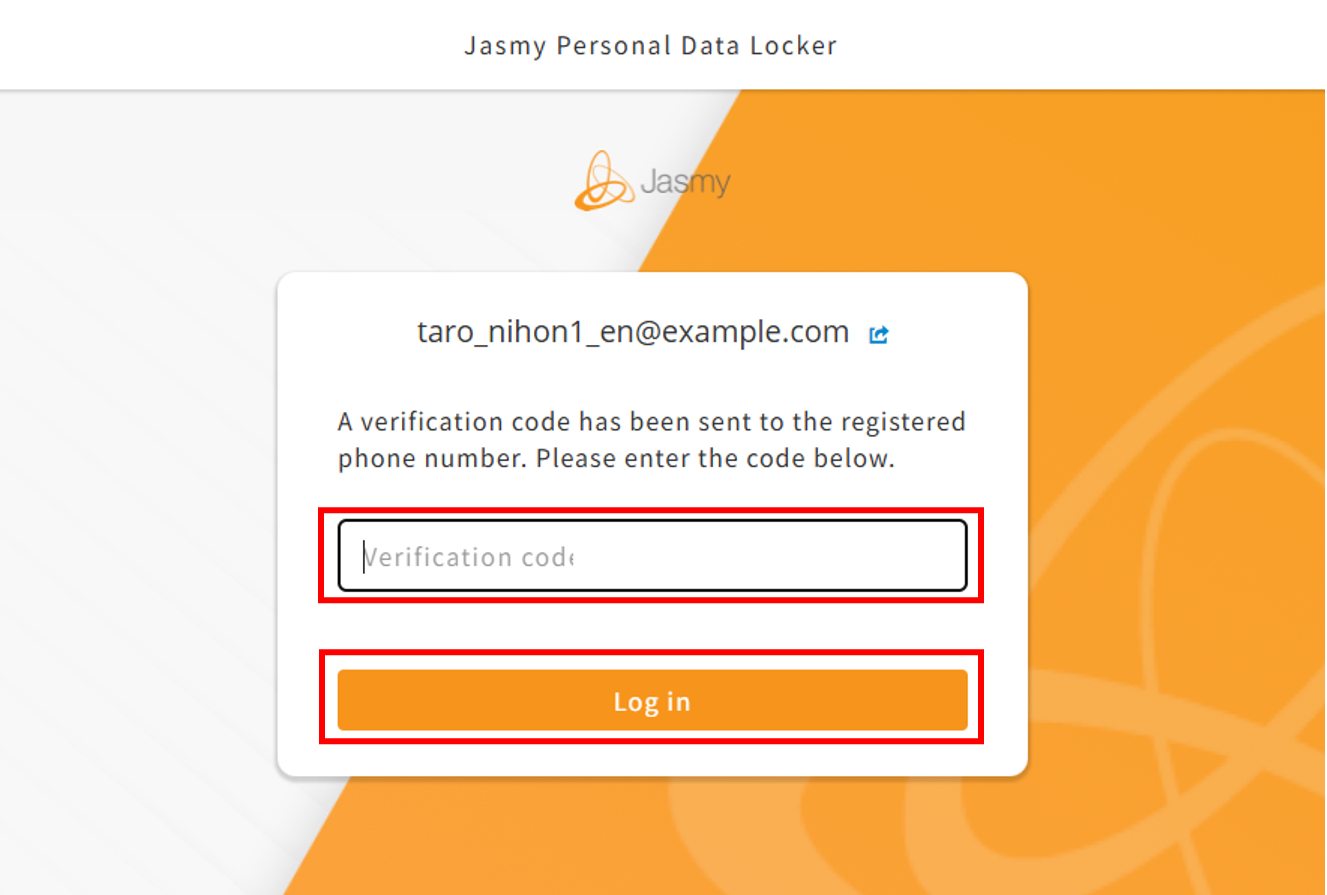
The “Home” screen will appear.
(Note)
If you navigate to another page without verifying the confirmation code, or if the 5-minute validity period for the confirmation code expires,
On the screen, the box next to “Send verification code by SMS to phone number” is checked, but
Since your phone number has not been verified, two-factor authentication via SMS has not been enabled, and you are currently logging in using your email address and password.

If you would like to enable two-factor authentication via SMS, please go to your authentication settings during login and
By setting it to “Do not send verification code” and then resetting it to “Send verification code by SMS to phone number,”
You will be redirected to the phone number verification screen. Please follow the instructions to verify your phone number.
11.2.2.Send verification code by email
If you want to send a verification code via email, please follow these steps to set it up.
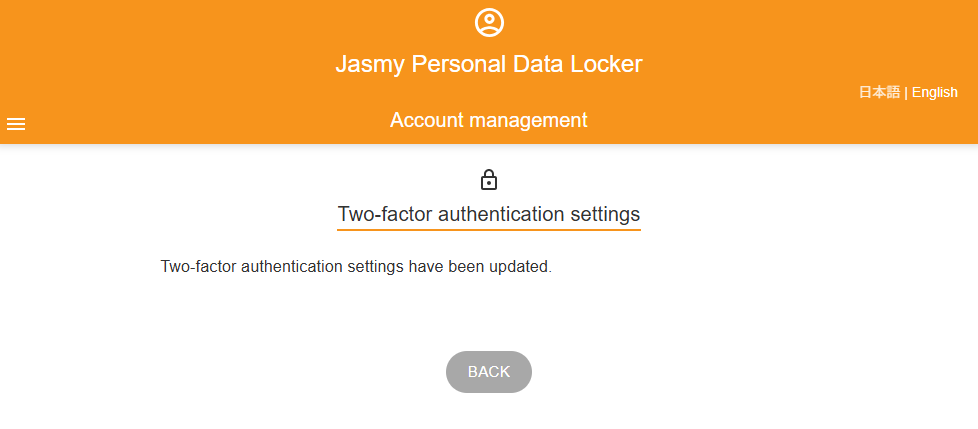
①Select “Send verification code by email” and click the “SET” button.
A message will appear indicating that the authentication settings for login have been changed.
The next time you log in, a verification code will be sent to the email address you used to log in.
①Go to the sign in URL.
https://user.datalocker.jasmy.co.jp/?lang=en
②On the “Sign in” screen, click the “SIGN IN” button.
The “Login” screen will appear.
③Enter your “Email address” and “Password,” then click the “Log in” button.
A verification code will be sent to the email address you provided.
The “Enter Verification Code” screen will appear.
④Enter the “verification code” and click the “Log in” button.
The “Home” screen will appear.
11.2.3.Do not send verification code
If you have not configured authentication settings, please follow these steps to do so.
By default, the setting is configured not to send a confirmation code.
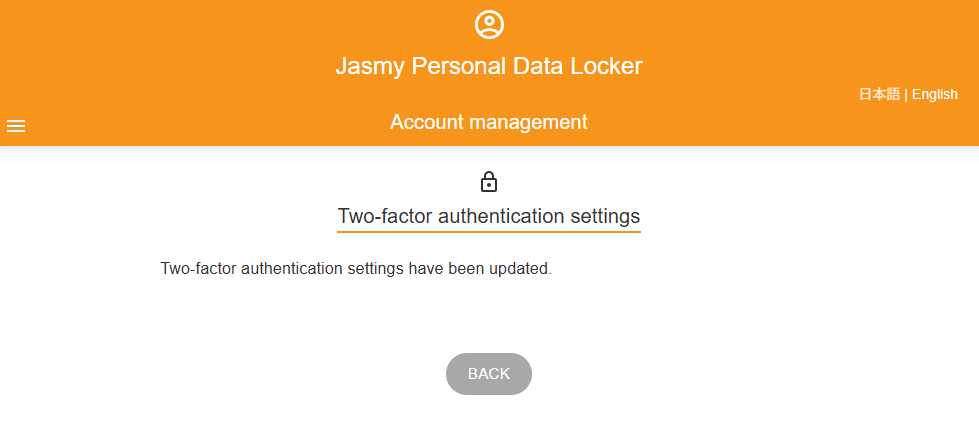
①Select “Do not send verification code” and click the “SET” button.
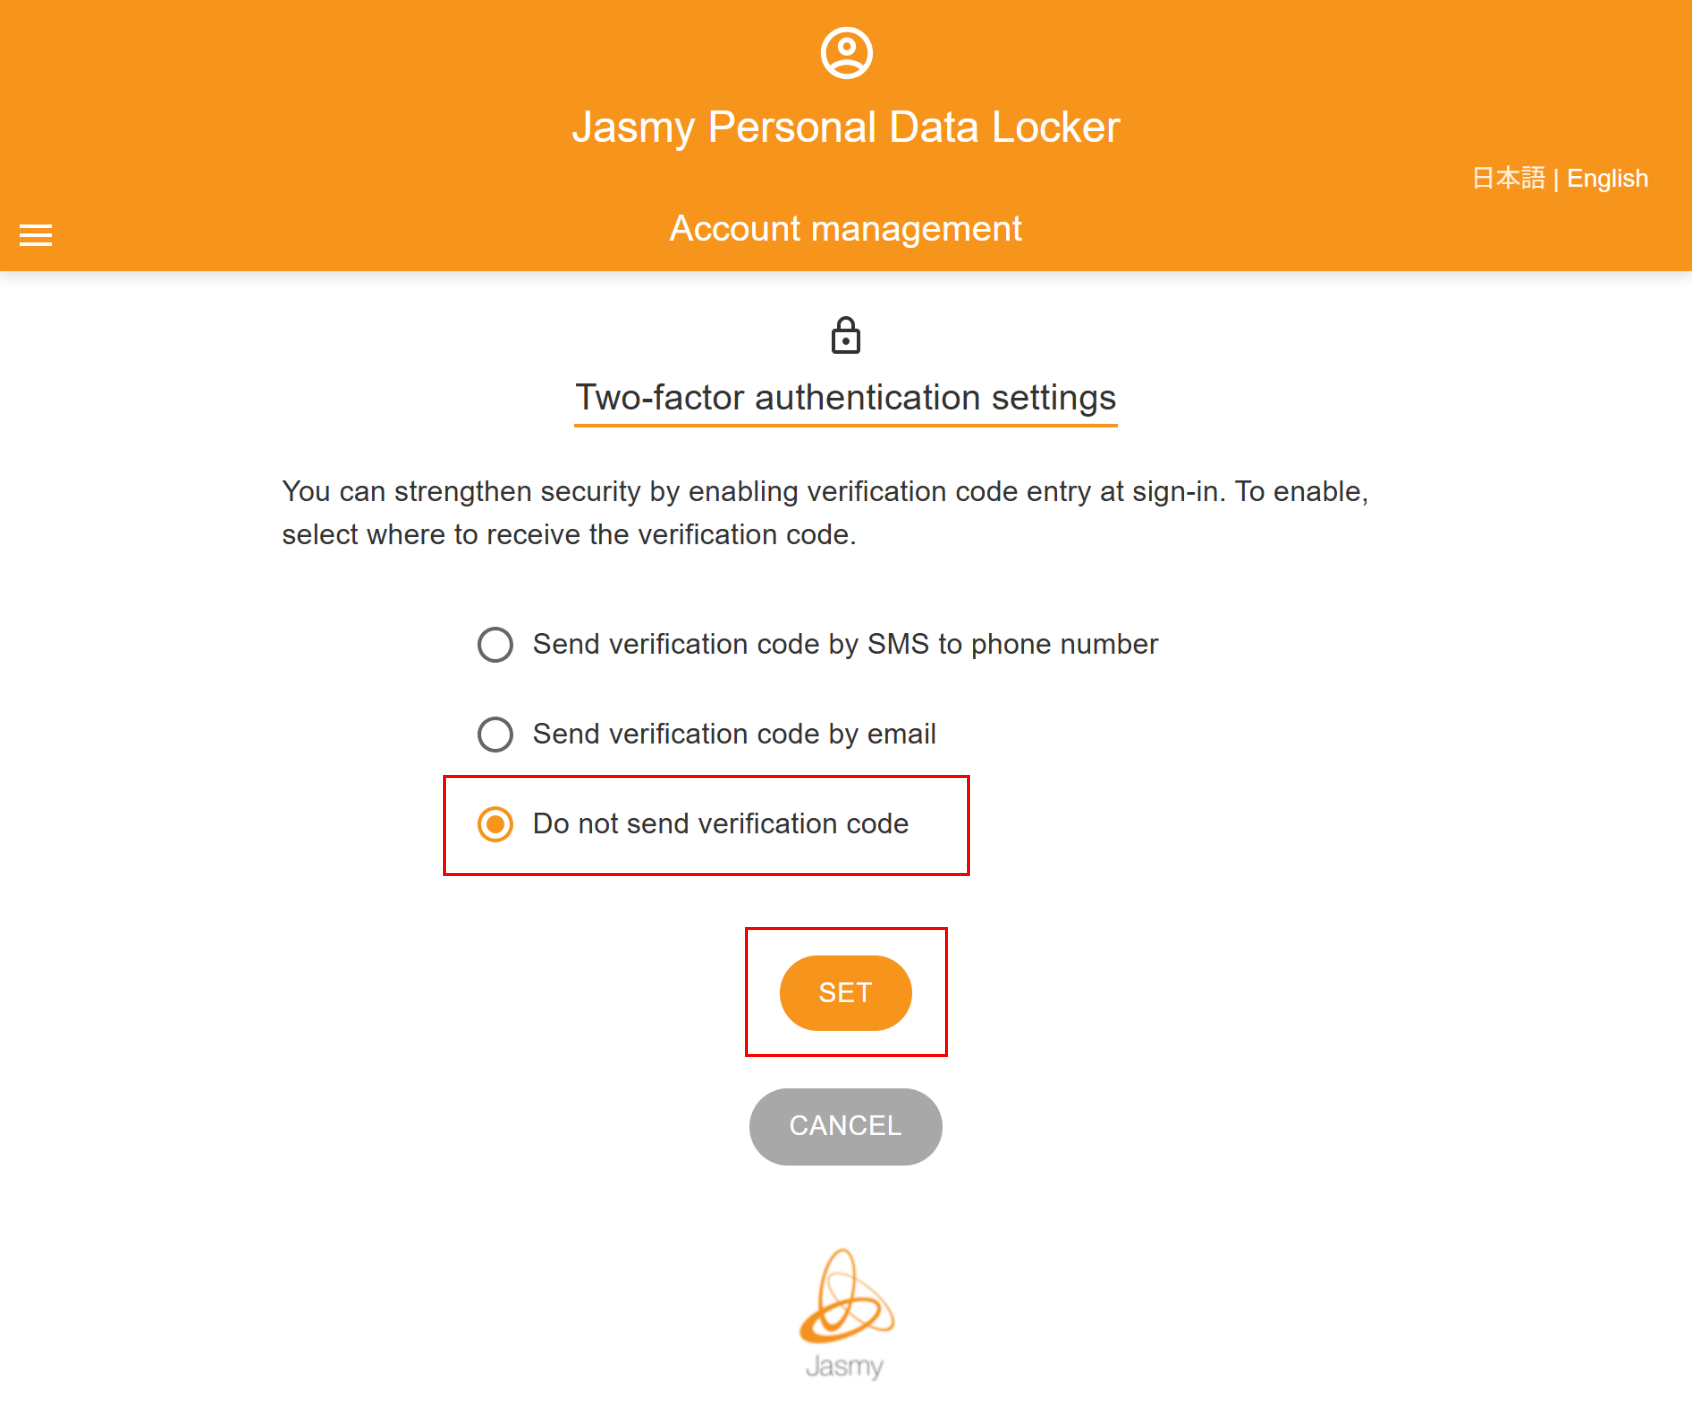
A message will appear indicating that the authentication settings for sign in have been changed.
You will no longer need a verification code the next time you sign in.
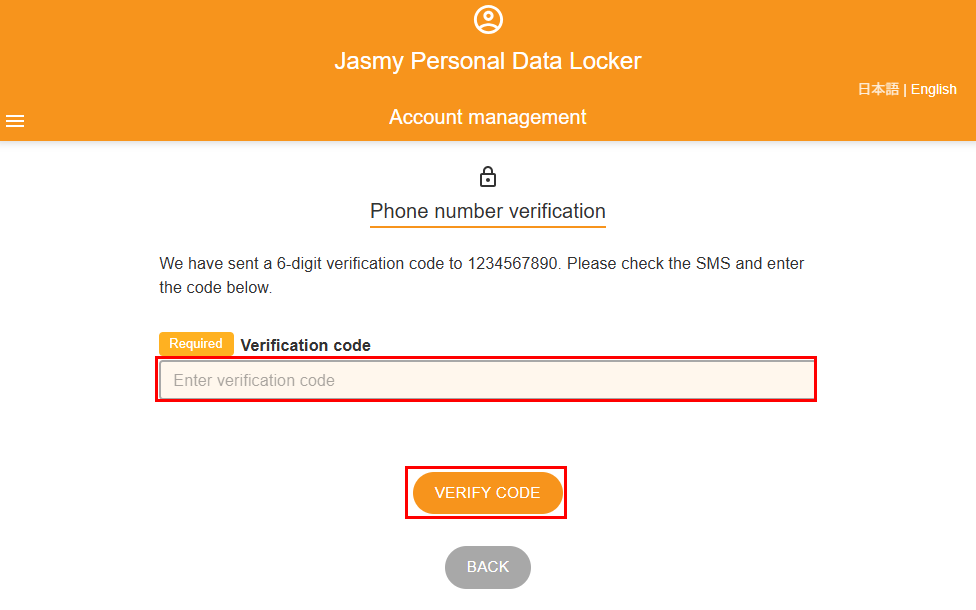
11.3.Phone number verification
You can verify the validity of your registered phone number.
①From the menu screen, tap “Security settings” to open the submenu, then tap “Phone number verification”
The “Phone number verification” screen will appear.
②Verify that the registered phone number is correct, then click the “SEND VERIFICATION CODE” button.
A verification code will be sent via SMS to the registered phone number.
If you haven’t received it after more than 5 minutes, we apologize for the inconvenience, but please re-enter your phone number.
The “Enter Verification Code” screen will appear.
③Enter the “verification code” and click the “VERIFY CODE” button.
A message confirming that your phone number has been verified will appear.

12.1.Email address settings
You can view or change your currently registered email address.
①From the menu screen, tap “Account” to open the submenu, then tap “Email address”
You can check your currently registered email address.
②To change your email address, click the “CHANGE EMAIL ADDRESS” button.
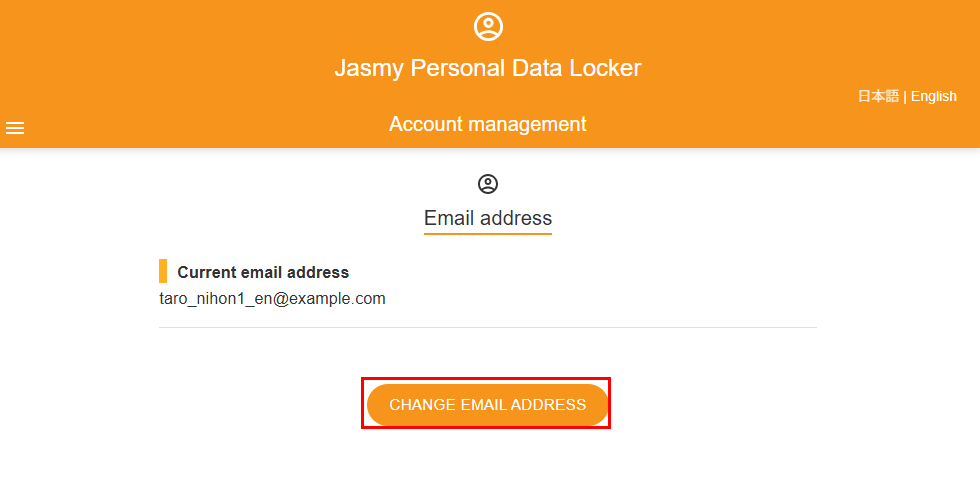
The “Change email address” screen will appear.
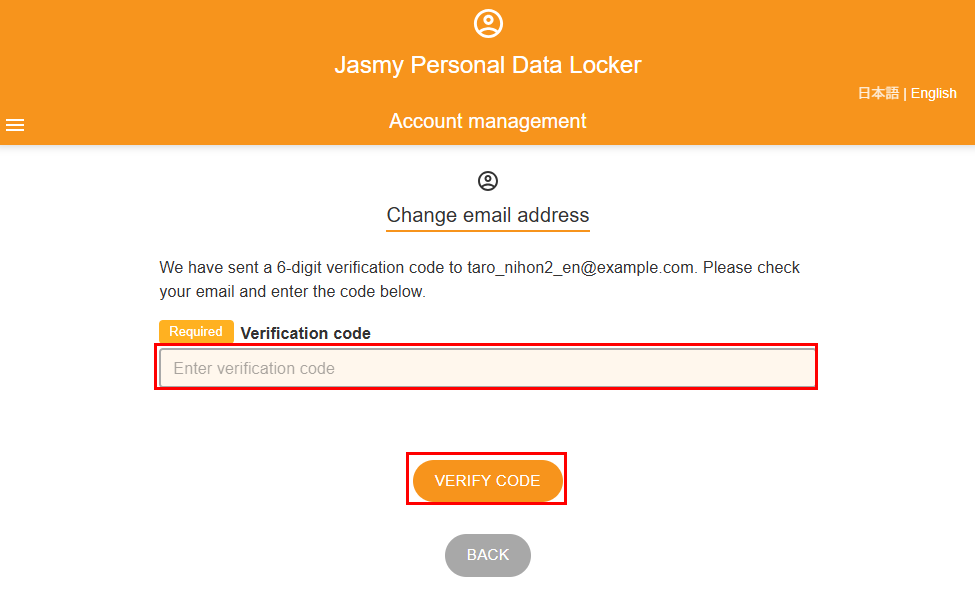
③Enter your “New email address” and “Password,” then click the “SEND VERIFICATION CODE” button.
You can view the password you entered by clicking here.
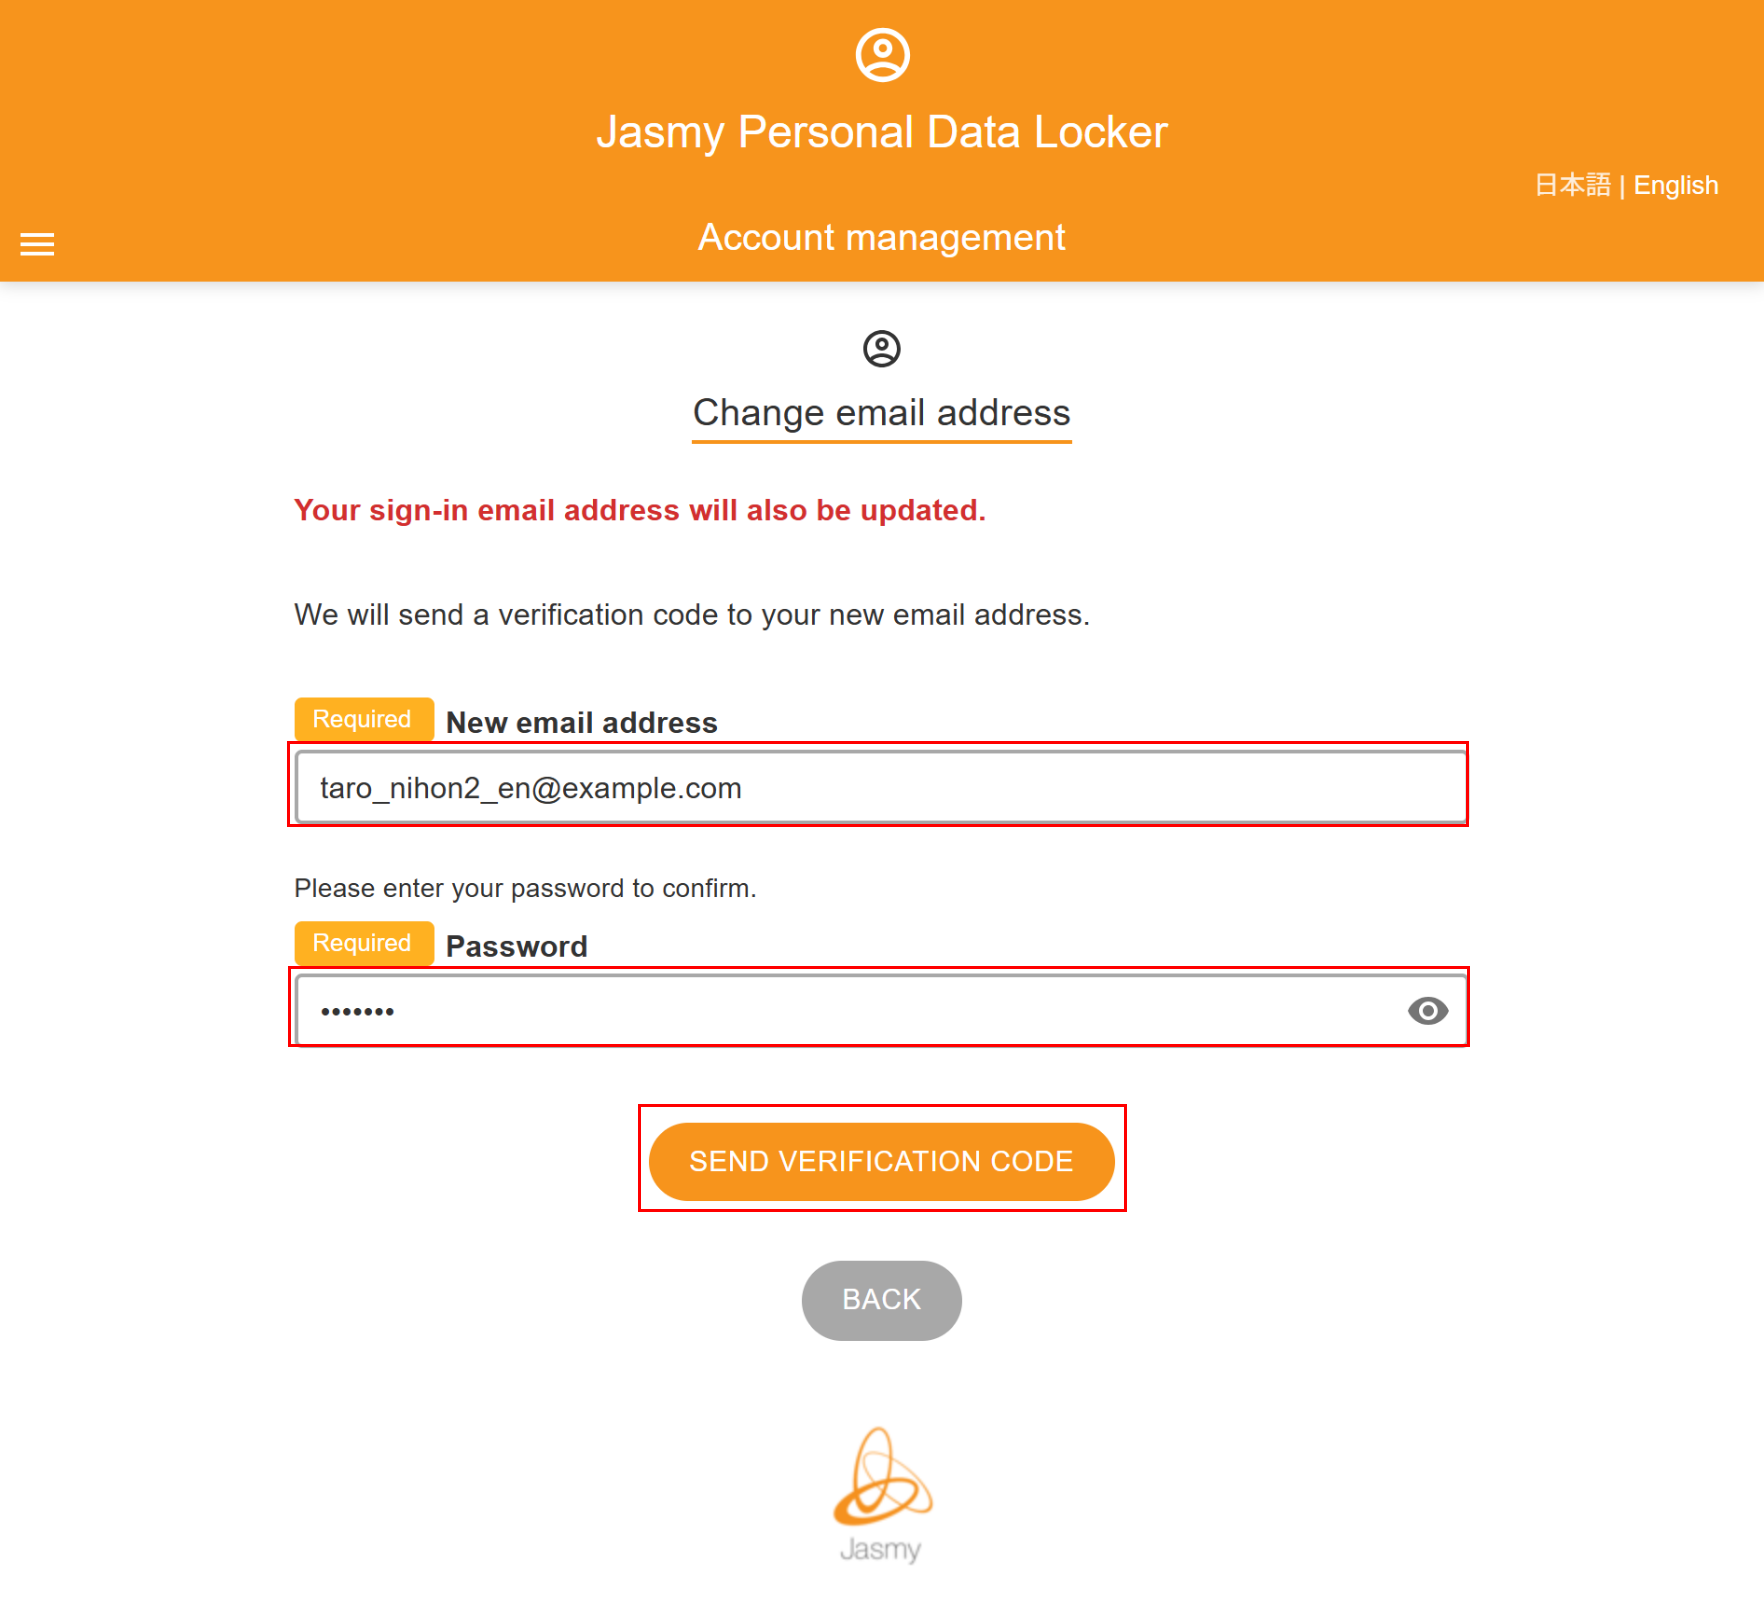
A confirmation code will be sent to your new email address.
If you haven’t received it after more than 5 minutes, we apologize for the inconvenience, but please go to the “Change email address” page and enter your email address again.
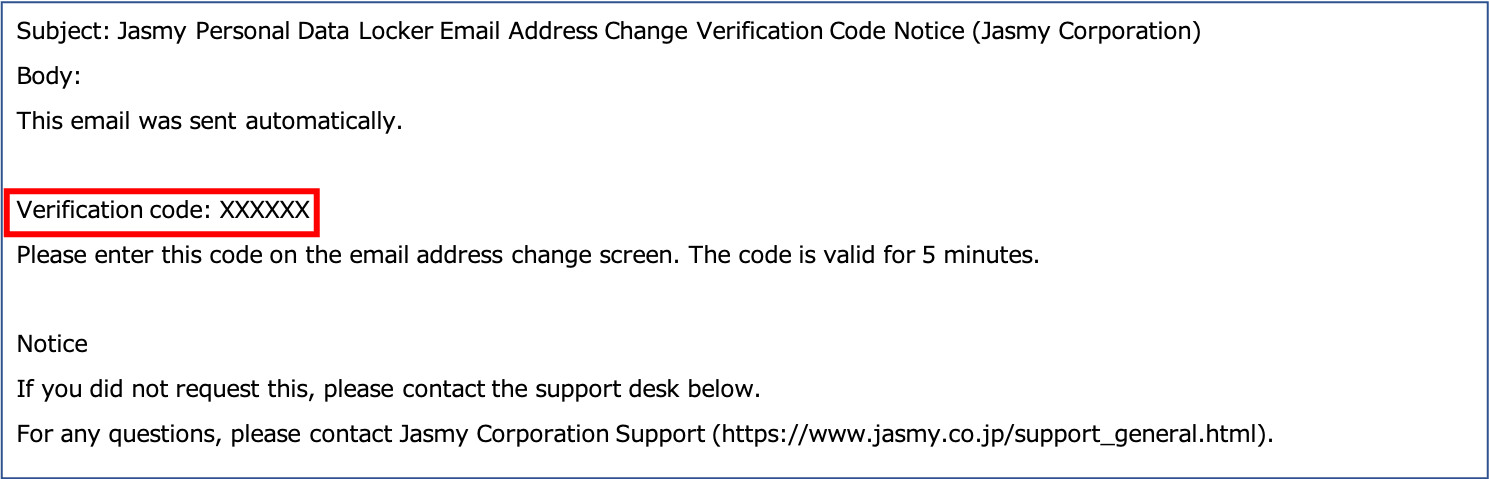
The “Enter Verification Code” screen will appear.
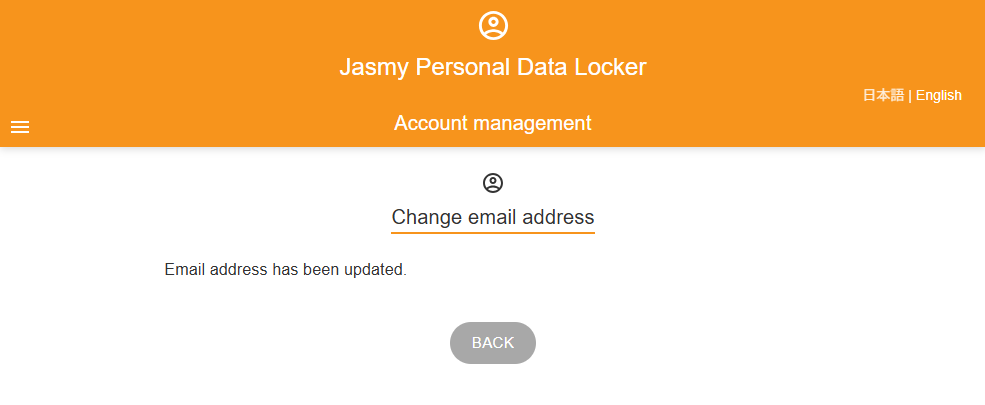
④Enter the “verification code” and click the “VERIFY CODE” button.
A message will appear confirming that your email address has been updated.
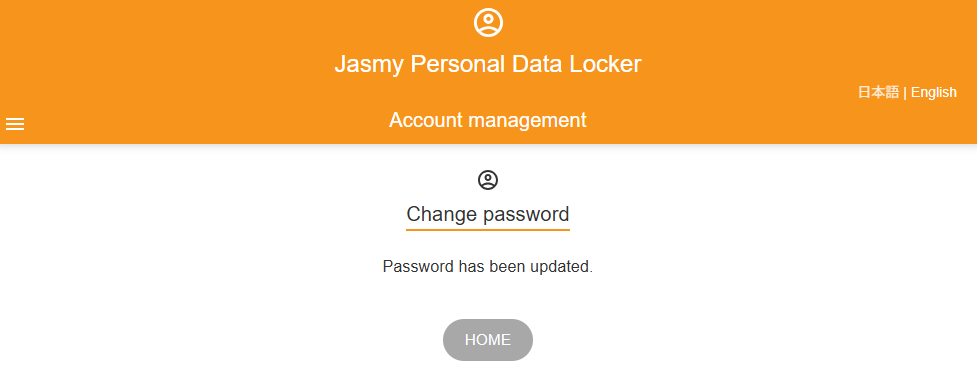
12.2.Change password
Enter your current password and set a new one.
①From the menu screen, tap “Account settings” to open the submenu, then tap “Change password”
The “Change password” screen will appear.
②Enter your “Current password”, “New password”, and “New password (confirm)” and
Click the “CHANGE PASSWORD” button.
You can view the password you entered by clicking the button.
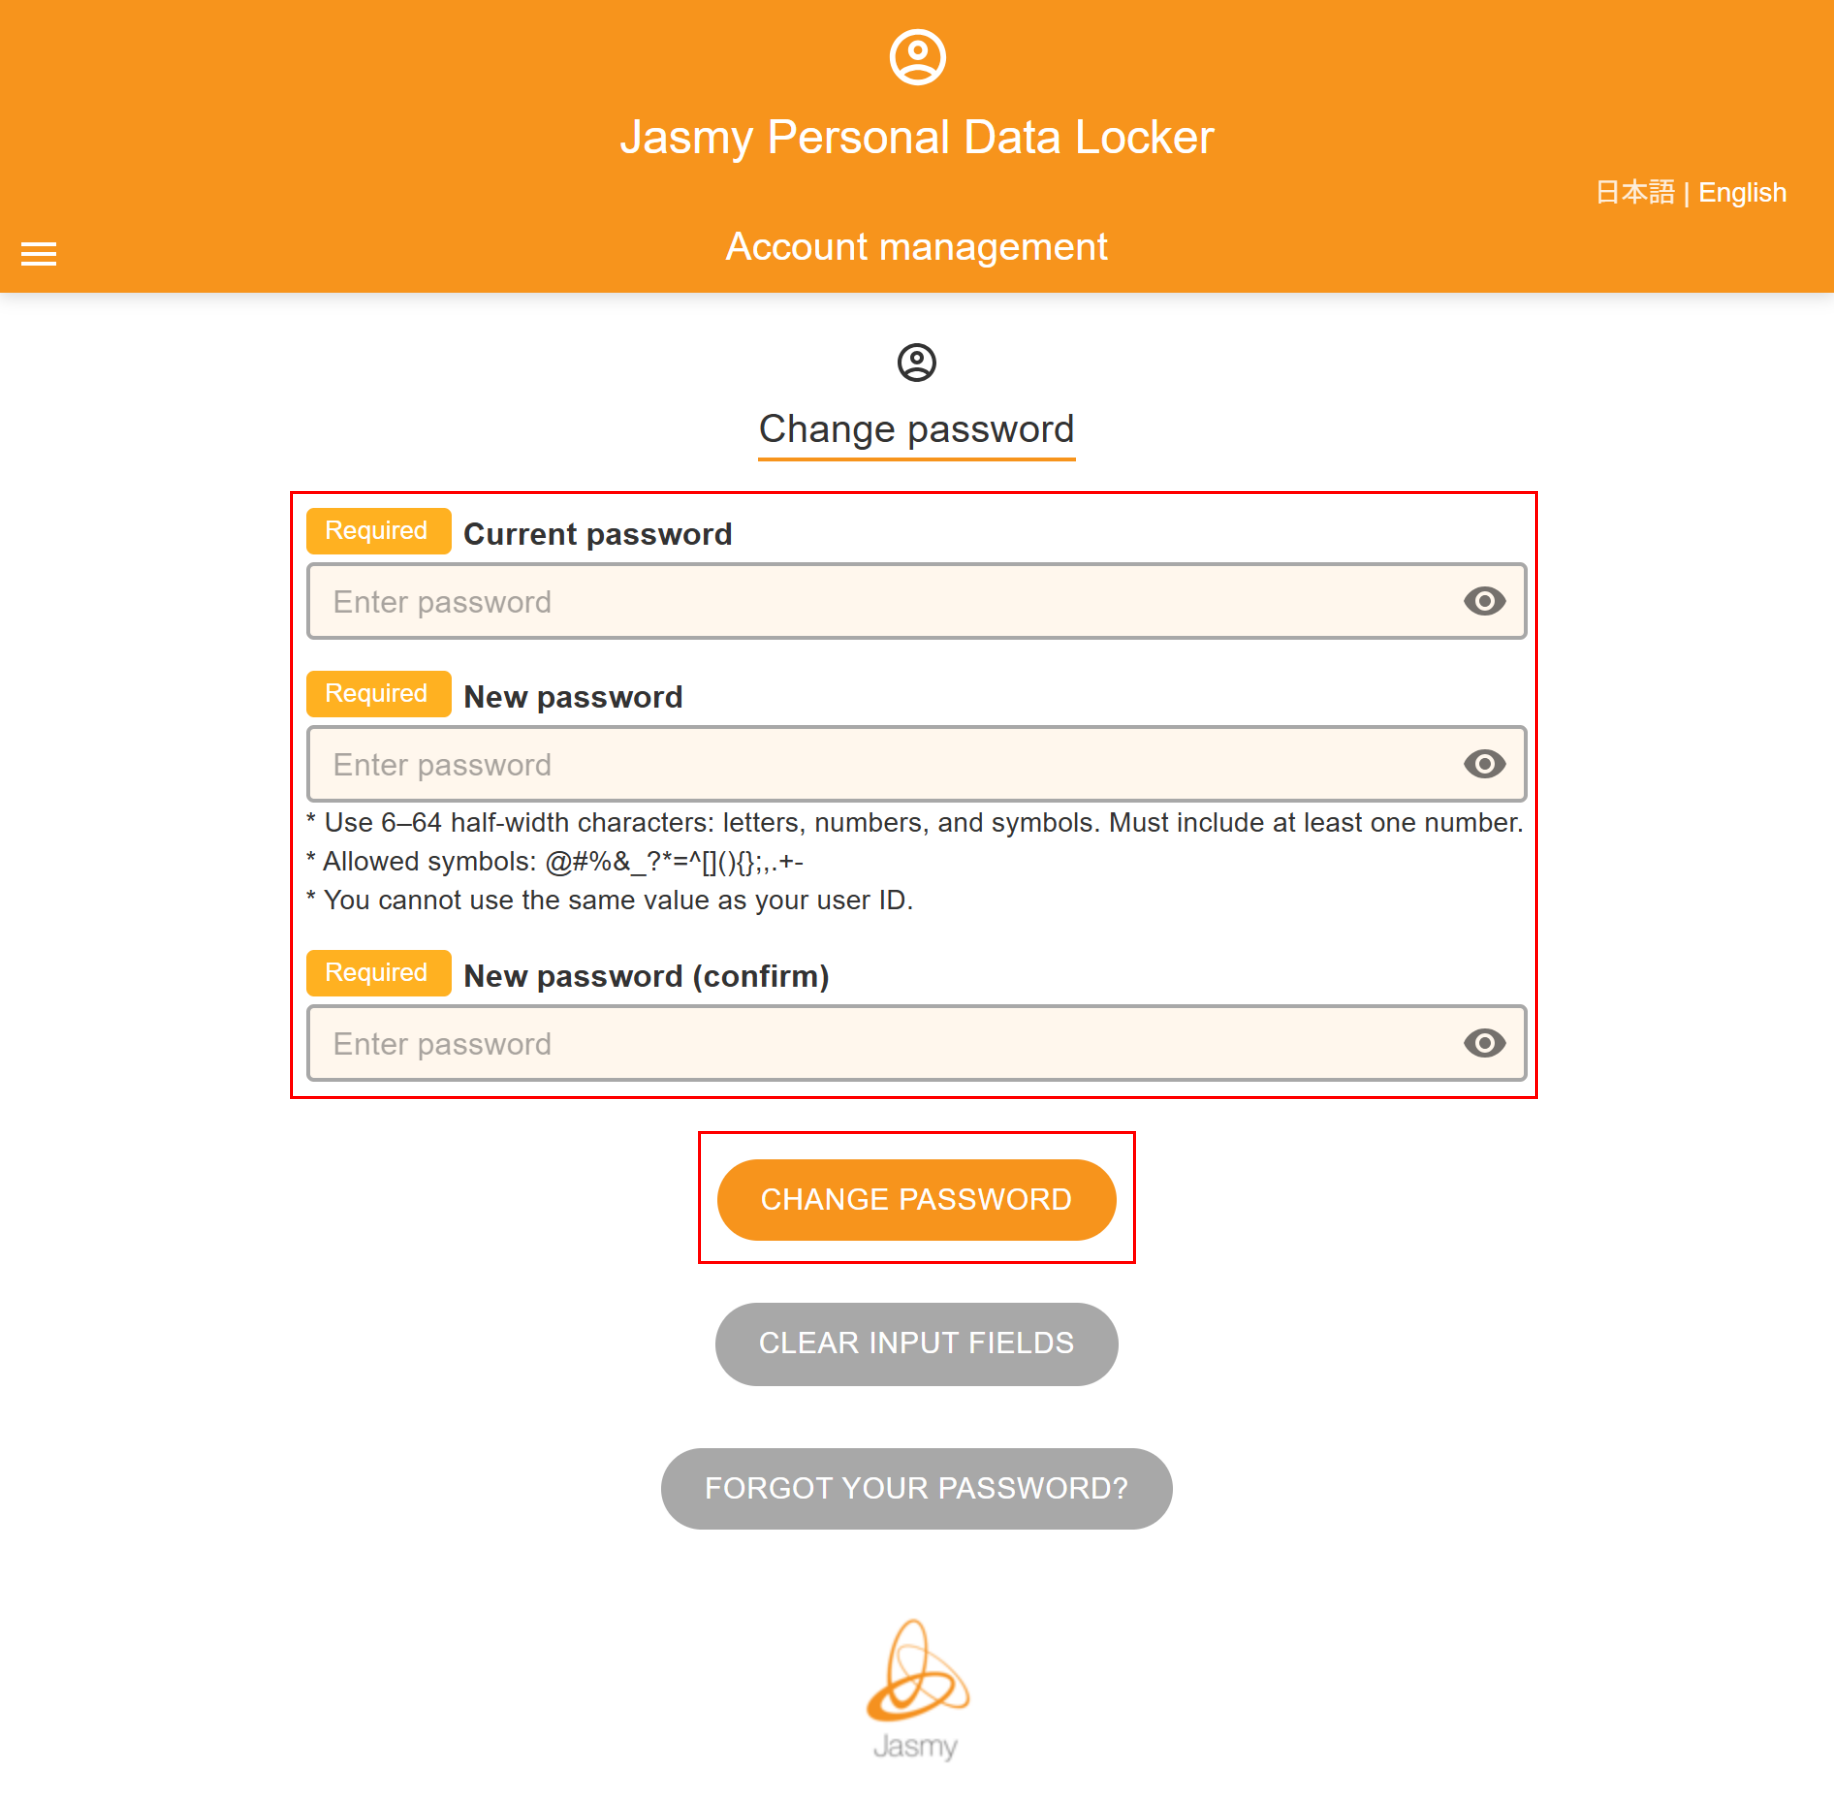
A message will appear confirming that your password has been changed.
12.3.Account closure request
You can unsubscribe from Jasmy Personal Data Locker through the account management app.
①From the menu screen, tap “Account settings” to open the submenu, then tap “Account closure request”
The “Account closure request” screen will appear.
②Please review the notes in red; if there are no issues,
Check the “Agreement” checkbox on the left side of the notice, then click the “SEND LINK TO CLOSE ACCOUNT” button.
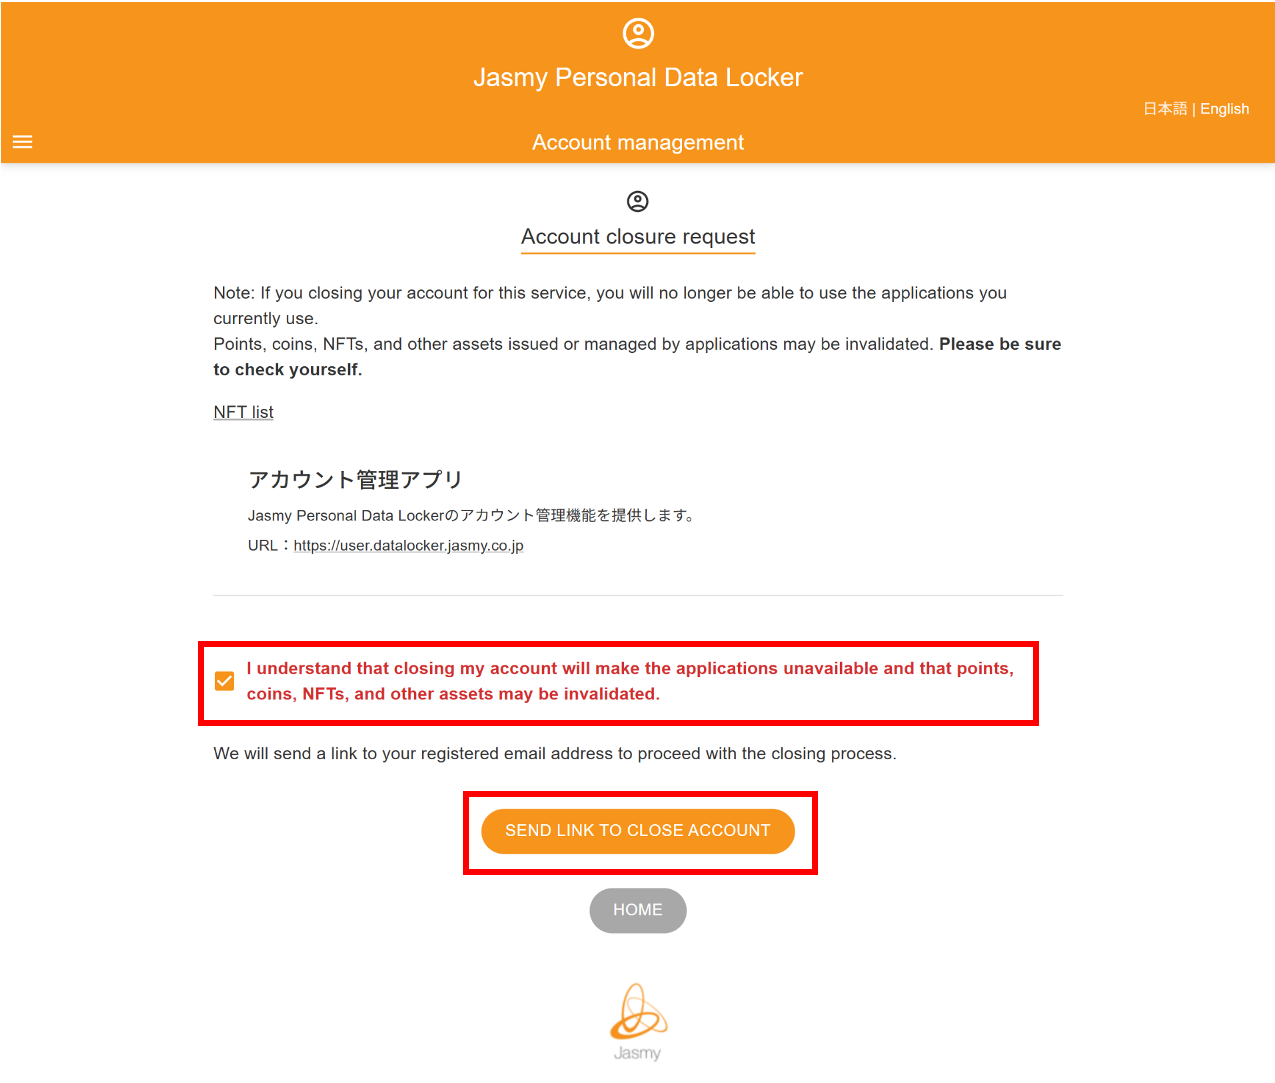
An email containing instructions for canceling your subscription will be sent to the registered email address.
If you haven’t received the email after a few hours,
Please check to see if emails from the jasmy.co.jp domain are being blocked,
Please check your spam folder. If you still can’t find it,
We apologize for the inconvenience, but
Please go through the cancellation process again.
③Go to the URL provided in the email notifying you of the cancellation process.
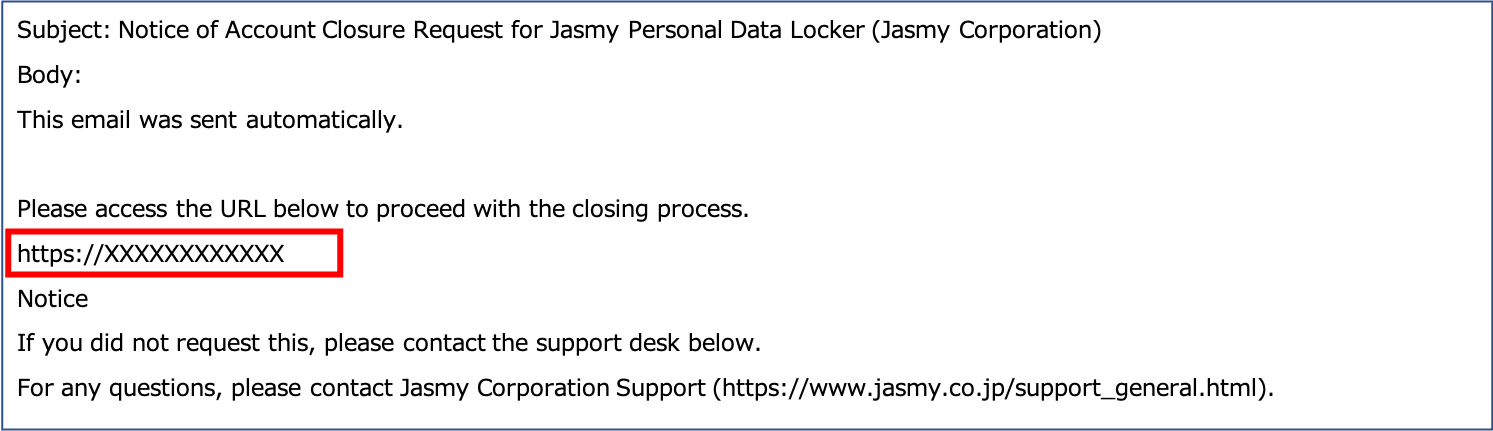
The “Confirm Account Closure” screen will appear.
④Click the “SUBMIT REQUEST” button.
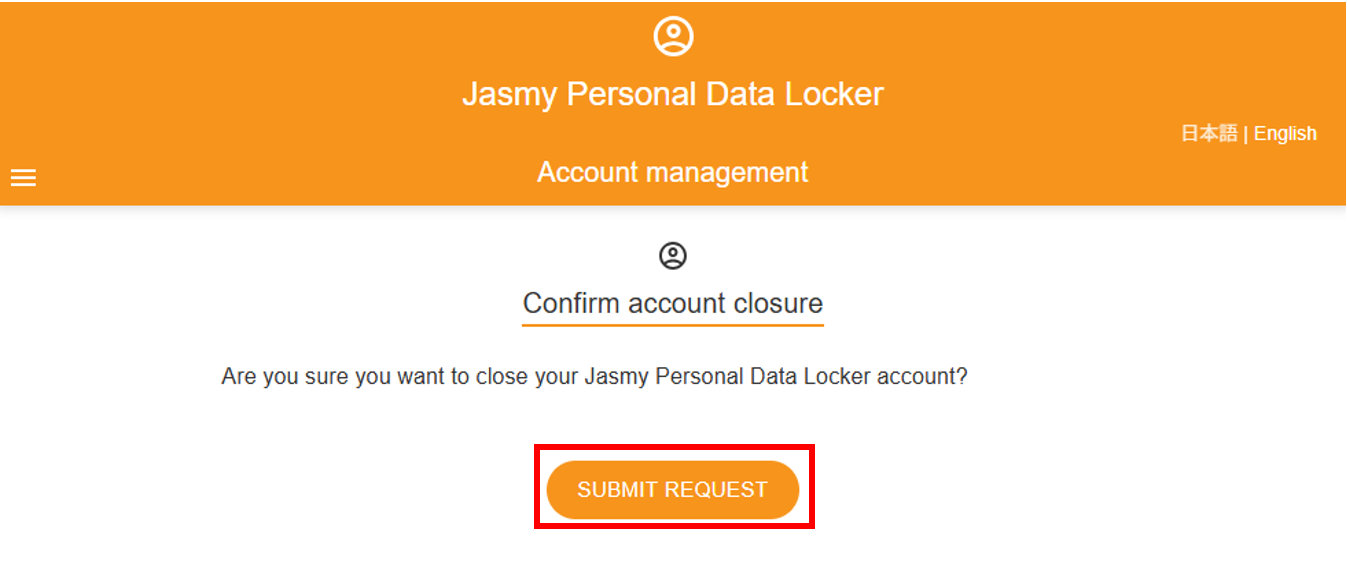
The “Account closure request completed” screen will appear.
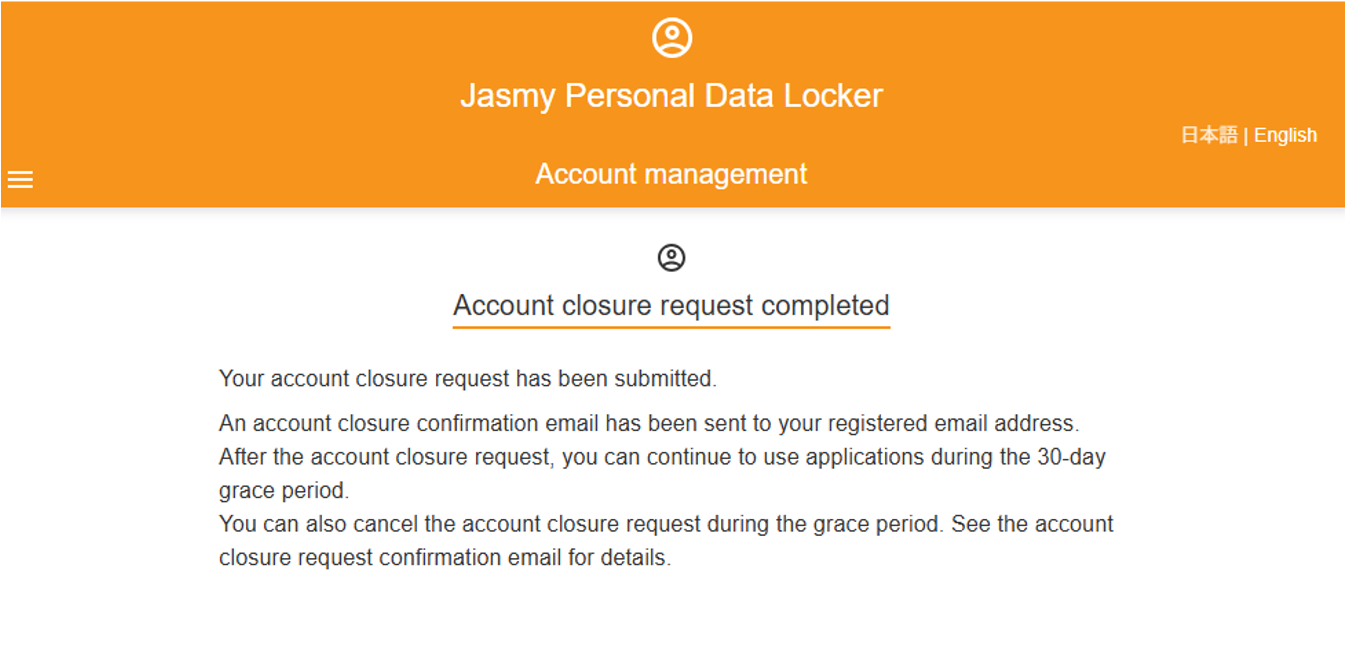
An email confirming your cancellation will be sent to the email address on file.
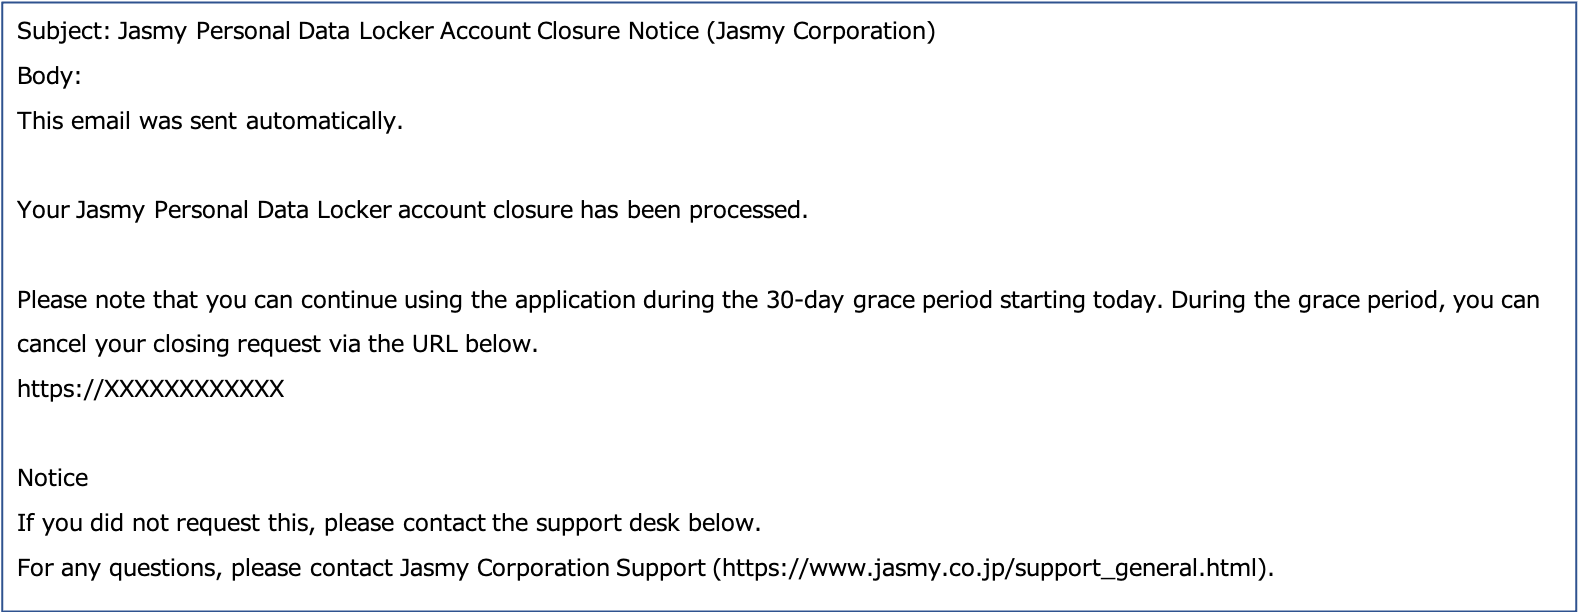
You can cancel your subscription within 30 days of canceling your membership.
You cannot register a new account until 30 days have passed.
If you wish to register, please cancel your cancellation.
Click here to learn how to cancel your membership
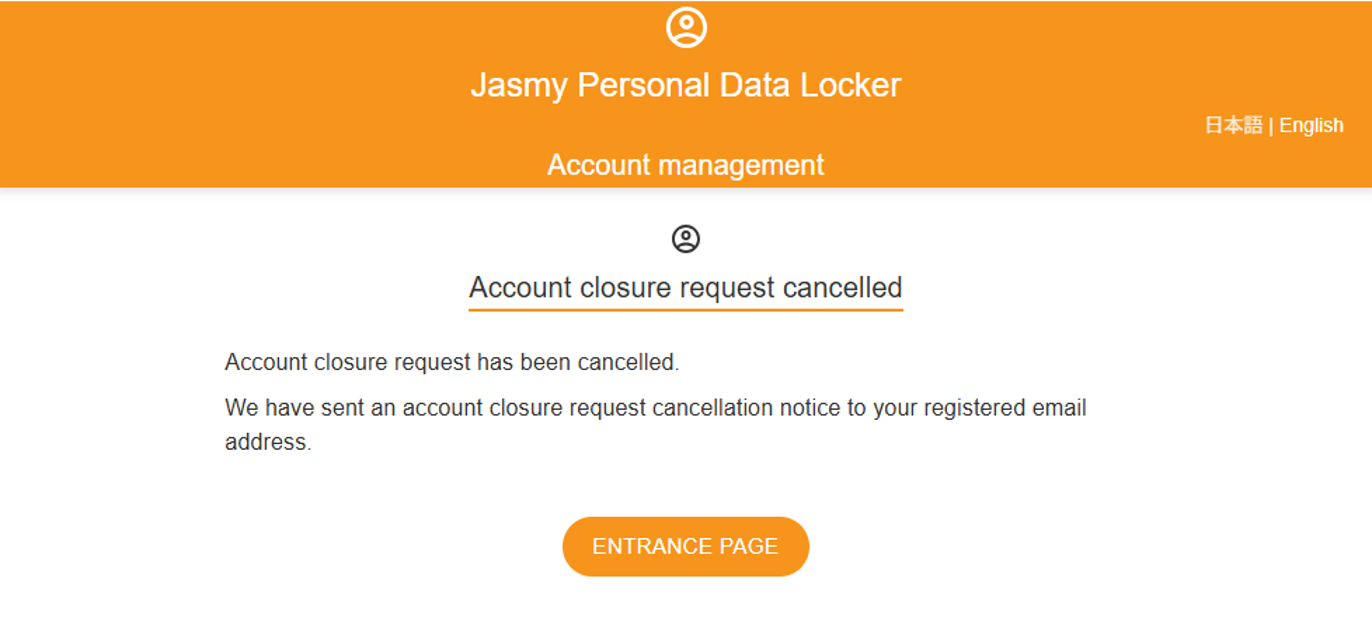
12.3.1.Account closure request cancel
You can cancel your cancellation within 30 days of completing the cancellation process.
①Go to the URL provided in the email confirming your cancellation.
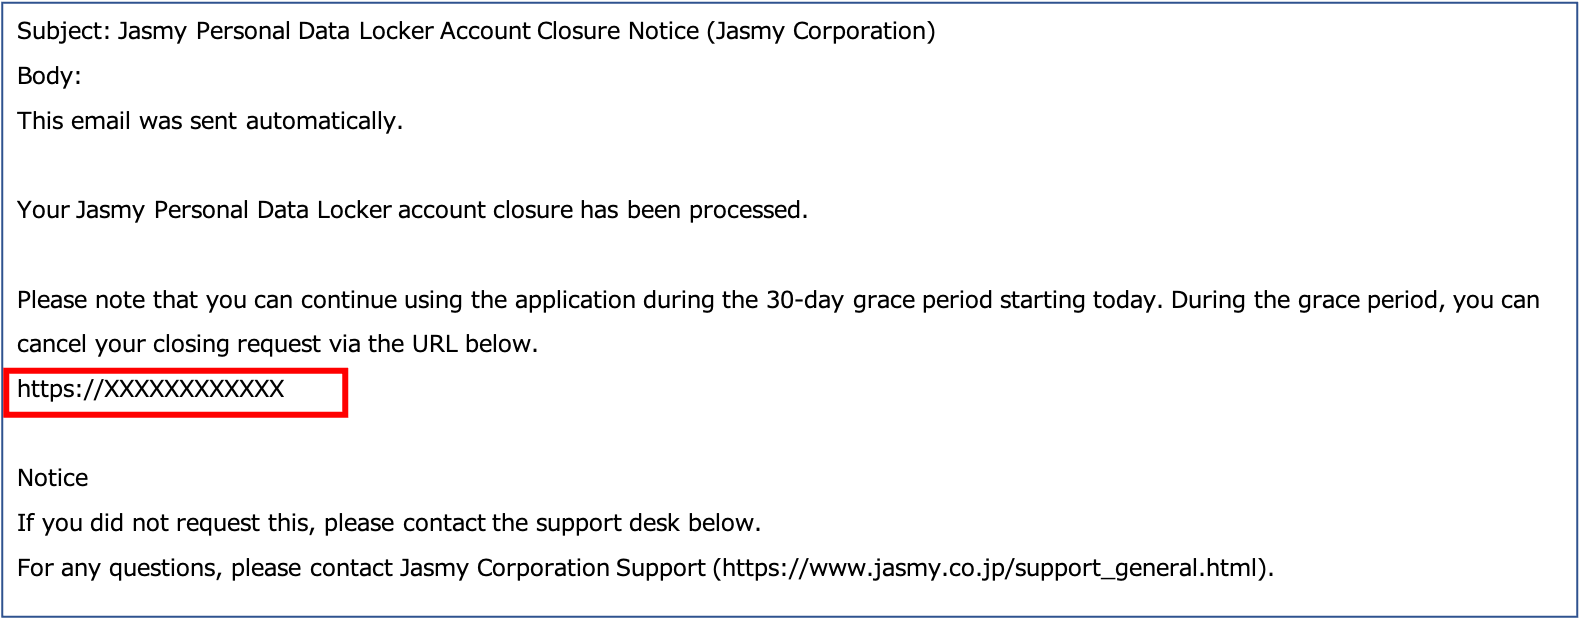
The “Confirm Cancellation” screen will appear.
②Click the “CANCEL REQUEST” button.
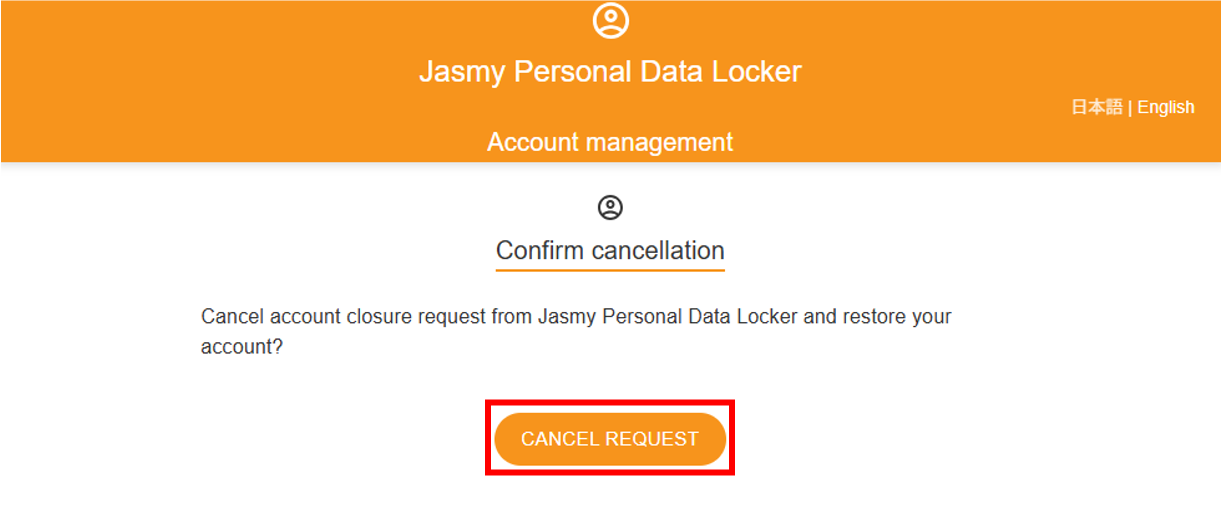
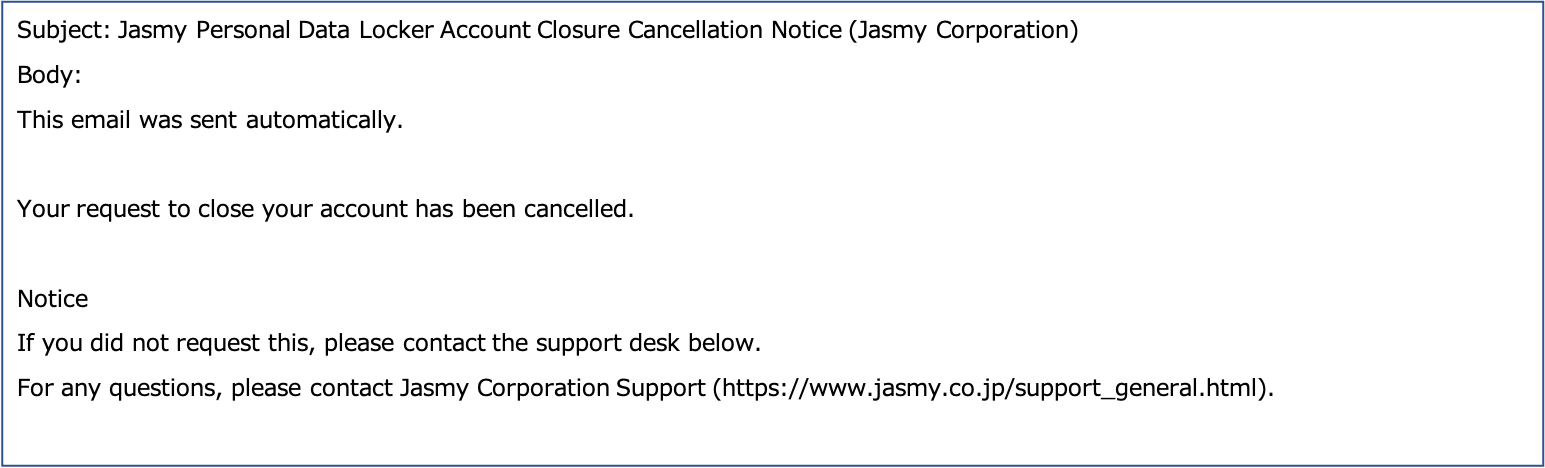
The “Account closure request canceled” screen will appear.
An email containing instructions for canceling your subscription will be sent to the registered email address.
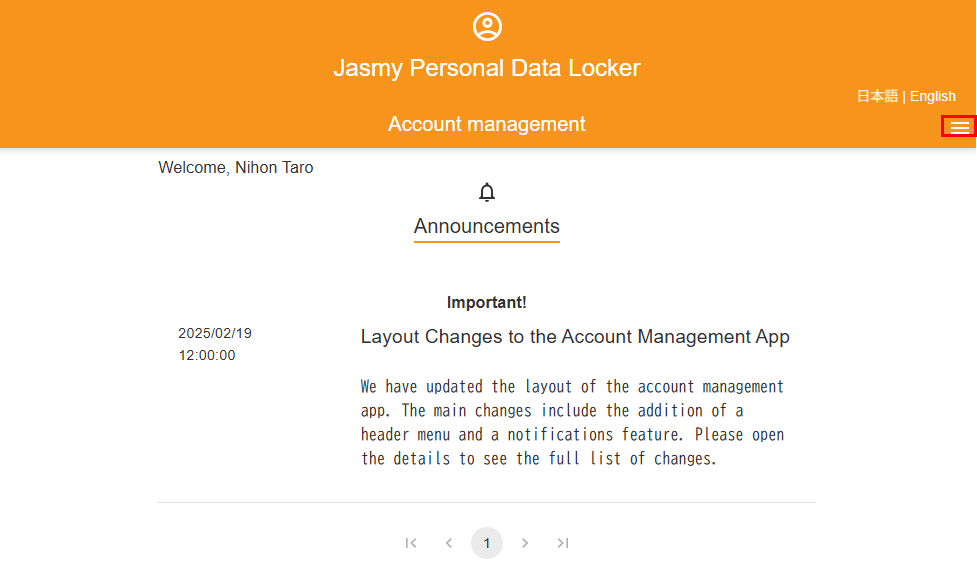
12.4.Menu position
You can change the menu location in the account management app.
①From the menu screen, tap “Account settings” to open the submenu, then tap the toggle next to “Menu position.”
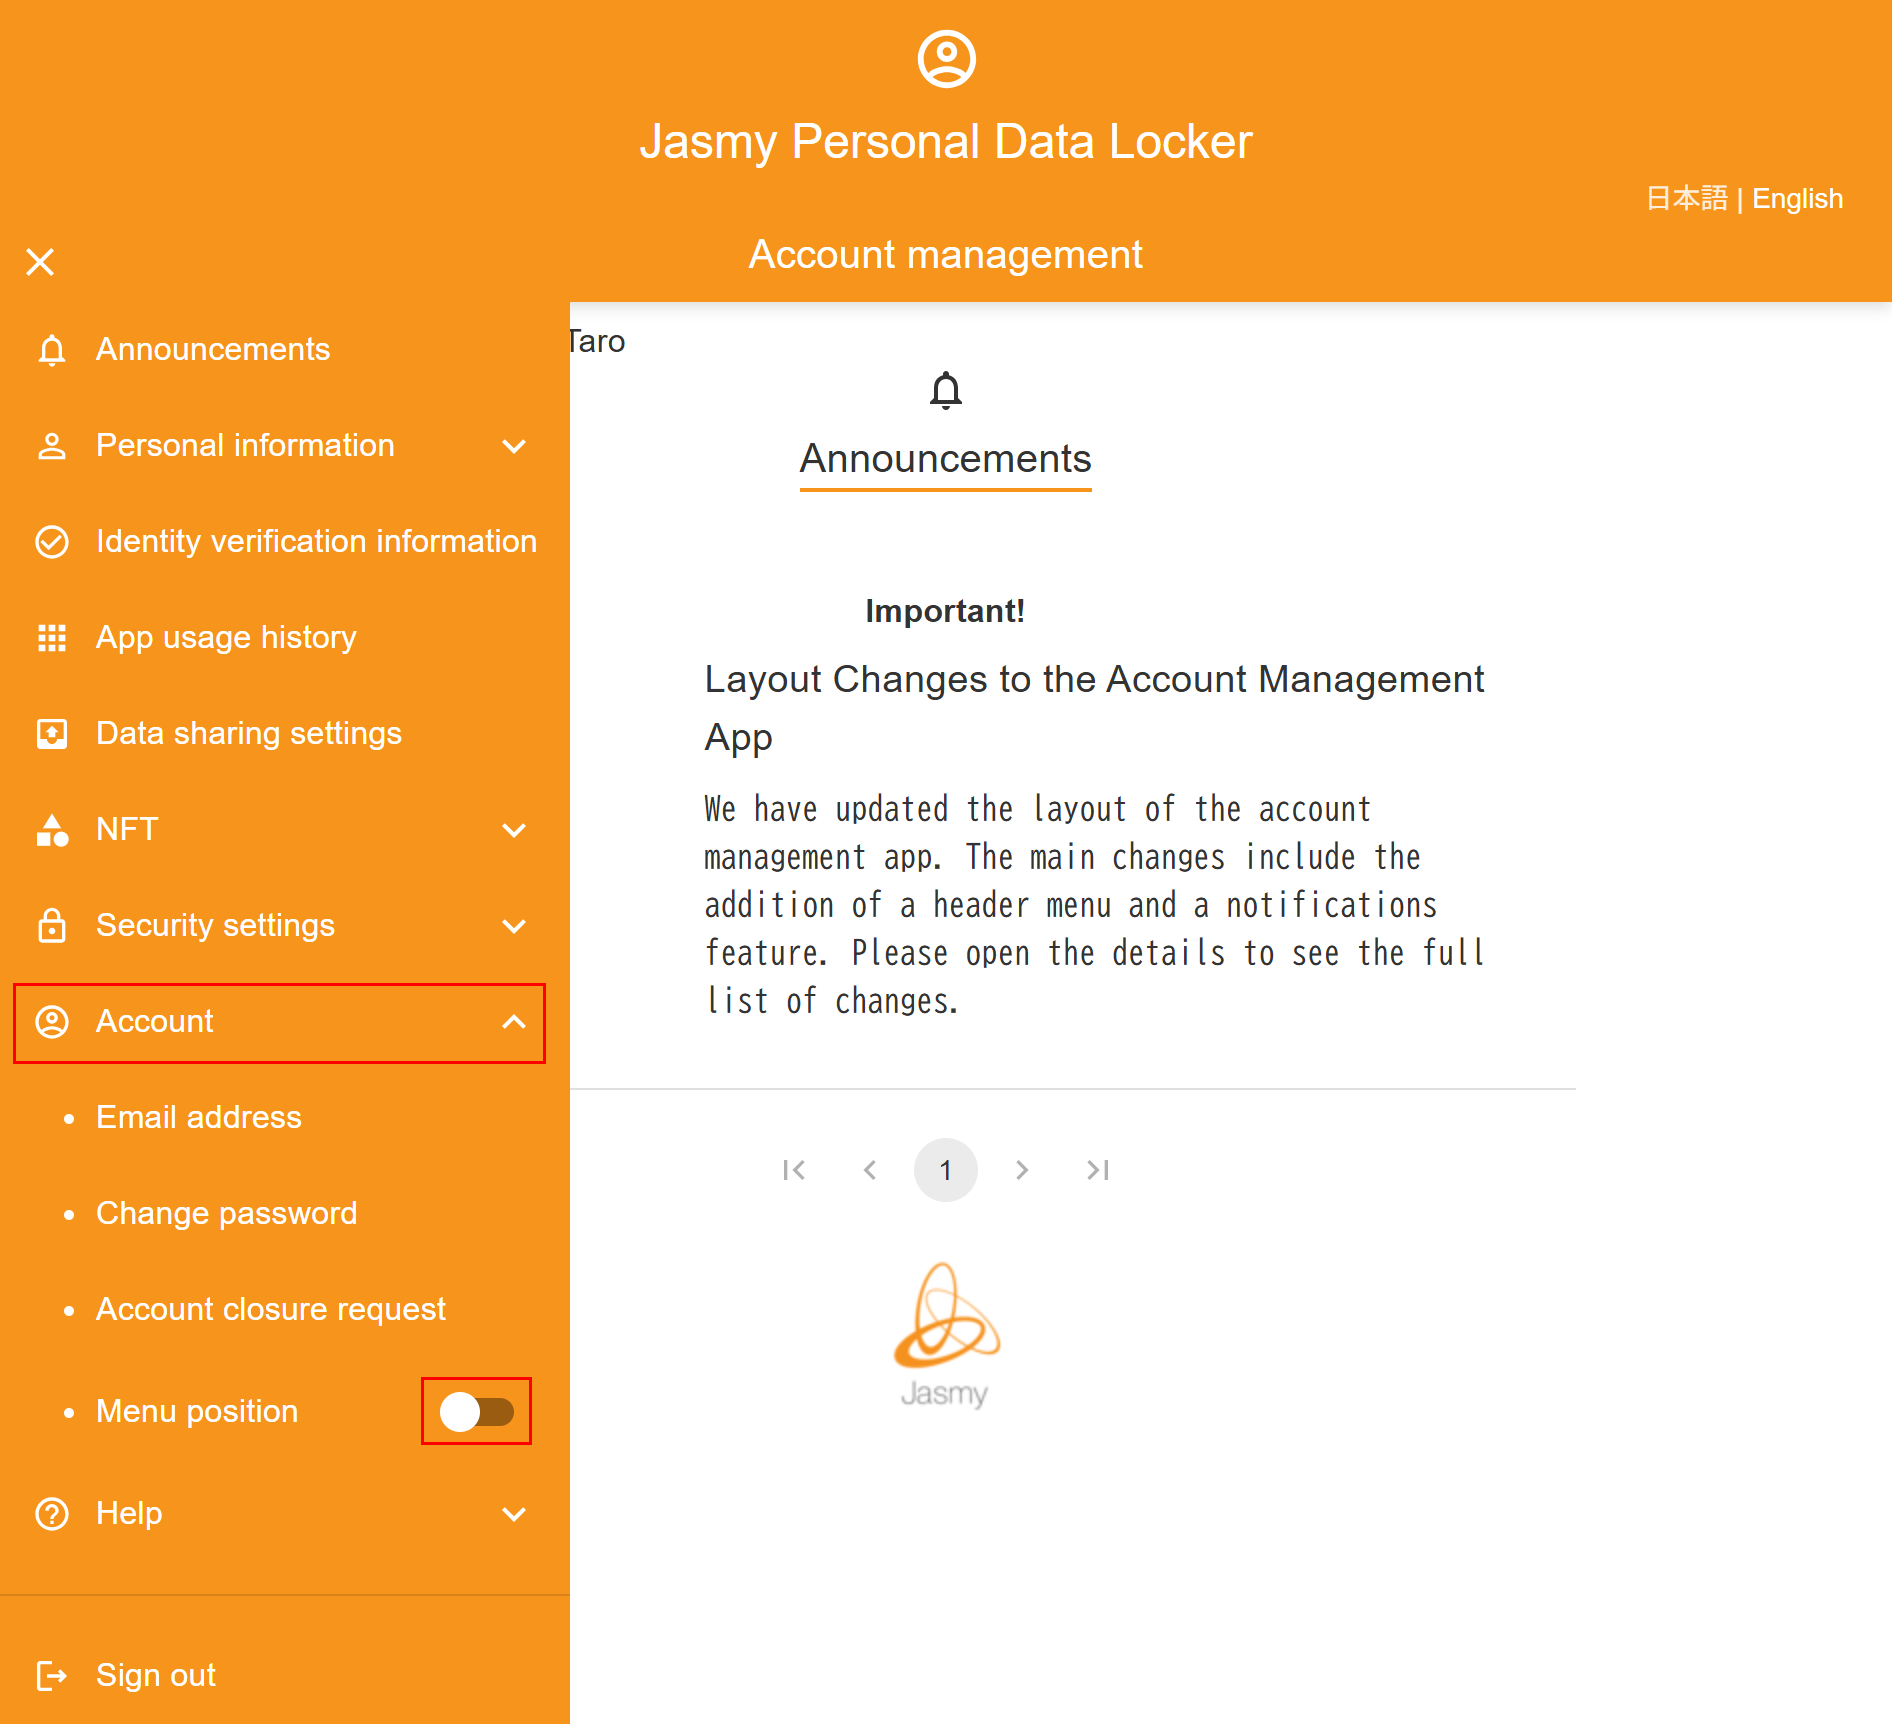
The menu will be moved to the top right.
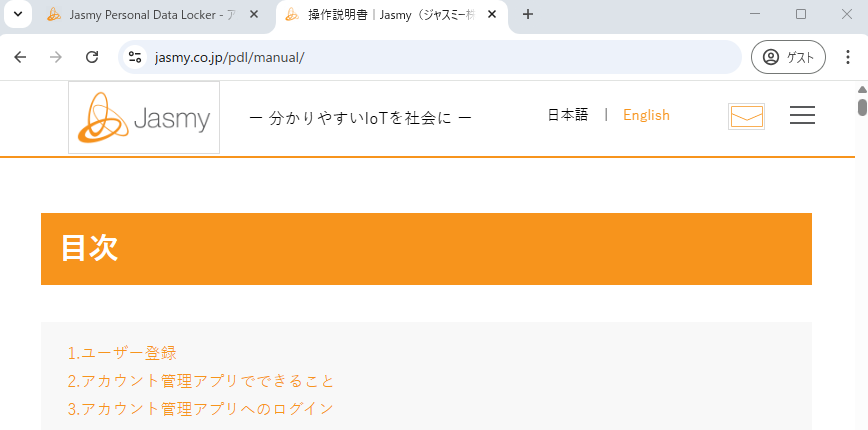
13.1.User guide
You will be redirected to this manual from the account management app.
①From the menu screen, tap “Help” to open the submenu, then tap the “User guide” button.
You will be redirected to this user guide on a new page.
https://www.jasmy.co.jp/pdl/manual/en.html
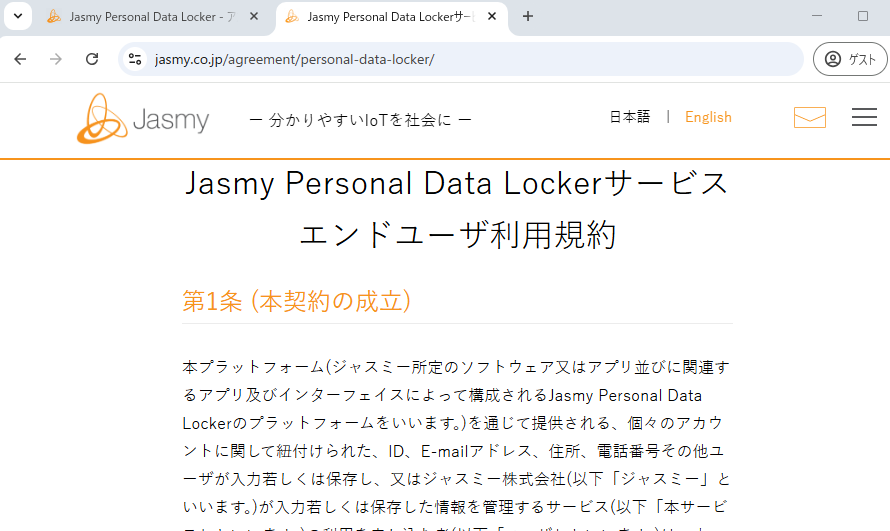
13.2.Terms of use
You will be redirected to the Jasmy Personal Data Locker Service End User Terms of Use.
①From the menu screen, tap “Help” to open the submenu, then tap the “Terms of use” button.
You will be redirected to the Jasmy Personal Data Locker Service End User License Agreement in a new window.
https://jasmy.co.jp/agreement/personal-data-locker/
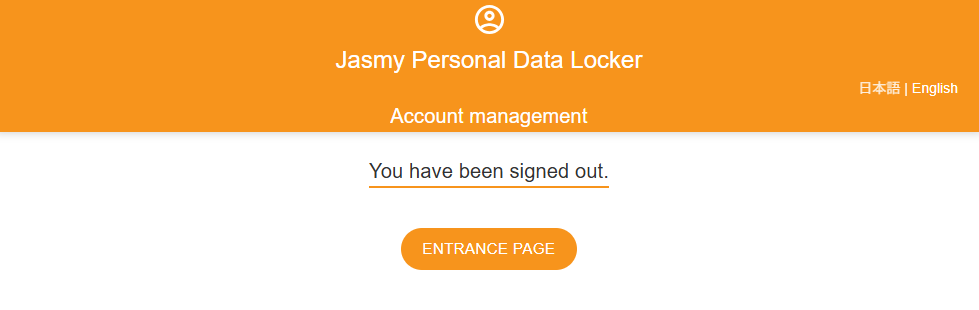
14.Sign out
Sign out of the account management app.
①From the menu screen, click the “Sign out” button.
The “Confirm sign out” screen will appear.
②Click the “SIGN OUT” button.
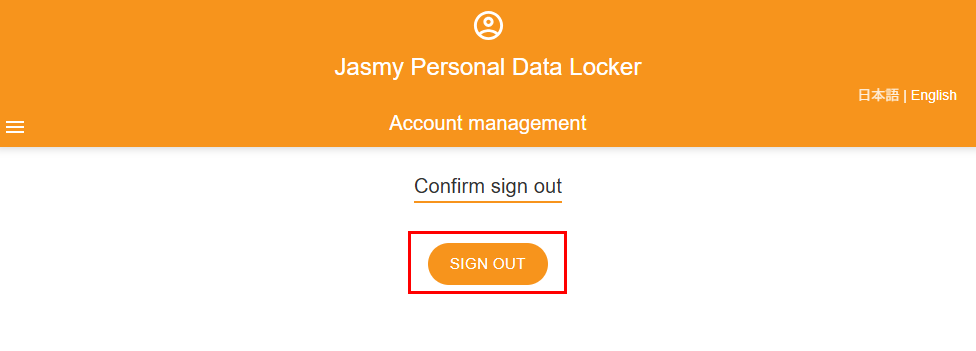
You are about to sign out.
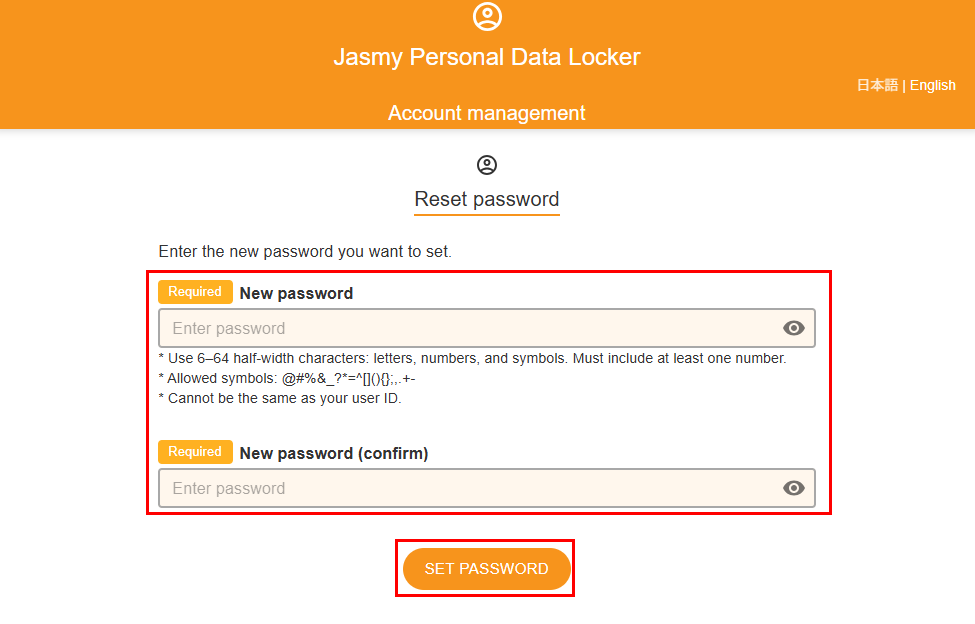
15.Forgot your password?
Enter your registered email address to reset your password.
①On the “Login” screen, click the “Forgot your password?” button.
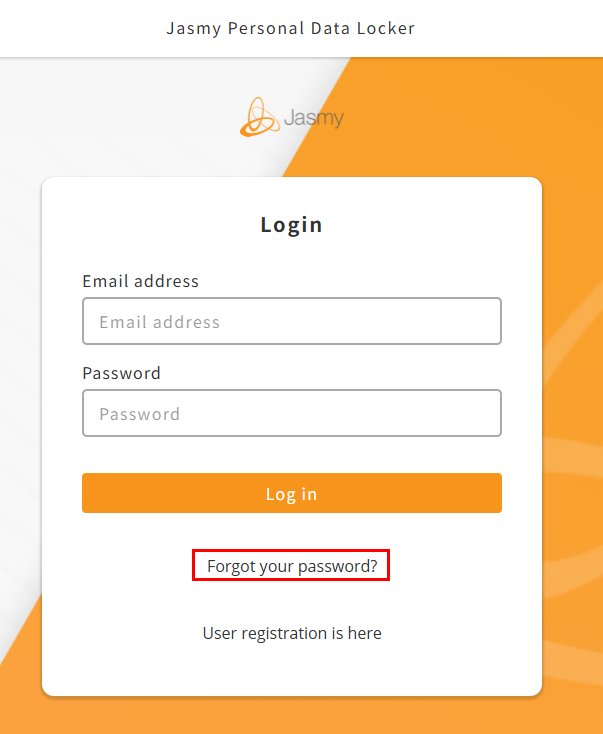
The “Reset password” screen will appear.
②Enter the email address you registered with and click the “SEND PASSWORD RESET LINK” button.
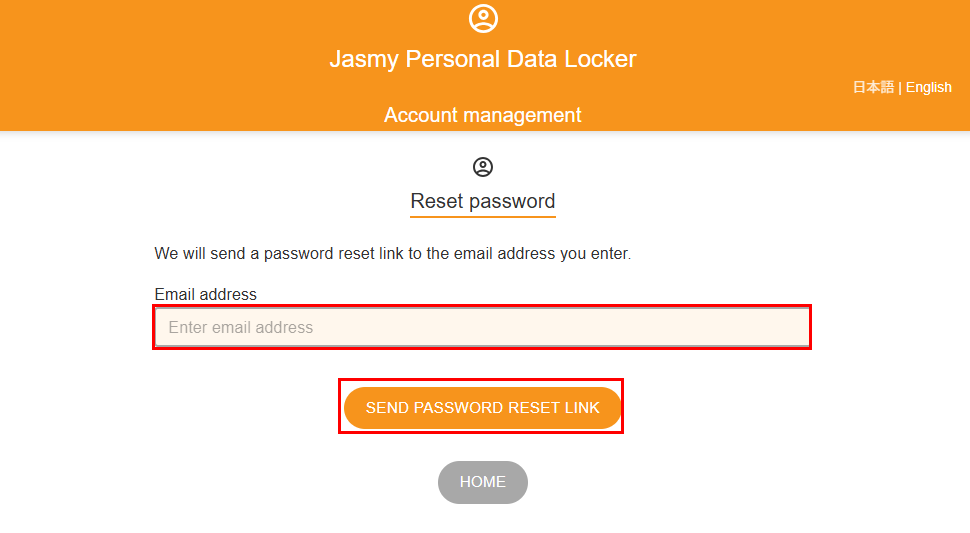
An email notifying you of the password reset process will be sent to the email address you entered.
If you haven’t received the email after a few hours,
Please check to see if emails from the jasmy.co.jp domain are being blocked,
Please check your spam folder. If you still can’t find it,
There may be an issue with your email address, so we apologize for the inconvenience, but
Please enter your password again via the password reset link.
③Go to the URL provided in the password reset notification email.
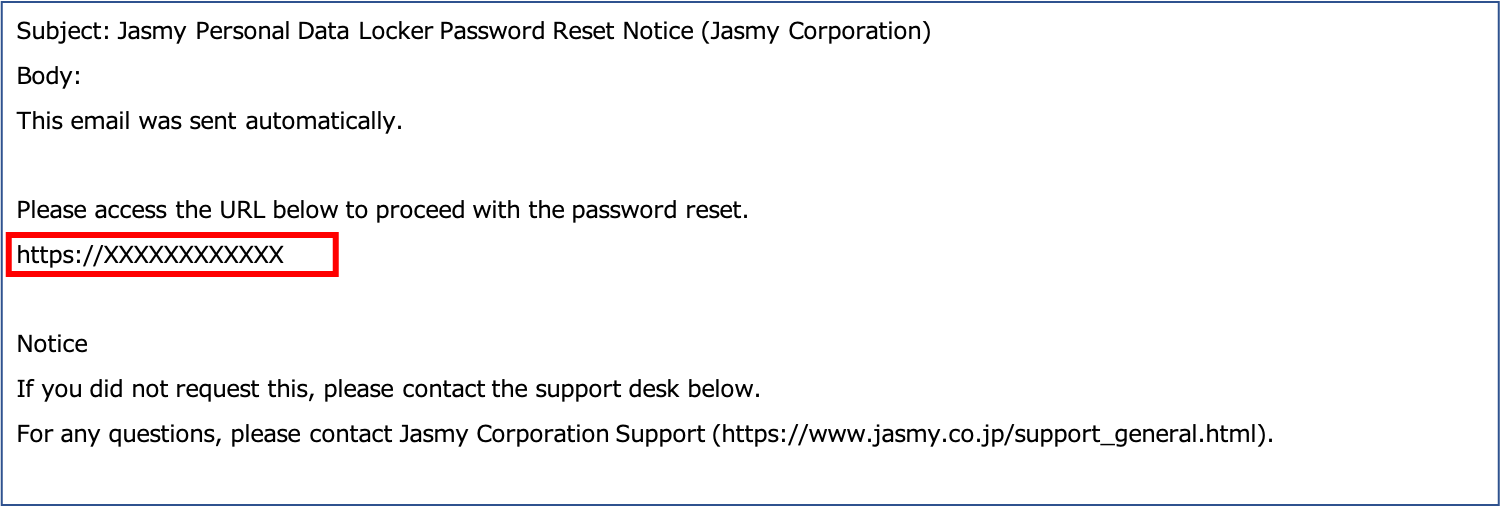
The “Reset password” screen will appear.
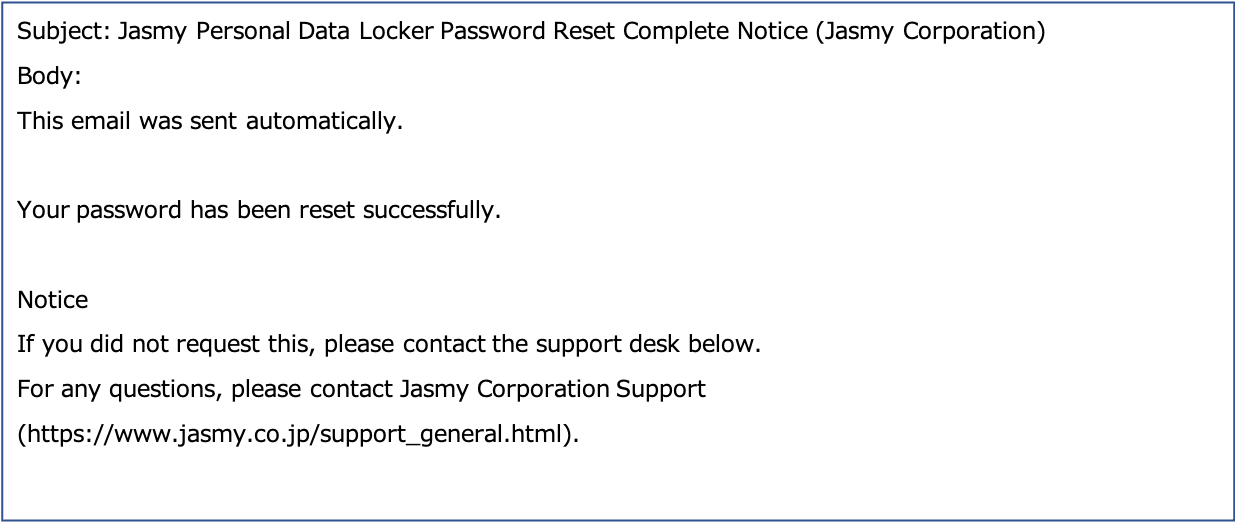
④Enter your new password and click the “SET PASSWORD” button.
You can view the password you entered by clicking the button.
Your password will be reset.
The “Password reset complete” screen will appear.
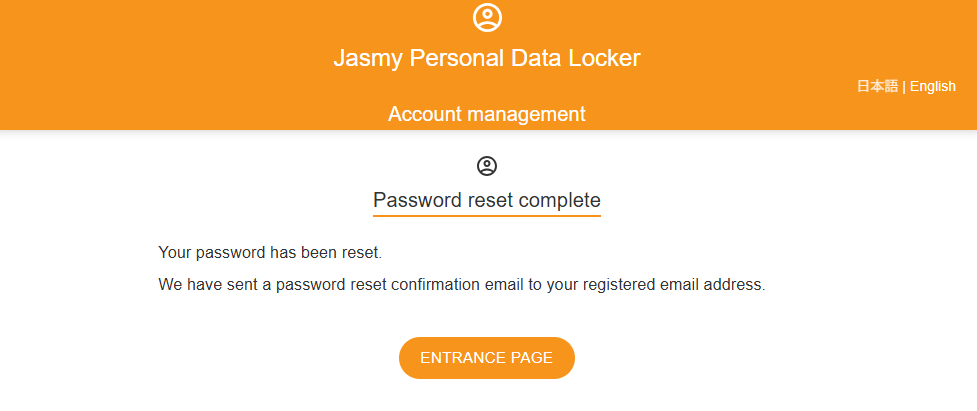
An email confirming that your password reset is complete will be sent to the email address you registered.